![]()
|
© 2013 Drake Smith - Please do not use or reproduce this elsewhere. Feel free to link to it though. K Bike Instrument Cluster With some minor exceptions, all K bike instrument clusters are the same. However, based on model, they mount differently. This first part of this page describes how to remove and install them by model. The latter part has information on taking the cluster apart as well as some detailed parts diagrams of the cluster and its components. Click on a link below to see the instructions on how to remove the cluster from each model. K100RS, K100RT, K100LT, K75RT, K1, K1100RS Taking The Instrument Cluster Apart
1 - Unscrew the Phillips screws holding the turn signal lenses on. Remove and unplug the turn signals. 2 - Undo the four machine screws, two on each side, that hold the headlight surround to its plastic mounting bracket. Hold onto it when removing the last one or the headlight surround will fall off.
3 - Unscrew the four 10mm hex bolts that hold the instrument cluster to the bracket.
4 - Unscrew the Phillips screw that holds the cover over the instrument cluster's wiring harness connectors.
5 - Pull out the two wiring harness connectors from the back of the instrument cluster. 6 - When reinstalling, the blue/red wire is for the left turn signal and the blue/black wire is for the right. Click here for info on taking the instrument cluster apart.
1 - Unscrew the side bolts that hold the headlight in place. 2 - Unscrew the four 5mm Allen head machine screws that hold the instrument cluster in place.
3 - Depending upon the year of your K75, the instrument cluster wiring harness connector will be one of two kinds: 3a - A cover held over a connector for each side. Unscrew the Phillips screw the holds the cover over the instrument cluster's wiring harness connectors.
3b - A 3MM Allen head screw in the middle of a single connector. If you have this style DO NOT over-tighten the 3mm Allen when reinstalling it or the nut that it mounts to will turn in its plastic mounting, making it impossible to get the cluster off again without destroying the back cover of the instrument cluster. Click here for info on taking the instrument cluster apart.
1 - Unscrew the Phillips screws holding the turn signal lenses in. Remove and unplug the turn signals. 2 - Remove the four 5mm Allen head machine screws, two on each side, that hold the C fairing to the mounting bracket "wings." These are all that hold the fairing body on so be sure to hold onto the fairing when undoing the last one.
3 - Unscrew the four 10mm hex bolts that hold the instrument cluster to the bracket.
4 - Unscrew the Phillips screw the holds the cover over the instrument cluster's wiring harness connector.
5 - Pull out the two wiring harness connectors from the back of the instrument cluster. 6 - When reinstalling, the blue/red wire is for the left turn signal and the blue/black wire is for the right. Click here for info on taking the instrument cluster apart.
To get to the instrument cluster on a K75, you have to take a lot of the fairing off. Click here for instructions on getting a K75 fairing off to get to the instrument cluster. If you have a later model K75S with the 3mm Allen bolt for the wiring harness connector DO NOT over-tighten the 3mm Allen bolt in the wiring harness connector when reinstalling it or the nut that it mounts to will turn in its plastic mounting, making it impossible to get the cluster off again without destroying the back cover of the instrument cluster. Click here for info on taking the instrument cluster apart.
K100RS, K100RT, K100LT, K75RT, K1, K1100RS: All of these models share a common system for instrument cluster mounting. It consists of an aluminum alloy cover that mounts to the back of the instrument cluster through rubber bushings:
1 - Unscrew the four 5mm Allen head machine screws that hold the instrument cluster in place. Be careful not to drop the Allen heads and/or washers as they have an affinity for getting lost in the fairing if dropped. 2 - Depending upon the year of your K bike, the instrument cluster wiring harness connector will be one of two kinds: 2a - A cover with a Phillips screw over a connector for each side.
2b - A 3MM Allen head screw in the middle of a single connector. If you have this style DO NOT over-tighten the 3mm Allen when reinstalling it or the nut that it mounts to will turn in its plastic mounting, making it impossible to get the cluster off again without destroying the back cover of the instrument cluster. Click here for info on taking the instrument cluster apart.
In order to gain access to the instrument cluster on a K1100LT you need to remove the windscreen. Click here for info on how to remove it. Once the windscreen assembly has been removed, remove the four 5mm Allen head machine screws that hold the cluster in place. Then unscrew the 3mm Allen head bolts in the center of the wiring harness connector. DO NOT over-tighten the 3mm Allen bolt in the wiring harness connector when reinstalling it or the nut that it mounts to will turn in its plastic mounting, making it impossible to get the cluster off again without destroying the back cover of the instrument cluster.
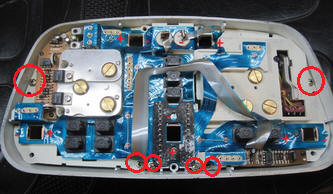
Taking The Instrument Cluster Apart: (This is not necessary to in order replace lamps or swap in LEDs.) 1 - Place the instrument cluster upside down on a towel and remove the nine (seven on 1985 and earlier K100s) Phillips screws around the perimeter. If you're just there to install a replacement bulb or swap in LEDs then this is as far as you need to go. 2 - To remove the internal workings from the housing, remove the following six Phillips screws:
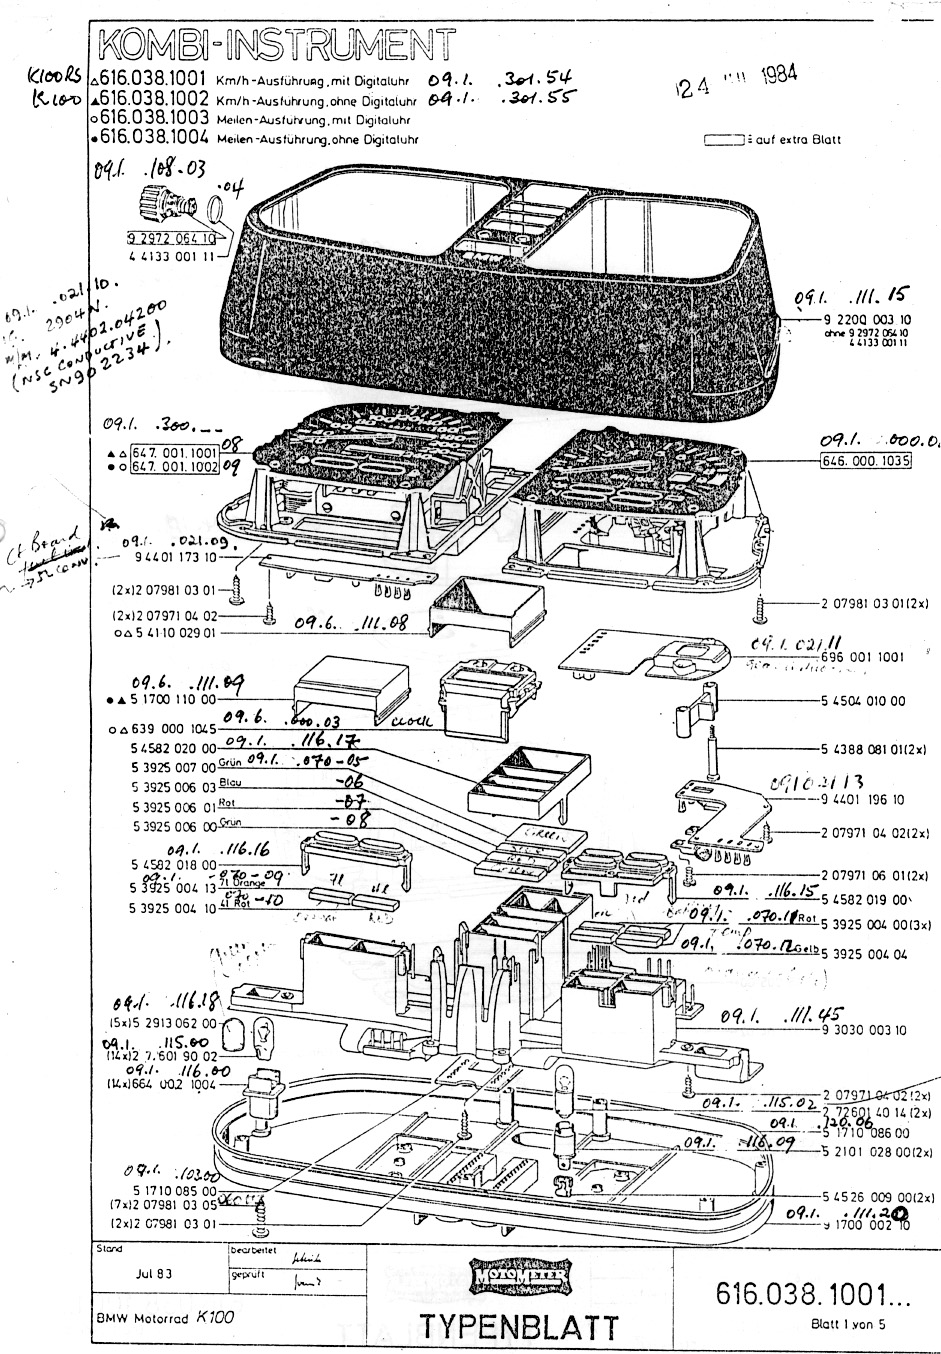
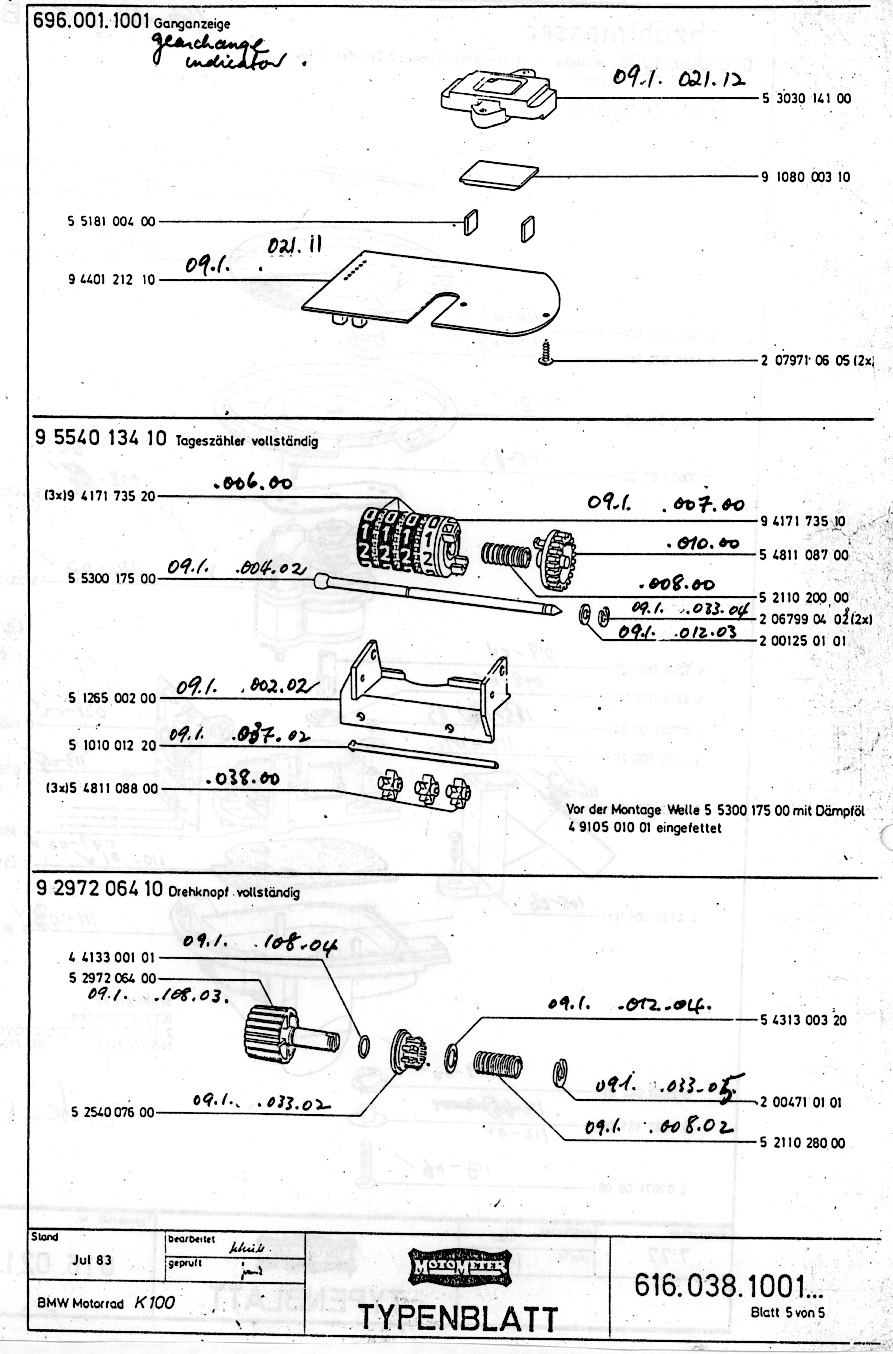
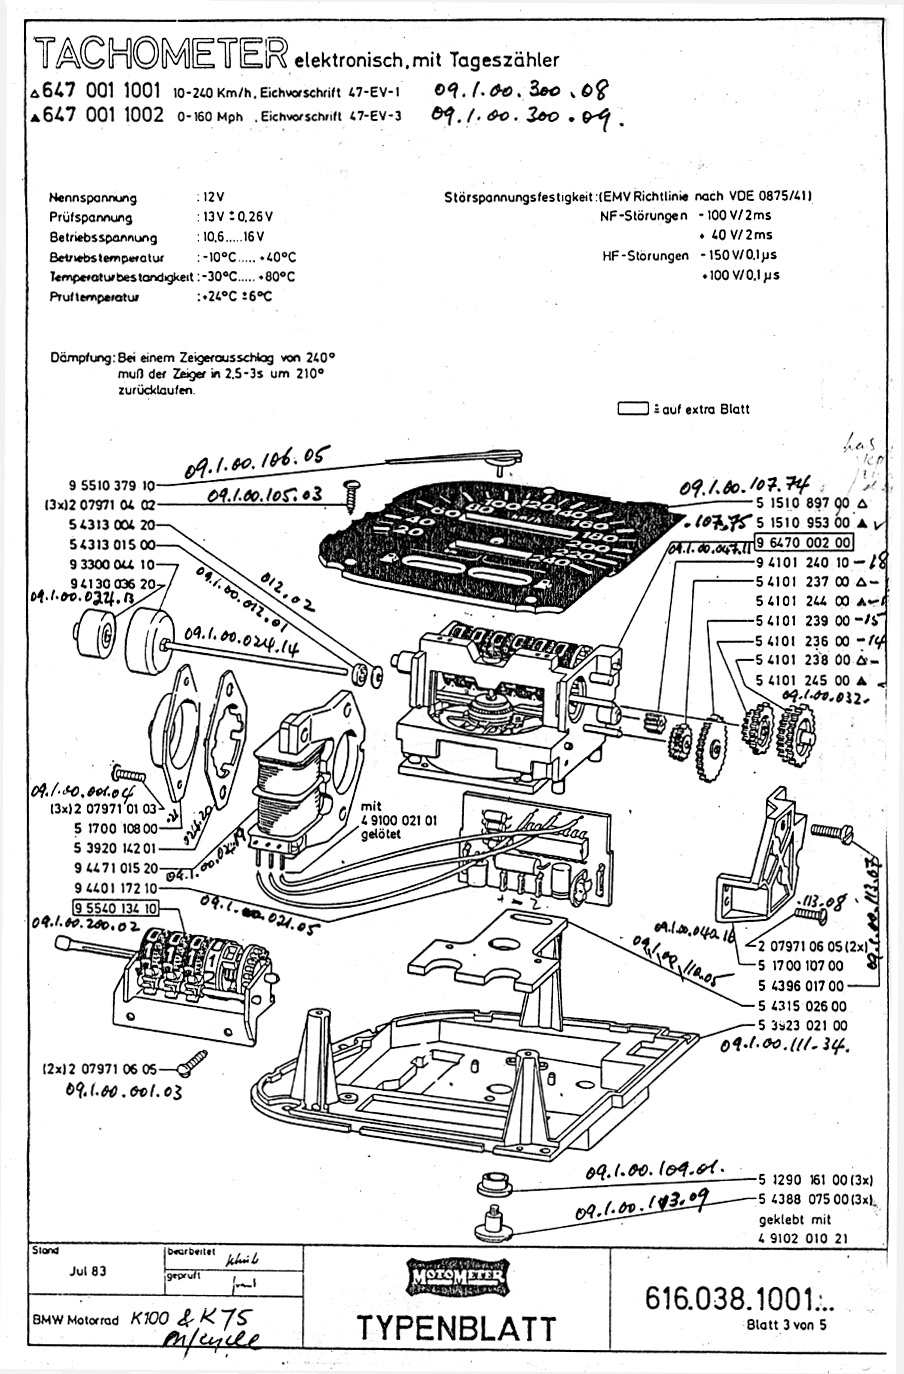
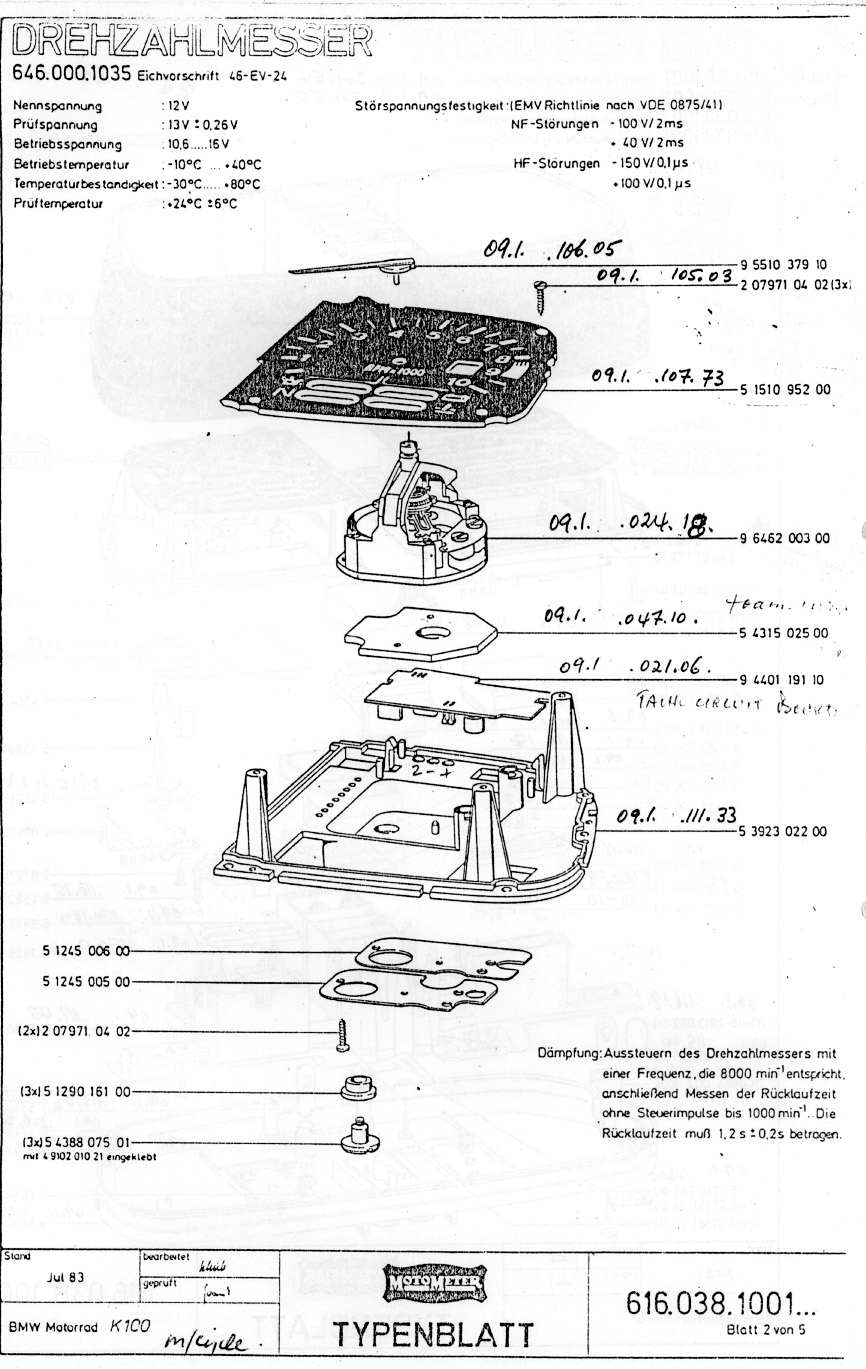
Then pull the trip odometer knob out to it's limit on its spring, invert the instrument cluster and gently shake out the internals. There's an indentation in the side of the speedometer faceplate for the trip odometer to pass through. Be very careful with it from now on. Try not to get any fingerprints on the faceplates or disturb the needles. The needles are fairly delicate and will bend if you look at them crossways. When putting the internals back in, remember to pull out the trip odometer knob again. Some of the fun things you can do while there: * Convert the clock from 24 hours to 12 hours. * Replace the gear position indicator * Replace the trip odometer. * Replace broken odometer gears. * Replace indicator lamp lenses. Here are some very detailed instrument cluster parts diagrams that you may find helpful. Click on the thumbnails below to open each in a new tab. They apply to 1985 and earlier K100s but are very applicable to other models and years too aside from the two low fuel lights that those had.
© 2013 Drake Smith - Please do not use or reproduce this elsewhere. Feel free to link to it though. |
![]()