![]()
|
© 2021 Drake Smith - Please do not use or reproduce this elsewhere. Feel free to link to it though. Optimizing Riding Comfort On A K Introduction: To really enjoy and have better control while riding it is important to have a proper riding position and the bike dialed in to your body's unique ergonomics. This page is broken down into two parts: Riding position and ergonomics. With both of these dialed in you'll be able to ride better and ride longer with less fatigue. Disclaimer: This is what has worked well for me and allows me to ride back to back fourteen hour days. If it helps you then great. If it doesn't work for you then try something else. Master Yoda Riding Position Much of what follows is based on Dick Franz's Master Yoda's Riding Position post at this link on the BMW Sport Touring Forum. Here's my short version of that: Bend at the hips, not at the waist: For the "sit up and beg" riding position of the RT/LT K bikes this isn't so critical but it does make a difference on the bikes with a slight forward lean like the S, RS and K1 models. Try practicing this on the center stand with the bike stationary to see what the difference is and start to teach your body how to do this. Keep your arms loose: Your arms should not be bearing any of the weight of your upper body. This causes fatigue and strain on your wrists. When riding in a straight line your arms should be slightly bent and loose. You should be able to easily flop your elbows around to confirm that they're not bearing any weight. Use your knees: After your heart and jaw muscles, your thighs are some of the strongest muscles in your body. Use them in the turns to keep your body firmly connected to the bike. If you find your knees slipping around on the tank's paint then consider installing some knee pads.
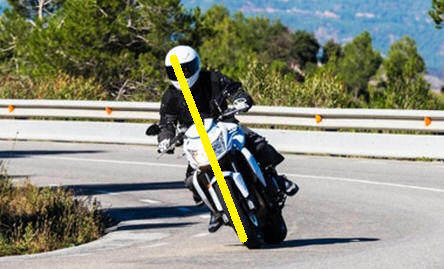
Lean with the bike: Many new riders tend to keep a more upright position and not lean with the bike. This is normal because we didn't evolve riding motorcycles. We evolved walking upright and chasing after mastodons. However, on a motorcycle it's best to lean the body with the bike.
In turns it also helps to lean your upper body forward to improve handling and control. (a.k.a. kissing the mirrors) And for faster riding you may even want to lean farther than the bike into the turn. (But there's no need to hang your butt off of the seat for touring and street riding.) One thing I learned a long time ago is that, due to evolution or whatever, the human brain kind of freaks out when your body leans past 17-18 degrees so your instinctive reaction will be to sit more upright. This is not conducive to good smooth motorcycle riding. You need to practice in order to overcome that mental barrier and comfortably lean past 17-18 degrees. More info: For more on riding tips click here.
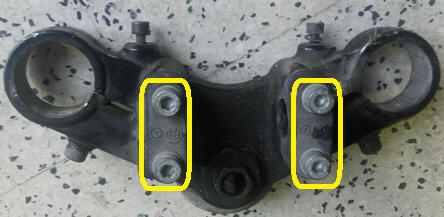
Dialing In Your K Bike Ergonomics In order to optimize your riding comfort on a K bike it is possible to make adjustments to the angles of the handlebars and controls. Handlebar angle: 1 - Remove the dash pad over the handlebars - two 5mm head bolts 2 - Loosen the bolts of the handlebar clamps slightly
3 - With the bike on the center stand, sit on the bike and rotate the handlebars to a position that seems most comfortable to you. 4 - Tighten the handlebar clamps. (22 Nm, 16 ft-lbs) 5 - Once you have the handlebars at a good angle then you can adjust the angle of the controls.
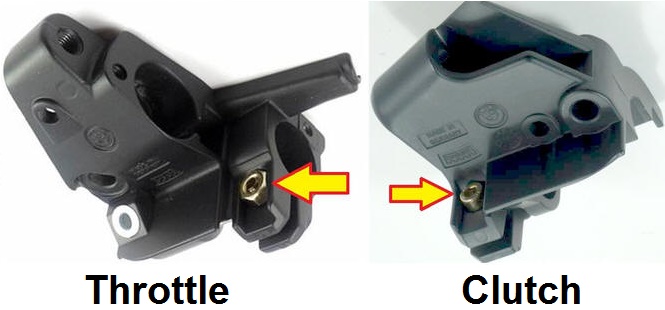
Angle of controls - K75 and 2V K100: On K75s and 2V K100s, the throttle and clutch perches clamp to the handlebars via 4mm Allen head bolts accessible from the front. Loosen these bolts and then, with the bike on the center stand, sit on the bike and rotate each perch to an angle that is comfortable to you. When retightening the perch clamp bolts do not he-man overtighten them. Just get them snug. If you overtighten a perch clamp bolt then it can break the perch which will then need to be replaced.
Angle of controls - K100RS4V, K1 & K1100:
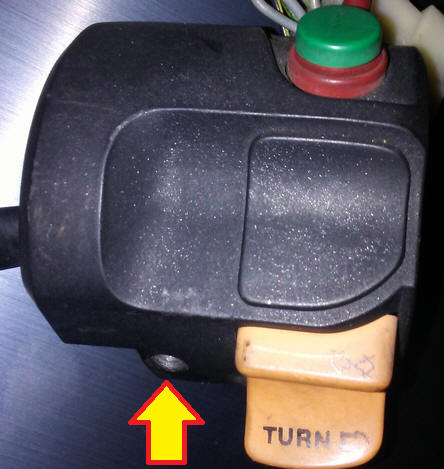
Clutch perch: The clutch perch adjusts the same as for the K75/K100 as pictured above. Throttle perch: The left combination switch assembly needs to be removed first. It is held on by a Phillips screw. Since the threads of that screw may be corroded be sure to use a good screwdriver with a fair amount of direct pressure to initially break the threads free.
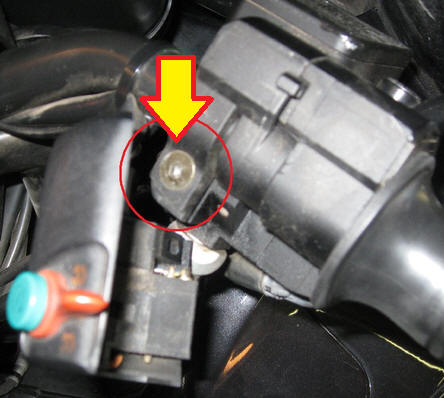
The 4mm head throttle perch clamping screw is then exposed:
Loosen the throttle and clutch perch clamp bolts and then, with the bike on the center stand, sit on the bike and rotate each perch to an angle that is comfortable to you. When retightening the perch clamp bolts do not he-man overtighten them. Just get them snug. If you overtighten a perch clamp bolt then it can break the perch which will then need to be replaced.
Real Cruise Control: Consider adding real cruise control to your K. It helps in many ways: Reduced physical fatigue: No need to be constantly gripping and fine tuning the throttle. Reduced mental fatigue: No need to be frequently checking the speedometer to maintain a certain speed. Better situational awareness: Spend less time watching the speedometer and have more time and concentration to observe what's going on around you. Make good progress: If you're not paying attention then K bikes like to speed up. With real cruise control you can set your speed at 8-9 MPH over the speed limit so that you can make good progress without getting a "performance award" from the police.
Here are links to my pages for installing cruise control on a K. It's a fairly significant DIY project but well worth the effort and expense.
© 2021 Drake Smith - Please do not use or reproduce this elsewhere. Feel free to link to it though. |
![]()