|
© 2019 Drake Smith - Please do not use or reproduce this elsewhere. Feel free to link to it though. Install Audiovox CCS-100 Cruise Control on a K Bike V4.0 - Feb. 2014 - Applies to All K75, K100, K1 & K1100 models
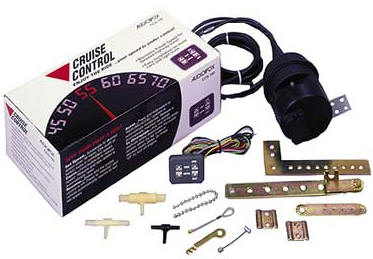
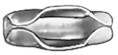
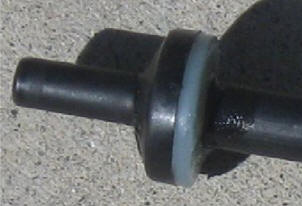
Disclaimer: I am sharing this as an account of how I install the CCS-100 on a K bike in the hope that others might find it useful. It is important to note that Audiovox does not condone the use of their cruise control products on motorcycles. You are modifying the throttle control on a vehicle that is dangerous enough in the first place. Therefore, if you do this then you do so at your own risk and I am not liable for anything that happens as a result of your reading this. Only do this if you feel you have the skill and knowledge required to do it safely. It requires electrical installation skills as well as mechanical skills. Though not really necessary, I strongly recommend that you do some research to understand how cruise controls work before attempting this. Disclaimer aside, it's really pretty straightforward to do and once you have the cruise control installed you'll wonder how you ever got along without it. Intro: I have successfully installed the Audiovox CCS-100 vacuum cruise control on two K1100LTs, four K1100RSs, three K100RS4Vs, six K75s, a K100 and a K1 as well as helping a few local riders with their installs. If you plan on putting any serious miles on any K then this is a "must have" in my book. You may have stumbled across my original write-up on The "IBMWR K Bike How To's" that I did back in 2005 or one of a couple of other versions floating around cyberspace. All of my previous write-ups are now obsolete and should be ignored in lieu of this most recent write-up. Noteworthy Issues CCS-100 "No Longer Available." This is and isn't true. While it is true that Audiovox no longer manufactures and sells them, that doesn't mean you can't get your hands on one. There's a ton of "new" ones floating around out there as people tend to buy items like this but never get around to installing them and will eventually sell them on Craig's List or Fleabay when cleaning out the garage. Power Consumption: As a vacuum cruise control servo, the power for pulling the throttle is from the vacuum "borrowed" from the throttle bodies pulling against a diaphragm attached to the cable. Due to this, the CCS-100's power requirements are small since the only power it needs is enough to open/close a valve and the very minimal power required for digital processing. This is confirmed by the fact that it comes with only a three amp fuse. Therefore, running this on a pre-94 K bike with a 32 amp alternator should not be an issue. A vacuum reserve canister is not necessary. When I did my first install, everything I found for installing the CCS-100 on a motorcycle said you needed a VRC. This isn't true for K bikes. I've since removed the VRC from my K1100LT and have not used one on any of my subsequent installs. There are many ways to skin a cat. But I'm not a Chinese cook so I wouldn't know about that. This is how I do these installs and what works for me. If you want to do it differently then go right ahead. 0) Items You'll Need 4 Posi-Taps (Part EX130-RR or PTA2022) - Posi-Taps are light years beyond the old ScotchLok connectors for tapping into wires. ScotchLoks are flimsy and often cut through the wire you're tapping into. I had to repair one of the coil leads on my K1100LT because I hadn't heard of Posi-Taps when I did my first CCS-100 install and the ScotchLok cut almost all of the way through the wire. There's a variety of on-line sellers of Posi-Taps and there's also a guy on Fleabay who sells them and ships VERY quickly. 3 Posi-Locks (Part number PL1824) or Posi-Twists (Part number PT2026 or PT1424) Or some blade connectors. The electrons don't know the difference but I'm a fan of Posi- products since they're easy to use and seem to hold up well. 1 "Universal" vacuum check valve - the NAPA part number is 730-1347. You can also find these under the "HELP!" brand at other auto parts stores. They can also be found on Fleabay. It's a generic item that looks like this:
Heat Shrink Tubing: Long sections of this can be cut to the right length for bundling and routing wiring. It comes in various diameters. Use the diameter that's appropriate for the number of wires that you need to follow the same path. (You don't need to shrink it when using it for this purpose.) If you live near a Fry's Electronics they usually have a good selection of four foot long heat shrink tubing in stock. McMaster-Carr is a good online resource. Don't bother trying at Radio Shack as they only carry 6" lengths at their retail locations. 1) Prepping The Servo Control Unit a) (if you plan to use a K1100LT windscreen switch) Trim the brown wire from the servo wiring harness and solder it to the red wire. Then cover that up with a layer or two of heat shrink tubing. The brown wire is the power wire for the servo unit. The red wire is supposed to go to the "hot" wire to the brake switch but since that's just switched power on a K bike then any switched power wire (many of them are green/black on a K bike) will do. This has the added benefit of not having a brown 12V+ wire on a bike where all of the other brown wires are grounds.
(If you're not into soldering then this might also be a good place to use another Posi-Tap to connect the brown wire to the red wire.) When you wire up the servo this way the cruise control will turn on automatically when you turn the bike on. The eliminates one wire that you have to connect and eliminates the need to turn the cruise control on every time you want to use it. When I get to the section on control switch options you'll understand why I wire things up this way. b) There's a pair of gray and black wires that join each other in a black sleeve coming from the servo wiring harness connector. Cut those off at the connector. Those are for the speedometer sensor. The CCS-100 will work off of those if you tap them into the K bike speedometer sensor wires (and set DIP switch #3 to ON) but since you have to hook up the coil wire anyhow (to detect surges - it's a safety feature of the CCS-100) and it's just another set of connections to potentially fail, my preference is to just run the CCS-100 off of the coil signal. c) Remove the wiring cover from the servo (two small Phillips screws) and remove the small black plastic jumper. This tells the CCS-100 that you have a manual transmission:
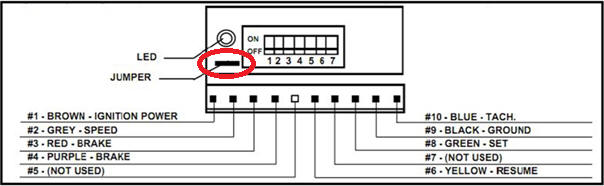
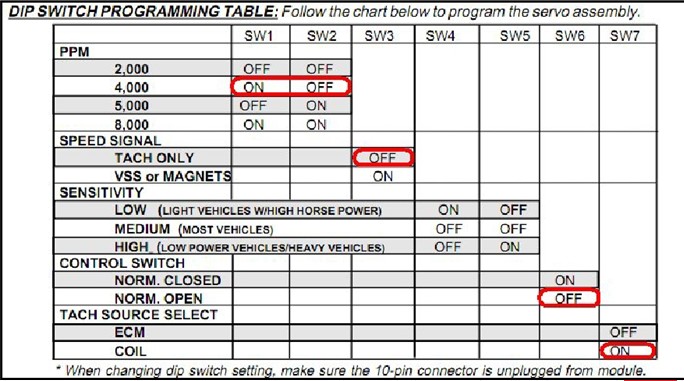
d) Now it's time to set the DIP switches using the settings circled in red below. I've left the sensitivity switches uncircled because different K bikes work better on different settings. Low (4 ON, 5 OFF) seems to work best for a K1100RS while medium(4 OFF, 5 OFF) seems to work best for the other K bikes. You can always experiment with the switches later to see what works best for your situation. It comes down to a trade-off between how responsive the servo is to minor speed variations and how jerky it is when the throttle is pulled by the servo. What you're actually adjusting is how hard the servo pulls on the throttle with low being less and high being more.
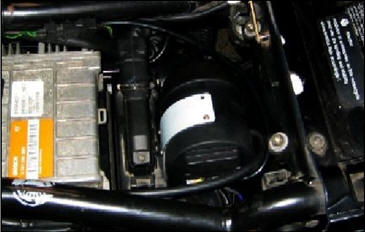
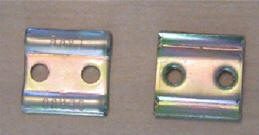
Switches 1 & 2 are set to 4,000 Pulses/Mile if you're controlling the CCS-100 from the coil signal. If you choose to control it from the speedometer sensor signal then you need to set these to set these for 5,000 PPM for a K bike. You also need to set SW3 to ON. However, for whatever reason, most cruise control units won't engage under 30 MPH or so. When using the coil signal to control the CCS-100, it does not know how fast you're going, only the RPMs. Therefore, I can set my cruise control at 25 MPH in a low gear. I find this to be handy when going through small "speed trap" towns while out touring. 2) Mounting The Servo By far the easiest mounting is on the 4 valve ABS I bikes. (K1, K100RS4V, 93 and earlier K1100s) I just point the servo throttle cable to the right and stick the CCS-100 mounting bracket in with the ABS control unit.
On my 94 ABS II K1100RS I just have it loose under the seat. I run a Corbin seat on that bike though. If you have an OEM seat pan then there probably won't be enough room height-wise.
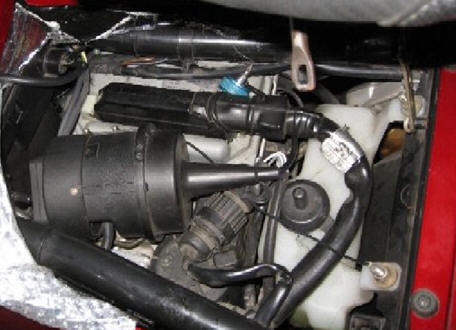
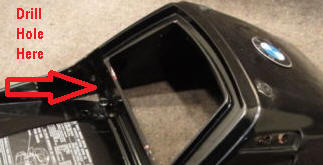
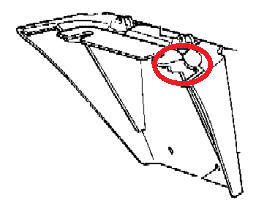
On LT/RT K bikes there should be enough room in front of the right storage "bucket" inside of the main fairing. That's where I mounted the servo in my K1100LT. I zip-tied the CCS-100 mounting bracket to the main fairing bracket and made a big loop in the servo cable inside the fairing to take up the slack. For other models of the 2 valve K bikes (K100, K100RS, K75, K75C, K75S) I mount the servo in the tail cowl and drill a hole for the servo cable in the lower front right corner of the rear storage compartment.
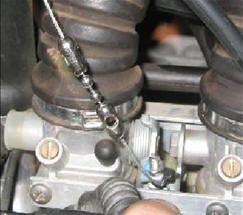
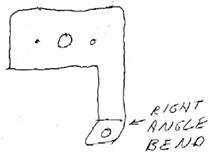
Remove the two nuts from the servo throttle cable end before passing it through the hole and you don't need to drill as large of a hole. The servo throttle cable can then be routed along the top right frame rail. When you eventually put the seat back on, make sure that the servo throttle cable is routed outside of the forward seat hinge. Once I've attached the wiring harness I then bolt the servo mounting bracket on the nut for the right bracket bolt at the bottom inside of the tail cowl. I also know of someone with a K1100LT who mounted the servo in the gap between the front of the air box and the radiator. As noted previously, there are many ways to skin this cat. 3a) Connecting Servo Throttle Cable - K75 or 2V K100 In the parts that come with the CCS-100 you'll find two throttle attachment parts that look like little hangman's nooses with a ball on the end. I use the shorter one. I wrap it around the throttle bar where the idle adjustment screw is. In order to make sure that it stays in place I put a small zip-tie around it. Adding the zip-tie to keep the noose in the same place is important. Don't skip this step.
There are two little bead connectors and a beaded chain that also come with the kit. These are used to connect the hangman's noose to the servo throttle cable. The connecting beads are pretty sturdy little guys. Dikes (the nickname for diagonal cutters) can be used to open them up so you can insert the beads. Cut a string of four beads off of the chain. Place one end of the bead on the end of the servo throttle cable and put the end of the four-bead chain in one of the beads. Then close it with firmly with some pliers or gently with some Vice-Grips. Now run the servo throttle cable over the air box with the servo cable towards the front of the bike with respect to the factory throttle cable. Once you've threaded the servo throttle and beads through the air plenum above the throttle bodies, use the other bead to connect the beaded chain to the ball on the hangman's noose. Then, above the middle of the air box, use the bracket below to fasten the servo throttle to the factory throttle cable. Adjust the length of the servo throttle cable so there's just a little slack at the beads.
On my most recent install like this, (on a K100) I found that it was easiest to do this by removing the top of the airbox first but it is possible to do it with the airbox in place.
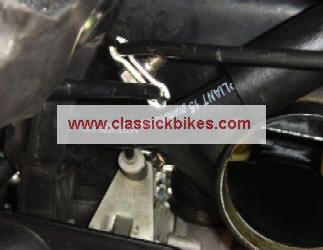
To be honest, this isn't an ideal setup because once in a blue moon the servo throttle may get stuck while riding but all you need to do is pull the clutch in and blip the throttle a time or two and things will settle back into place. However, it makes the install pretty easy. If you prefer to fashion your own custom bracket or connect the servo cable via another means then go for it. 3b) Connecting Servo Throttle Cable on a K100RS4V or K1100 I use one of the brackets that comes with the CCS-100 and install it at the hole in the plate on the left front corner of the frame. It's best just to let pictures tell the story:
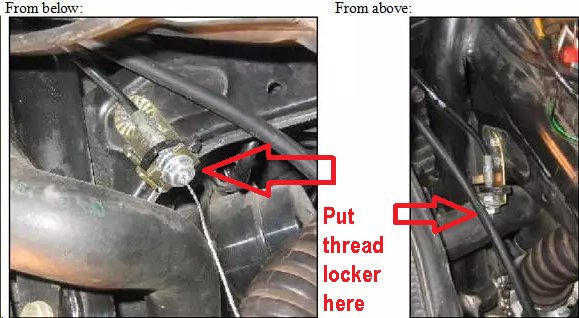
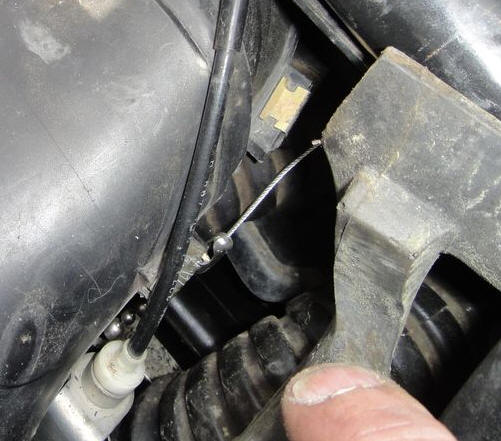
On my first install I drilled another hole and used two bolts to secure the bracket to the frame so it wouldn't drop down and let the cable saw through the radiator hose but I don't bother with that anymore. DO NOT overtighten the nuts at the end of the servo cable. The threads at the end of the cable are made of some very cheesy metal and that will break it you tighten those nuts too much. Use thread locker instead. I then wrap the small hangman's noose connector around the throttle bar at the front blue painted screw (Don't mess with that screw. Its position is factory set.) and secure it in place with a small zip-tie. If you don't secure it with the zip-tie then it can move around and your throttle could get stuck open.
If you've installed the servo under the seat then run the servo throttle cable up the right frame rail, across the top of the radiator and down to the bracket. Then cut a length of four beads from the beaded chain that came with the kit and use the bead connectors to hook it up to the hangman's noose and the end of the servo throttle cable. Then, using the two nuts on the end of the servo throttle cable hose adjust things so there's just a tiny bit of slack in the cable. (The threaded part at the end of the cable sheaf is made from some very cheesy metal so be careful not to over-tighten those nuts and break that threaded part off.) 3c) Connecting Servo Throttle Cable on a K1 Given the weird air hoses above the throttle bodies on a K1 (what isn't weird about that bike?) you can't install the servo throttle cable like you can on the other 4 valve K bikes. What I ended up doing was drilling a hole in the black plastic plate under the tank right above where the factory throttle cable is and used the nuts at the nd of the cable to mount it in that hole. I'm not a fan of mounting that in plastic but it does work.
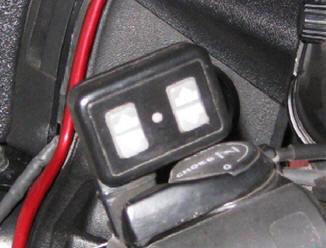
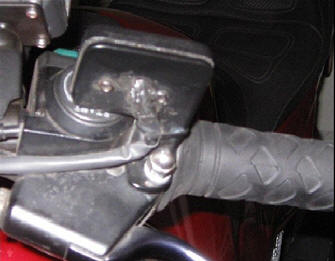
Then I used the hangman's noose and the beads to attach the servo throttle cable as described above for the other 4 valve bikes. Remember to zip-tie it in place around the throttle bar. 4a) Using The Audiovox Control Pad On my first few installs I used the switch that came with the CCS-100. In order to "waterproof" it I pried it apart and used some clear silicone sealant to "glue" the rubber button sheet to the front and then when putting it back together I sealed it around the edges. For mounting it I used some 2" aluminum bar stock from the hardware store and made a little "flag" mount that bolts in the mirror hole in the clutch perch. See pictures below. I don't trust double stick tape so I used some small machine screws to bolt it to the mounting bracket. If you've got longish fingers like I do then you can control the CCS-100 without even taking your hand off of the clutch grip. (I bent the aluminum in a bench vice. Aluminum is a brittle metal so it's a good idea to pound it with a hammer while you're bending it to keep it from cracking/breaking.) I'm no artist but you get the idea:
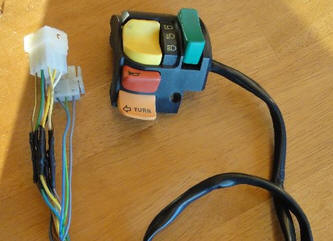
4b) Using The K1100LT Windscreen Switch On my first few CCS-100 installs, I used the control pad that came with it. Even though I'd filled the control switches with RTV to "waterproof" them, eventually one of them leaked, shorted and failed. Then I came up with the idea of using windscreen up/down switch from a K1100LT to control the cruise control. This has several advantages. First, it actually IS waterproof since it was designed for a motorcycle. Next, it's an OEM switch so it looks like it belongs there, unlike the aftermarket look of the Audiovox control pad. Finally, it's ergonomically more convenient to use.
For the 4 valve K bikes, the connector for headlight, horn and turn signal is a plug-n-play deal as the windscreen switch uses a separate three wire connector. For K75s and 2 valve K100s there's a little more work involved because you need to graft the headlight/horn/turn signal wires of the windscreen switch to the older K75/K100 left combination switch connector but that's pretty simple since all of the wires are the same colors.
The three wires (input, up and down) for the windscreen switch go to a separate connector so you can just cut that connector off and hook those wires up to the servo. More on this later. One difference between using the windscreen switch and the Audiovox control pad is that the Audiovox pad has an on/off switch. On my first windscreen switch install I wired the CCS-100 brown power wire up to a K bike dash switch. But I never used it because I just left it on all of the time. I've since decided to just wire that up to switched power so that the cruise control is always on when the bike is turned on. 5.1a) Wiring The Servo Red (and brown) CCS-100 wire: This wire is the power wire to the cruise control. If you remove your tank and look in the relay box you'll find a round four wire white connector that (unless you have the factory alarm) isn't connected to anything. The green wire with a brown stripe is switched power for the alarm and comes from fuse 7 which also powers the radiator fan and horn. Since the CCS-100 servo doesn't draw much current I Posi-Tap into that green/brown wire and hook up the red (and brown) wire from the servo to that. By tapping into this wire you eliminate the need to have a separate in-line fuse for the CCS-100. If you're mounting the servo in the tail cowl then you could probably get away with tapping into the power for the tail light. However, in the very unlikely event that something goes haywire and the CCS-100 causes a short I'd rather have it blow the fan and horn fuse than the brake and tail light fuse. Black CCS-100 wire: This is the ground wire for the CCS-100 servo. I usually Posi-Tap that into the brown ground wire for the factory alarm connector just to have the two power wires on the same circuit. If you're mounting the servo in the tail cowl you can optionally tap this into one of the brown ground wires for the rear lighting. Blue CCS-100 wire: This wire monitors the RPMs from one of the ignition coils. Despite what the Audiovox instructions emphatically state, you CAN cut this wire. However, you do need to keep the filter (it's just a resistor) under the red warning tag in the wire somewhere. Posi-Tap this wire into the outer wire on the rear coil. Purple CCS-100 wire: Posi-Tap this wire into the wiring for the rear brake switch under the right side battery cover. You can tap into the wire on either side of the connector for the gray/green rear brake switch wire. Note that this wire internally connects to the front brake switch wiring as well so using either the front or rear brake will cause the CCS-100 to disengage. (See the Appendix A at the bottom if you have an LED brake light.) Green and yellow CCS-100 wires: These wires are for the up (resume/accel/tap up) and down (set/coast/tap down) buttons. The yellow wire is for up and the green one is for down. The buttons send 12V+ to the servo "brain" when pressed. Following subsections describe how to wire each type of switch. 5.1b) Routing The Wiring on a K75 or 2V K100 I encase all of the wires from the control unit in an approximately 2 1/2 foot long section of heat shrink tubing to bundle and protect them. (You don't need to heat shrink it.) I run this out of the left turn signal wiring hole in the lower left corner of the tail cowl and then zip-tie the bundle to the left frame rail under the tail cowl, similar to how the factory tail light wiring runs along the right frame rail. Then, up near the battery, I split off the various wires to where they need to go. In order for the rear fender to fit on the right rear corner of the frame, I cut a U for the wiring bundle here:
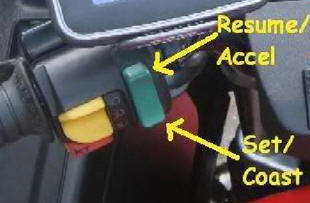
5.2a) Wiring the Audiovox switch The gray wire is for switch backlighting. I don't think that matters so I just cut if off. You can hook it up to a switched power source if you feel like it. If you want to be able to turn the CCS-100 power on and off then you can connect the four wires as described in the CCS-100 installation manual. (Appendix C at the bottom of this page.) I prefer just to have the cruise control be on all of the time by having switched power from the bike go straight to the red & brown wires of the CCS-100 servo. However, you'll still need to feed power to the brown wire of the control pad for the up and down buttons. Connect the brown wire from the control panel to the Posi-Tap you placed on the green wire with a brown stripe of the alarm connector in the relay box. Connect the yellow and green wires from the control to the corresponding wires to the servo. I usually use Posi-Locks or Posi-Twists for these connections. 5.2b) Wiring The Windscreen Switch The BMW windscreen switch has a three wire connector. Cut that connector off and connect the wires as follows with either Posi-Locks or Posi-Twists:
6) Install The Vacuum Hose The CCS-100 will not operate correctly unless you have a vacuum check valve installed in the vacuum hose from the throttle bodies to the servo. The black end should be pointed towards the throttle bodies and the white end should be pointed towards the CCS-100 servo. Cut off 3-4" of the vacuum hose that comes with the CCS-100 and slide it over the black end of the vacuum check valve. Take the remaining vacuum hose and slide it over the white end of the vacuum check valve. You'll notice that the white tube from the vacuum check valve is a little small for the vacuum hose. There's several ways to get it to seal properly: 1) Being careful not to get any in the hole in the end of it, use some silicone or RTV sealant to glue the vacuum hose onto the vacuum check valve's white tube. This is how I usually do it.
2) Put a layer or two of electrical tape around the white tube to increase its diameter. 3) Put a layer or two of heat shrink tubing around the white tube to increase its diameter. Remove one of the small black rubber caps from one of the throttle bodies (it doesn't matter which one) and attach the short vacuum hose to the little brass tube on the throttle body. Being careful that it is not pinched or kinked, route the vacuum hose to the CCS-100 servo and connect it to the servo. When I install servo in the tail cowl then I usually run the vacuum hose along the left frame rail and through the hole for the left rear turn signal wires. I attach it with zip-ties that are left slightly loose so as not to pinch the vacuum hose. If you find that the length of vacuum hose that came with the CCS-100 is inadequate then take a piece of the vacuum hose to the nearest auto parts store and buy another 5 or 6 feet. It's a standard generic item that only costs about a quarter/foot. Ask at the counter, they usually have it on reels in the back. 7) Testing the CCS-100 Time to button things up and go for a ride. You can't really test the CCS-100 on the center stand because when the cruise control engages the RPMs will surge and the safety feature of the CCS-100 that detects RPMs surges will disengage it. Tests: Set - You need to have the RPMs up above 2,500 or so - but you should be riding in that range anyhow. Holding either the up or down button for a second or two should set the cruise control and have you traveling at a constant speed. Surge safety feature - Pull in the clutch while the cruise control is engaged. Almost instantaneously the cruise should disengage when it senses a sudden surge in RPMs. Hopefully it never happens to you but this should also disengage the cruise control in the event that you ever have a getoff. Front brake - The cruise should disengage when the front brake switch is activated. Rear brake - The cruise should disengage when the rear brake switch is activated. Tap Up - Set it again. Holding the up button for a second or so should yield about a 1 MPH speed increase. Tap Down - Holding the bottom button down for a second or so should yield about a 1 MPH speed decrease. Tap up and tap down can be used to fine tune your cruising speed. Coast - Tap the down button once quickly and the cruise control should disengage. Accelerate - Pressing the up button and keeping it depressed should slowly increase your speed until you let it go. Decelerate - Pressing the down button down and keeping it depressed should slowly decrease your speed. If something goes wrong with the cruise control then just pull in the clutch, hit the kill switch and pull over. One thing to note is that when you hit the kill switch on a K bike that also kills the brake light circuit so any cars behind you won't know when you're braking. Appendix A: LED Brake Light I run LED brake and tail lights in my K bikes. It's easy to do by eliminating the BMU (black bulb monitor unit on the left side of the relay box.) All you have to do is short the wiring as follows: 1) Short the front brake switch wire (Gray/Red) and the rear brake switch wire (Gray/Green) to the brake light (Gray/Yellow.) 2) Short the tail light/parking light power (Gray/White) to the tail light wire (Gray/Black) However, the CCS-100 won't work with an LED brake light bulb. It's easy to make it work with an LED bulb though. All you need to do is hook the purple wire up to a normally closed relay so that the purple wire is grounded until you hit the brakes. If you're using a standard automotive Bosch type relay (a.k.a. 5-terminal relay) then wire the relay up as follows:
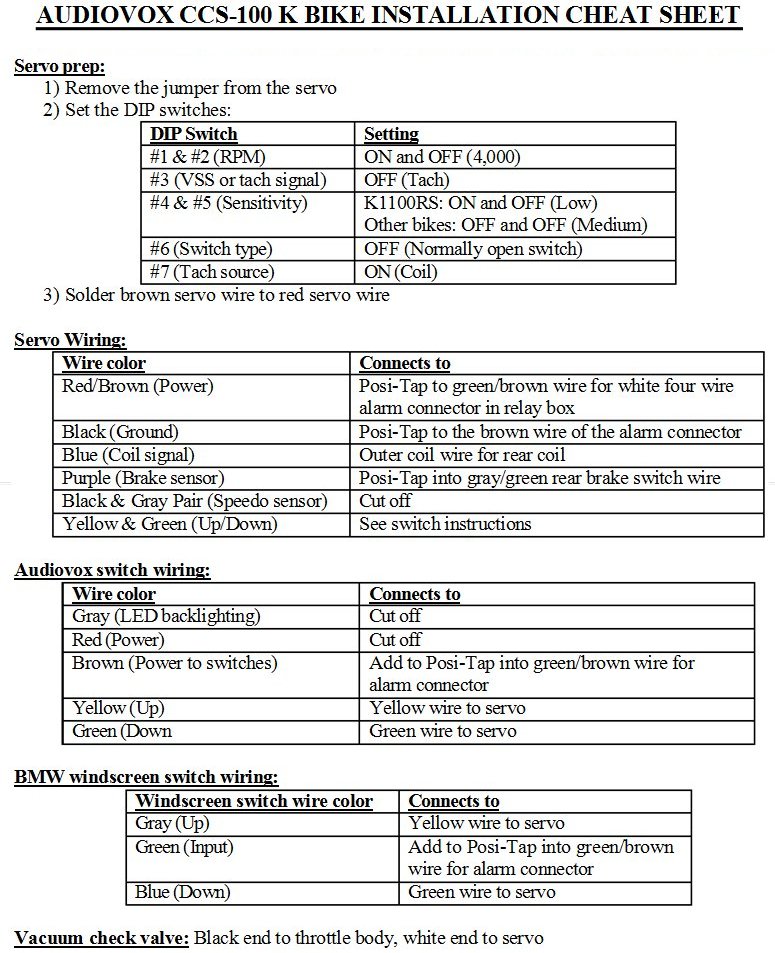
Or you can do what I do and make your own waterproof micro relay. Side note: Eliminating the BMU to run LED tail and brake lighting removes the BMU's safety feature of checking the brake switches. However, installing a cruise control unit brings that back to a certain extent in that if you ever determine that your front or rear brake doesn't disengage the cruise control as it should then it most likely means that brake switch has gone bad. Or if you find that the cruise control doesn't engage as it should then it may be due to a faulty brake switch. This happened to one of my K75s once. Appendix B: Installation "Cheat Sheet" Here's a "cheat sheet" that you can print out and take to the garage. Click on the thumbnail below to have it open in a new tab for printing.
Appendix C: Audiovox Installation Manual Here's a PDF of the Audiovox CCS-100 installation manual: CCS-100.Manual.pdf © 2019 Drake Smith - Please do not use or reproduce this elsewhere. Feel free to link to it though. |