![]()
![]()
|
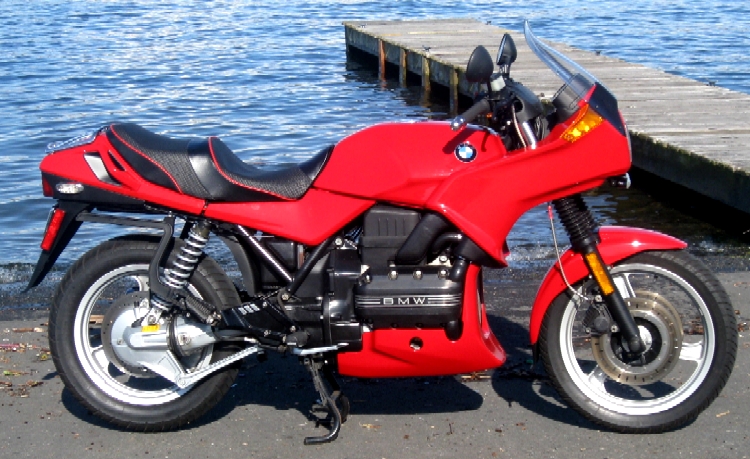
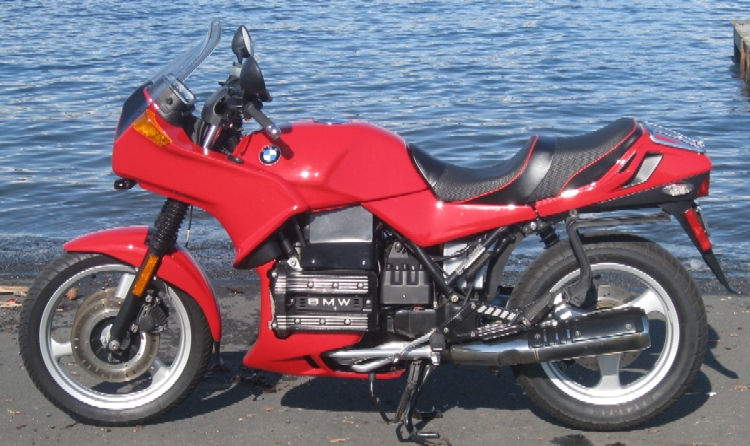
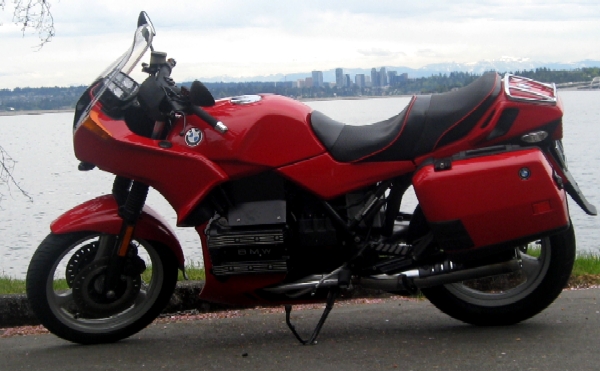
1991 K75SP (K75S-Paralever)
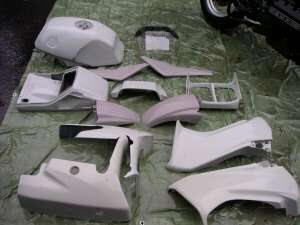
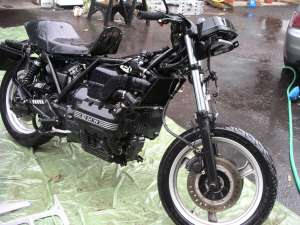
I bought this bike in pieces. I was a project bike that someone had never gotten around to and had given up on so I got it for a good price. Here's a couple of pictures from the local Craig's List ad for it: All of the bodywork was in primer. It only had 24k on it and hadn't been started in years so I installed some reconditioned fuel injectors in it before trying to start it. Being a K75, it started right up. I'd always wanted to convert a K75 to a paralever so this was a good opportunity to try that. It came out nicely in the end but by the time I'd finished it I'd already acquired another couple of K bikes so I decided to sell it. I started on this project a while back. Unfortunately, by the time I'd completed it I had somehow managed to acquire another two motorcycles and don't have room for this one so I decided to finish it according to my plans and then sell it to someone who could appreciate it. I've been riding it around for the last couple of weekends and it's really a smooth and fun bike to ride. Needless to say, it turns a few heads. Below is a detailed description of all of the components and modifications incorporated into this bike. |
|
|
Drive Train
|
Suspension
|
|
Brakes
|
Fluids |
|
Exhaust |
Seat
|
|
Electrical |
Lighting |
|
Cosmetic
|
Instruments/Controls |
|
Miscellaneous
|
|
|
Drive Train |
|
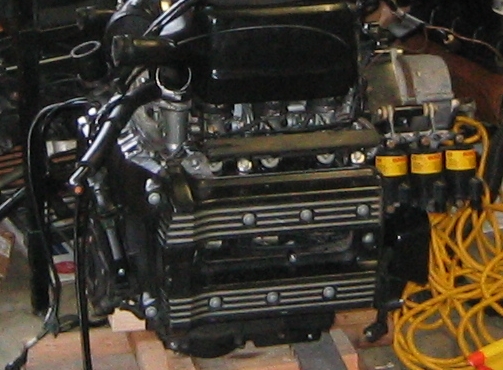
This is the heart of the beast and my starting point for the project. It comes from a 1993 K75S that was totaled by the insurance company due to fairing damage. Though it hadn't been run in five or six years, it started right up after I replaced the clogged fuel injectors. Here is my starting point:
Some of the rubber parts like the crank case breather hose and some of the fuel lines were showing their age so those were also replaced. |
|
45k K100RS4V Transmission: From the outset I had planned on replacing the K75/K100 monolever final drive with a paralever final drive from a later K bike. In order to do this the transmission has to have a front mounting point for the paralever rod. I had this transmission from a well-running K100RS4V that I merged with another bike. Aside from fifth gear and the paralever mount, this transmission is identical to a K75 transmission. Being from a 4 cylinder K bike, fifth gear is geared at 1.61:1 vs. a K75 transmission which is geared at 1.67:1. This is roughly a 4% difference in fifth gear. Although it does reduce the torque in fifth gear slightly, it also reduces the RPMs required for a specific speed to some extent it reduces the "where is sixth gear" feeling common on K bikes and should also provide slightly better mileage.
|
|
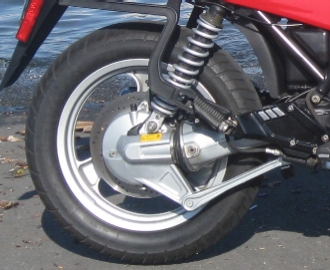
40k K1100RS Paralever Final Drive: Why use a paralever final drive? Although the monolever final drive system worked well on the early K bikes it did have a few issues, the most notable being that even if properly serviced the drive shaft and final drive splines would wear out and strip at around 100,000 miles, aside from possibly stranding you it is also quite expensive to replace the drive shaft and final drive when the splines go.
In addition, the monolever final drive has a tendency to "jack" the rear end on acceleration. BMW introduced the paralever final drive in 1988 on the R bikes and a year later on the K1 and a year after that on the K100RS 4 Valve. By keeping the final drive more parallel to the ground during rear suspension travel, the paralever keeps the rear end from jacking and also makes rear end of the bike feel more solid and planted on higher speed turns. It's dual U-joints also virtually eliminate the spline wear problem. I know many people who have 100k+ miles on this setup, and some with mileage in excess of 200k. Though some of BMW's later final drives had issues, the paralever final drive from the early four valve K bikes is one of the most reliable final drive assemblies produced by BMW. A good pseudo-technical explanation of the differences between a monolever and paralever can found be found at this link: http://www.largiader.com/paralever/ The other impact this has is that the gear ratio on a K75 final drive is 3.2(32:10) while the final drive ratio for the K1100RS final drive I used is 2.82(31:11). The end result is that at 60 mph per hour this bike is running at about 4,000 rpm instead of a stock K75 which would be running at about 4,700 rpm. This gets rid of the "Where's 6th gear?" and improves both gas mileage and top speed.
|
|
Suspension |
|
24k "S" Forks: The forks for this bike came from the same 24k K75S as the engine did. There are the later "S" sport forks used on later 2 valve K bikes. I disassembled and thoroughly cleaned them. |
|
New Progressive Fork Springs: Before starting on this bike I purchased a set of new Progressive fork springs for it. The stock fork springs on K bikes were constant rate springs. The new springs I installed are progressively wound and a bit stiffer so they provide better front end performance and reduced dive on deceleration. |
|
Even though the old fork seals were not leaking I replaced the fork seals with new fork seals when I took the forks apart to clean them and install the Progressive fork springs. |
|
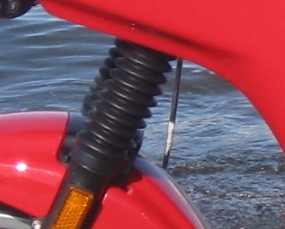
Fork Boots: In order to protect the upper fork tubes from pitting or other damage I also added fork boots.
|
|
Low Mile K1100RS Rear Shock: In order to use a paralever final drive on a K75 you need to use a slightly longer shock. I was able to get my hands on a very low mile K1100RS shock. It's better than the K75 shock and has easily adjustable preload and rebound damping. |
|
Brakes |
|
9k Front Rotors: I got these from a friend who had them leftover after restoring his K75S. They're extremely low mileage and look like new. |
|
Adjustable Brake Lever: The earlier K bikes had a simple brake lever. The later ones had an adjustable set screw which allows you to adjust the front brake lever to your liking. |
|
Braided Stainless Front Brake Line: The stock setup for K75 brakes was rather complicated with a line from the master cylinder that attached to the top of the steering head. Then there was a metal line though the steering head that split off in a Y to normal rubber brake lines to each caliper. Since this setup has several rubber brake lines in it and the K75 brakes aren't super duper brakes in the first place, I decided to simplify and upgrade the brake lines. This bike has a braided stainless steel front brake line from the master cylinder direct to the right front brake caliper and then a solid metal line from the right caliper to the left caliper. This minimized the "mush" in the brakes and makes them stronger and more responsive. Though I could've made the brakes have more bite by using sintered pads I chose to use organic pads as they seem to work fine and don't wear the rotors down as quickly as sintered pads can. |
|
Ventilated Rear Rotor: The earlier K bikes had solid rear rotors. The later K bikes had vented rear rotors. Though probably not necessary, having a vented rear rotor keeps the rotor heat reduced and, in my opinion, looks better. |
|
Fluids |
|
Engine Oil: Since the engine has sat for a few years, I replaced the engine oil, added some flushing oil and ran that for a short while in order to clean out any residual gunk which might be in the engine after sitting. I then replaced the oil and filter during my restoration project and ran that for a while. At completion of the bike, I drained that oil and replaced it with fresh Castrol GTX 20/50. |
|
Transmission Oil: As with the engine, I ran some fresh gear oil through the transmission during the project. At completion, I drained the transmission again and filled it with Mobil 1 75W-140. I run this in all of my K bike transmissions as it makes the transmission run noticeably smoother than the regular 90W that BMW uses. Aside from making the transmission run smoother using synthetic gear oil allows the maintenance interval to be extended to 20,000 miles or so vs. 12,000 miles for regular gear oil. |
|
Final Drive Oil: The final drive uses Mobil 1 75W-90 gear oil. It's better than regular gear oil and also allows the maintenance interval to be extended from 12,000 miles to 20,000 miles. |
|
Radiator - Red Line Water Wetter: The radiator was of course flushed and refilled and, like the oils, replaced again at the completion of the bike. I added Red Line Water Wetter to the cooling system which provides additional corrosion protection, slightly reduces coolant temperature and improves the heat transfer properties of the coolant. |
|
Exhaust |
|
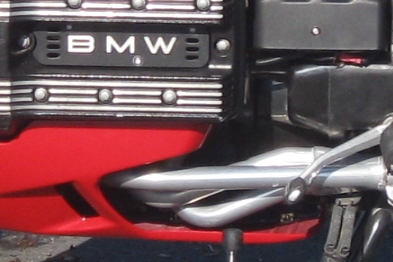
Ceramic Coated "Chrome" Headers: The stock headers on K75 had a tendency to start "bluing" from heat the moment the bike left the dealer. This is inevitable and makes the headers not so attractive. I had the headers of this bike covered inside and out with a chrome-like ceramic exhaust coating. This gives the headers a nicer look and keeps them from getting ugly.
The interior ceramic coating supposedly helps smooth out the exhaust flow and increase power a bit but I haven't dyno'd the bike with and without the coated headers and I did this mostly for appearance reasons anyhow.
|
|
Seat |
|
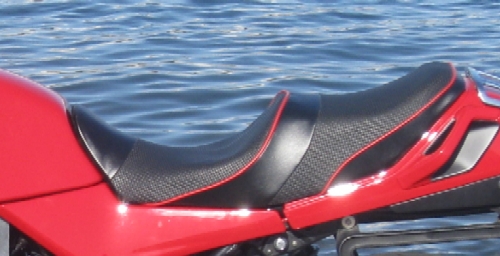
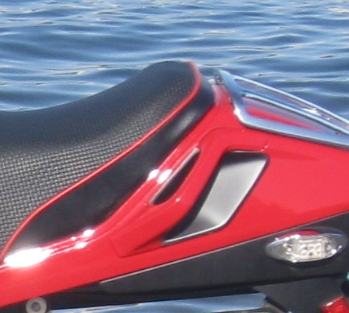
Corbin: The bike has a newly recovered Corbin Dual Canyon seat with red piping to match the paint job.
|
|
Electrical |
|
Upgraded Alternator: The stock alternator on K bikes has a 32 ampere output capacity. Though they work fine and provide more than adequate power to operate the bike, they do not provide enough extra current when you start adding things running/driving lights, running heated grips and riding with heated clothing. I swapped in a 50 ampere alternator from a K1100 which provides more than adequate power for just about anything you want to add. |
|
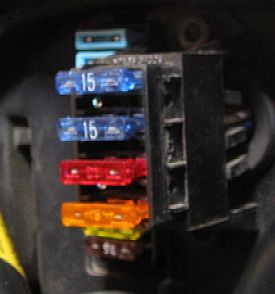
Auxiliary Fuse Block: I knew I'd be adding several electrical upgrades to this bike and I don't like having in-line fuses scattered about the bike so one of the first things I did was add an auxiliary fuse block next to the factory fuse block. Both the factory fuse block and the auxiliary fuse block also have laminated waterproof labels on them identifying what each fuse is for.
|
|
Upgraded Horn: The stock disc horn that came on K75S bikes is pretty wimpy and sounds like a scooter. I upgraded the horn to a Fiamm horn (one of the same horn that was used on BMW cars of the era) which is much louder and much better for getting attention on the road. |
|
Lighting |
|
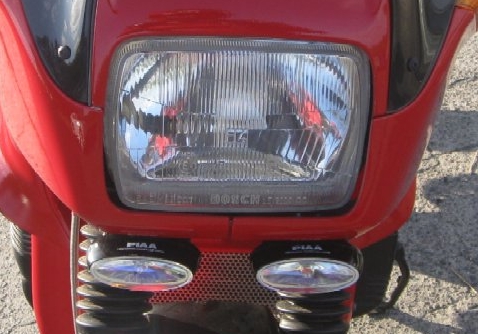
Upgraded Headlight w/ Relays: The stock headlight wiring is rather wimpy which results in a voltage loss at the headlight and, as a result, less light. By adding relays and upgrading to 14 gauge wiring there is minimal voltage loss at the headlight. I've also upgraded the headlight bulb from the factory halogen bulb to a whiter, brighter Xenon bulb. The result is much better lighting and reduced wear and tear on the high/low switch. |
|
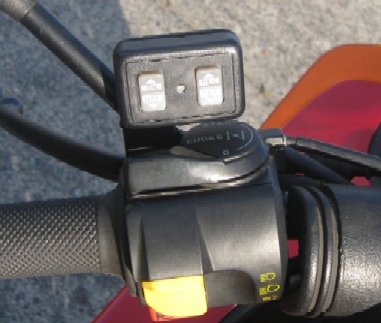
Driving Lights w/ Relay: Having logged a few riding miles, I'm a big believer in adding front lighting to make a bike more visible in traffic. It noticeably reduces the number of cars who "don't see you" and just makes riding safer. In order to minimize clutter on the bike I mounted a pair of small yellow PIAA fog lights under the headlight. The purpose was not to have fog lights but to make the bike more conspicuous. I added a BMW OEM on/off switch for them on the dash.
|
|
LED Running Light Turn Signals: Since they come on virtually instantly and "never" wear out, I'm a big fan of LEDs so I decided to give this bike LED running lights by changing the turn signals so that they are always on but flash off for the turn signals. The rear turn signal stalks on K bikes tend to get banged around a bit, especially when mounting/unmounting the side cases. I replaced the stock turn signal stalks with flush mounted red LED turn signals. This made the turn signals not very obvious from behind but I dealt with that by adding turn signal LEDs to the outer compartments of the tail light lens. The LED running lights are also wired to be on when the parking lights are on. Given the small amount of current consumed by LEDs this will light up the bike better in parking light mode without much of a drain on the battery. |
|
Cosmetic |
|
New "Formula Red" Paint Job: In my opinion, the K75S looks best in red. The most popular red from BMW was the classic Marakesh Red. There are enough Marakesh Red K75s in the world so I decided to use a slightly different red. I chose "Formula Red" which is a special red developed by Acura for the NSX. Not only does this make the bike's color unique but it makes getting touch up paint much easier. Just stop by the local Honda car dealership and drop down $8; (Many BMW colors are no longer available and, if they are, are quite expensive.) |
|
New Main Fairing: I got this bike as a project bike that the prior owner had never gotten around to. Since the main fairing was busted up, he'd purchased brand new main fairing parts in primer from BMW. So the fairing is brand new. |
|
New Windscreen & Front Turn Signals: The bike also has a brand new BMW OEM windscreen and front turn signal lenses. |
|
New BMW Roundels: The gas tank and tail cowl both have brand new BMW roundels. |
|
Factory Chrome Tail Rack: The usual factory tail racks for K bikes are painted black. Not many people know it but BMW also produced chromed tail racks from the factory. I purchased a brand new chromed tail rack from BMW to give the bike some uniqueness and bling. |
|
Chrome Powder Coated Gas Cap: In my years of owning K bikes I've found it very hard to keep the gas cap looking decent. For this bike I had the gas cap powder coated in chrome to match the tail tack. |
|
Custom Powder Coated Fuel Injector Cover: From the factory, the K75S came with the fuel injection, fuel rail and throttle bodies exposed. Many years ago there was a Canadian company that made plastic fuel injector covers to hide that part of the engine and clean up the lines of the bike. I made a custom fuel injector cover out of aluminum and had it powder coated black to hide the fuel system.
|
|
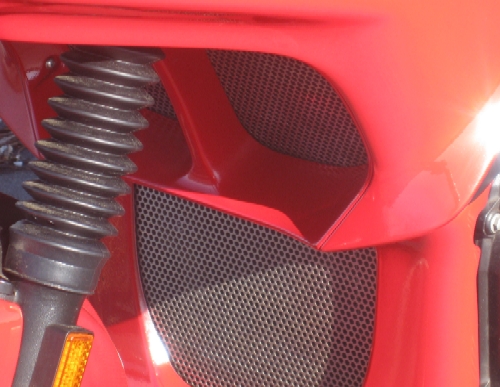
Perforated Stainless Steel Radiator and Belly Pan Grills: I made some custom perforated stainless steel radiator and belly pan grills to replace the boring stock ones.
|
|
New Tail Cowl Handhold Protectors: There are several features and parts that were included on early K bikes that BMW did away with in later years. (I assume for cost cutting reasons.) One of those parts was plastic covers which protect the paint under the passenger grab handles. I purchased a set of new ones and installed them on this bike.
|
|
Stainless Steel Hardware: I have replaced all of the visible nuts and bolts on the bike with stainless steel hardware. The exceptions are things like frame mounting bolts and brake caliper bolts where stainless steel would not have the requisite strength. |
|
Matching Hard Cases: I also refurbished a set of the newer style "integral" side cases and had those painted to match the bike. They are keyed to work with the ignition key.
|
|
Front and Rear Fender Extenders: The bike has a BMW OEM new rear fender extender. It helps quite a bit in keeping your back clean when riding in wet weather. BMW never made a front fender extender for K bikes. I don't know why. I did want one to protect the belly pan so I got my hands on an aftermarket one (again no longer in production) and added that to the front fender |
|
Instruments/Controls |
|
LED-Lit Instrument Cluster: It's really a pain when one of the instrument cluster bulbs goes out on a K75S. In order to get the instrument cluster off you have to remove the windscreen and one of the fairing side panels. It's a lot of work just to replace a burned out instrument cluster bulb. All of the lights in the instrument cluster on this bike have been replaced with specially selected LEDs. Since LEDs "never" fail there's no need to rip the bike apart for a burned out instrument cluster bulb. Not only that but the LED backlighting is brighter and crisper and can be noticed once sunset begins. |
|
Calibrated Speedometer: All K bikes came from the factory with a speedometer that runs about 10% high. I suppose BMW did this for liability purposes or whatever but I've always found it to be incredibly annoying that the speedometer runs that high. I calibrated the speedometer on this bike to run just a little bit high instead of 10% high. That way when the speed limit is, for example, 60 MPH I can ride at an indicated 10 over while my actual speed is 68 or 69 MPH, keeping me below the magic 10 MPH over when tickets are generally issued. |
|
Fuel Gauge: All K bikes have a low fuel "idiot light" in the instrument cluster that comes on when there's approximately a gallon of fuel left. Some other K bikes came with fuel gauges but not the K75S. I added a BMW fuel gauge to the left side fairing panel so judging how much gas you have left is much easier. |
|
Real Cruise Control: Yes, REAL cruise control. As I have done with my other K bikes, I've installed real cruise control on this bike. It works just like the cruise control in a car. Set the speed and the cruise control takes over. I have this on my other bikes as well and it makes touring a breeze.
|
|
Throttle Friction Screw: The bike also has a BMW OEM throttle friction screw (a.k.a. poor man's cruise control.) The real cruise control works great but I've found that a throttle friction screw is better when riding in traffic where constant minor speed changes are required. |
|
K1100RS Handlebars: I swapped out the stock K75S handlebars and replaced them with handlebars from a K1100RS. They have the same shape as K75S handlebars but also allowed me to install some nice chromed bar ends. |
|
Heated Grips: I ride in the winter and determined long ago that heated grips can make a big difference. I installed new heated grips on this bike. They have a high and low setting. |
|
ProGrip Gel Grips: I never liked the stock BMW grips. As I do on all of my K bikes, I installed ProGrip gel grips on this bike. They are more comfortable and work well with the heated grips. |
|
Altitude Switch: Although many people don't know it, K75s had an optional "altitude plug" which should be used when riding above an elevation of 4,000 feet. This tells the fuel injection computer to adjust the mixture to compensate for thinner air at high elevations. The altitude plug could be kept on your key chain and you could pull over when traveling at higher elevations to insert the plug. This seems kind of ridiculous so I wired the altitude plug to the up position of the emergency flasher switch. Instead of pulling over to insert/remove the altitude plug when passing through an elevation of 4,000 feet it allows the rider to just hit a switch while riding. It's much more convenient and there's no risk of misplacing the altitude plug when not in use. |
|
Choke Light: The early K bikes had an orange indicator lamp in the lower instrument cluster to remind you if you still had the "choke" on. BMW cheaped out on this in later years but I retrofitted a switch to the throttle bodies on this engine so that the choke indicator lamp works. |
|
Miscellaneous |
|
Insulated Fuel Return Line: The fuel return line from the fuel pressure regulator to the tank on K bikes sits right behind the radiator. This has a tendency to needlessly heat up the gas returning to the tank and heating up the gas tank. On some K bikes BMW insulated the fuel return line, on some K bikes they didn't. This bike has the BMW insulation on the fuel return line. |
|
Insulated Fuel Rail: BMW also randomly did/didn't insulate the fuel rail on K bikes. I added the fuel rail insulation to this bike. |
|
L-Jetronic Mud Guard: Early K bikes also had a protective mud guard under the seat to protect the connector to the fuel injection control unit. This is another thing that BMW cheaped out on on the later K bikes. This bike has a brand new one. |
|
Complete Factory Tool Kit: The bike also has a complete BMW OEM toolkit. It is all original except that the shock wrench had been upgraded to the correct shock wrench for the K1100RS rear shock that this bike has. |
| Return to classickbikes.com home page |
![]()