![]()
| 1986 K75C Turbo - "Renup" | ||||||||||||||||||||
|
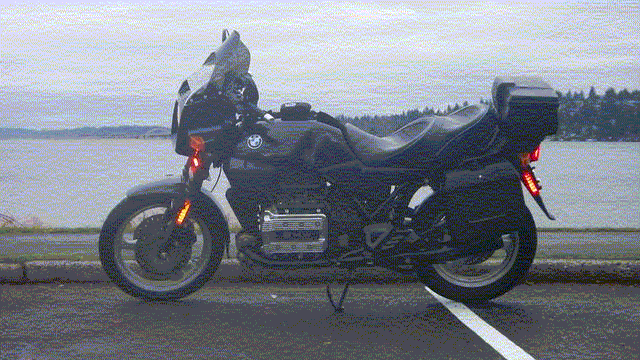
K75 Renup: This page contains pictures and descriptions of the renup (renovation & upgrade)of the Luftmeister turbo'd K75 I acquired late in the summer of 2013. They generally follow the order in which I did things. For the most part this bike was in pretty good shape for a bike of this age and miles (approx. 115K) but I wanted to go through it from head to toe to, within reasonable limits, optimize its reliability and performance. As I dug into it I discovered that although it seemed to be in good shape and was a good starting point, it needed lots and lots of TLC. I also swapped in a bunch of newer and lower mile parts to get it in the best shape I could without spending oodles of money. 2/15/14: I finally got it out in the country this week so I was able to see what the turbo can do. When accelerating, I first feel the normal power curve surge of a normal K75 at 4,500 RPM. And then there's yet another bigger surge at about 5,500-6,000 RPM when the turbo spins up. Even with a "taller" than stock 32:11 paralever final drive, this is one fast K75! |
||||||||||||||||||||
|
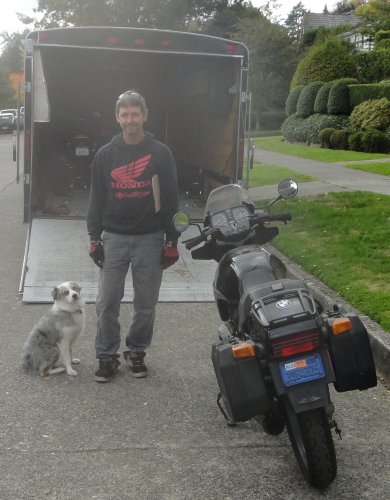
Delivery
|
||||||||||||||||||||
|
History Of This K75
From the documentation that came with the bike, I was able to determine the following: Given the bike's general condition, I'm sure that other routine maintenance like fluid and filter changes have been kept up to date along the way. Things I Noticed When Working On It: Given how old it looked, I think this is the original license plate from 1986:
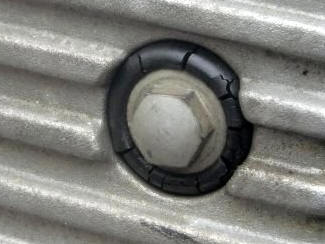
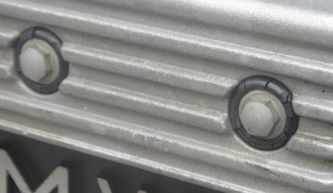
All of the engine cover grommets looked like this:
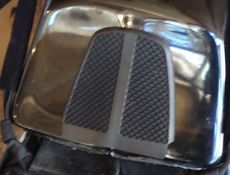
Neither odometer worked. (Not a big deal as I'd planned to replace the instrument cluster anyhow.) The paint job on the frame is in excellent condition so I assume that it's been repainted fairly recently. The Corbin Dual Sport seat that came on it was in pretty good shape but the material at the tip of it was worn through. At some point the bike had OEM aux lighting as the wiring and relays were installed - but not the lights themselves anymore. It had new Bridgestone Spitfire tires and a new AGM half battery. Although the CL ad said "new fuel" pump, the fuel system had been recently butchered. (More on that later.) |
||||||||||||||||||||
|
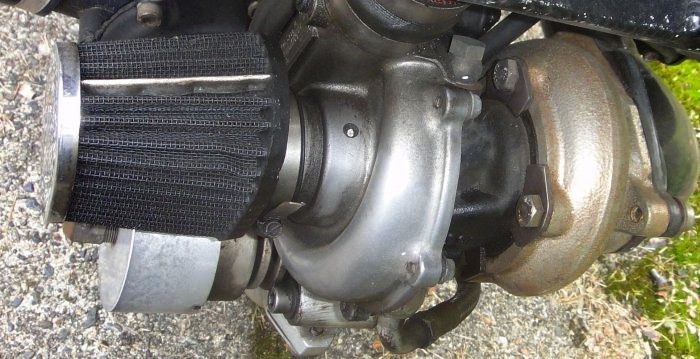
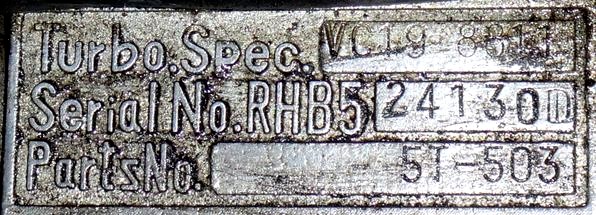
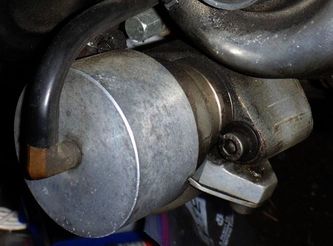
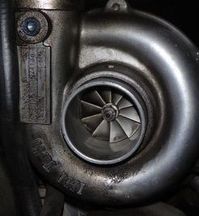
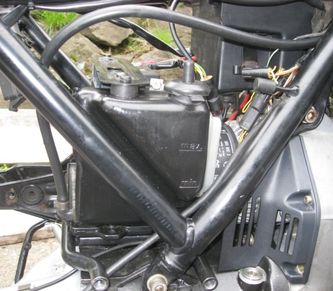
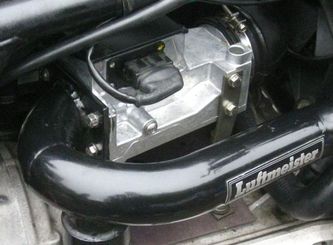
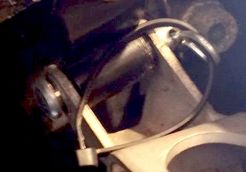
Turbo Stuff (Click here to skip the turbo stuff and get to the project.) This K75'sTurbo: Here's some pictures I took of the turbo system prior to digging into working on the K75. The turbo is an IHI RHB5 which was fairly popular back in the 80s and used on custom vehicles like this K75 and but also used quite a bit on Subarus, Fords, Mazdas, etc.... IHI RHB5 Turbo
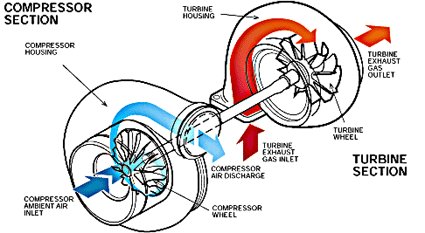
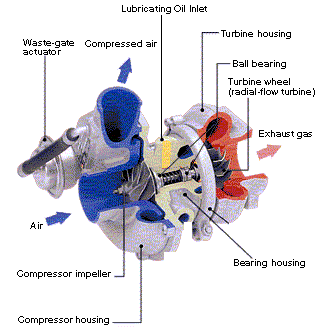
Turbo 101 I didn't know too much about turbos when I got this bike (still don't) so I studied up on them on The Internet and figured out what's what on this K75. I may update this section as I continue to learn more. Basic Concept: A turbo increases the air intake pressure by using the energy of the exhaust to spin a turbine which is connected by a shaft to a compressor wheel.
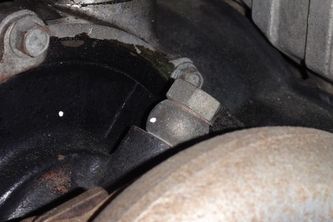
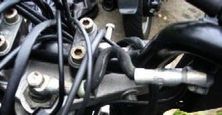
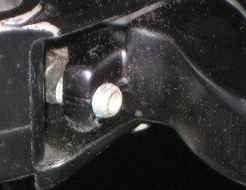
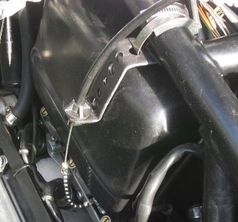
CHRA: In between the turbine and compressor is the housing for the shaft between them. Given how fast turbos rotate, (tens of thousands of RPMs) the CHRA (center hub rotating assembly) needs a constant source of pressurized oil to cool and lubricate the bearings. On this K75 that comes from a fitting installed at the opening in the oil pump for the oil pressure switch and then a braided stainless steel hose goes around the radiator hose up to the top of the CHRA.
And enters the top of the CHRA via this banjo bolt.
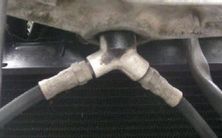
And then returns to the bottom of the oil sump.
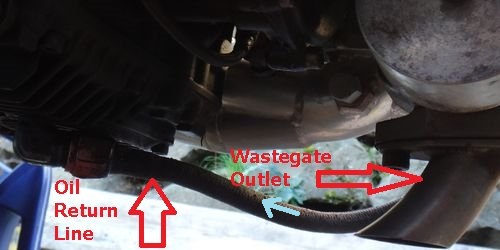
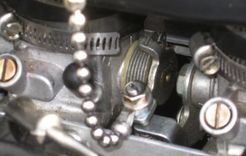
Wastegate: In order to keep the turbo from overcharging the engine, the wastegate valve diverts gas away from the exhaust turbine. It is controlled by a wastegate actuator that monitors the pressure in the compressor housing.
Intercooler: Air heats up and looses density when it is compressed. To offset this the intercooler cools the compressed air down before it enters the engine. On this bike the intercooler is a custom split one that has a space in the middle in order to allow airflow to the cooling system's radiator.
Air Intake From Intercooler: This is also custom with a second air filter and a blowoff valve to reduce lag when the turbo kicks in.
OEM fuel injectors: I was curious to see if the injectors had been upgraded and couldn't read their part number but by sticking my camera in and taking a macro shot I was able to determine that the normal stock injectors were used.
Crank Case Breather: I noticed that the crank case breather hose was missing. Instead the tube on the plenum was blocked with a small K&N filter on the breather. I assume this is done to keep the higher pressure turbo'd air from blowing into back into the engine.
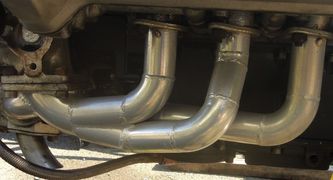
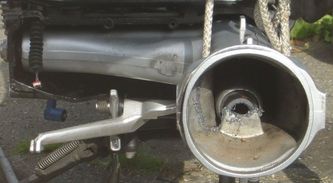
Headers: The exhaust headers from the head to the turbo exhaust intake are custom built and look to be in good shape.
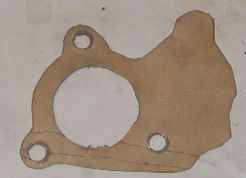
Exhaust: The exhaust is a custom one piece system built for the bike. When I removed it I discovered there was no exhaust gasket so I got some generic exhaust gasket material at AutoZone and fabricated one.
Turbo Condition: After doing some research I found out how to assess a turbo's condition: 1) Checking the condition of the blades on the exhaust turbine and compressor wheel for damage 2) Checking for oil leaks on both sides to see if the oil seals in the CHRA are still good 3) Checking for radial or axial play on the shaft that connects the turbine and compressor
I was pleasantly surprised to discover that this turbo
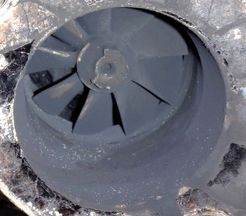
seemed fine on all three counts. Exhaust turbine:
Compressor wheel:
Here's a diagram of a similar IHI turbo:
|
||||||||||||||||||||
|
Clutch: The first thing to do with any K bike is to remove the final drive and transmission to inspect the clutch, check that the rear main seal isn't leaking, replace the clutch nut O-ring and lube the splines. When I got the clutch basket off I discovered that someone had been in there fairly recently to replace the rear main seal.
The clutch was also is good shape too with a recently replaced friction disc but, since I had it on hand, I installed a newer, nicer clutch assembly.
K1100 Transmission & Paralever Final Drive: In order to provide better rear end handling, eliminate the monolever "jacking effect," and not have to worry about drive shaft wear, I installed a K1100 transmission and paralever final drive. The "shortest" (most torque) stock gearing available for the early K bike paralever is 32/11 from an early K1100LT and I had one on hand so that's what I installed. The 32/11 paralever final drive gearing is about 9.1% "taller" than the original 32/10 monolever that most K75s came with. And the K1100 fifth gear is about 3.6% taller than that of a stock K75 transmission. Clutch Arm: I removed the clutch arm and relubed the needle bearings for its pivot arm. Center Stand: The center stand was in good shape (and had obviously been replaced relatively recently) so I used the one that came with the bike.
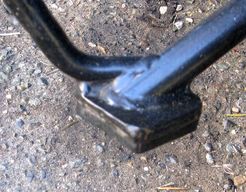
Side Stand: I also noticed that a prior owner welded some more metal onto the bottom of the side stand to reduce the excessive side stand lean typical of K bikes.
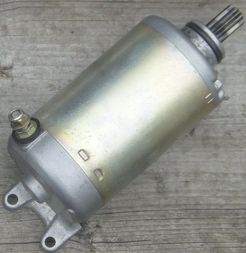
Starter: After I installed the transmission and center stand, I replaced the starter motor with a near new one.
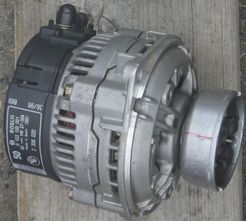
Alternator: Upgraded from the original 32A alternator to a low mile 50A alternator.
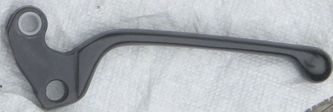
Clutch Lever: Before I adjusted the clutch after installing the transmission and freshly lubed clutch arm pivot, I installed a nearly new clutch lever.
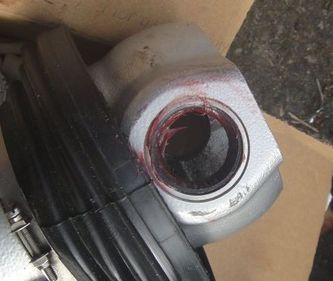
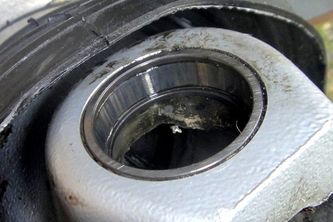
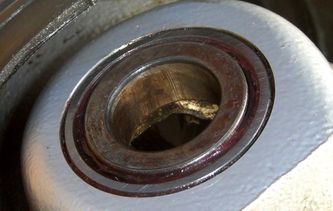
Final Drive Pivot Bearings: The pivot bearings on the final drive I used weren't in great shape so I rebuilt them and packed them with fresh Mobil 1 synthetic bearing grease.
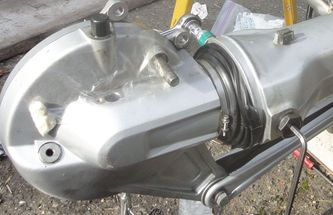
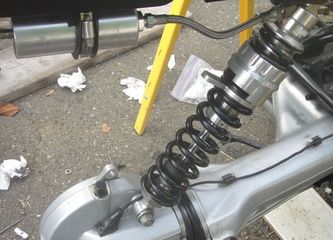
Swing Arm: Then I installed the paralever swing arm .
Final Drive: And then the final drive and paralever strut.
Shock: Newly rebuilt Works Performance shock for the paralever final drive.
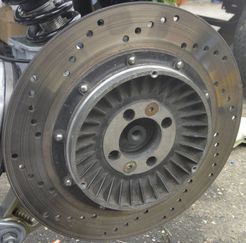
Rotor: Vented rear brake rotor
Side Stand Retractor: The side stand retractor was missing when I got the bike so I replaced that.
K1100 Peg Plates: One of the issues when converting a monolever to a paralever is that the "hump" in the paralever swing arm is wider and will hit the rear of the original peg plates. I addressed this by using K1100 rubber-mounted peg plates that are stepped out in the rear to accommodate the swing arm. K1100 peg plate mounting bracket.
Gas Cap: The gas cap was a little hammered so I replaced it with a nicer one after I'd rekeyed it to work with the bike's ignition switch.
After I'd siphoned the gas out of the tank I discovered that the fuel level sender's float ball was flooded.
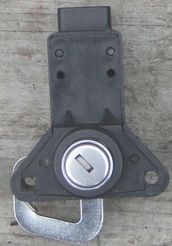
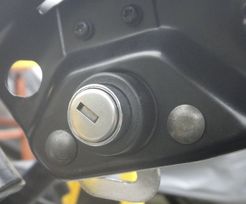
Seat Lock: As is typical for many of these old bikes, the hook in the seat lock was broken off so I replaced that with a good seat lock after I installed the old lock core in it so it would work with the ignition key.
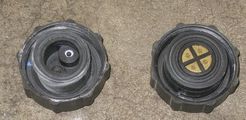
Radiator Cap: The radiator cap was hosed so I replaced that with a better one.
Ignition System: The next step was to renovate the ignition system. It was at this point that I noticed how badly cracked the engine cover grommets were. These were replaced later.
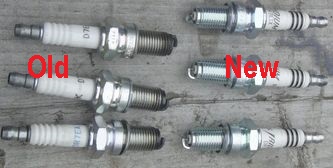
Spark Plugs: I replaced the old spark plugs with new NGK iridium ones.
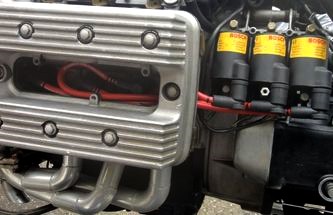
Ignition Coils & Spark Plug Leads: I replaced the ignition coils with newer, lower mile ones and replaced the spark plug leads with new 8.5 mm "competition" spark plug leads from Magnecor.
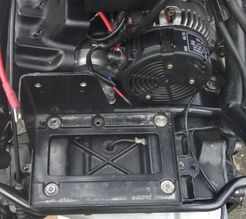
Battery Tray: I installed an early K1100 battery tray since it is less subject to corrosion than the earlier ones.
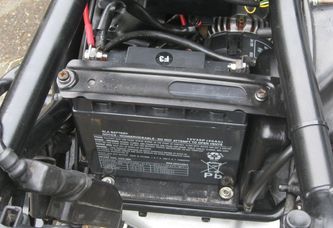
Battery: "Half-sized" new AGM battery.
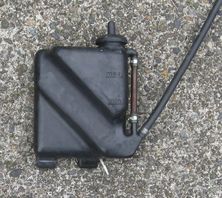
Coolant Reservoir: I replaced the old coolant reservoir with a K1100 one that has room for the longer 50A alternator. Old one:
Alternator Cover: And also installed a newer alternator cover that works with the K1100 peg plate mounting.
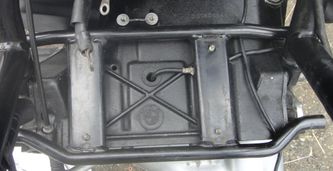
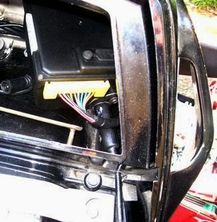
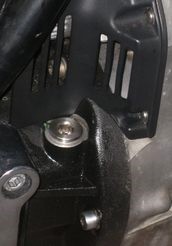
Rear Brake Reservoir: Since the bike was originally a K75C with a rear drum brake, I needed to add a bracket to the relay box to hold the rear master cylinder reservoir for the disc brake system of the paralever final drive.
I was now ready to install the right peg plate.
Aside from being rubber mounted and IMO looking better, the K1100 peg plates also have a beefier, better spring system for the rear brake pedal return.
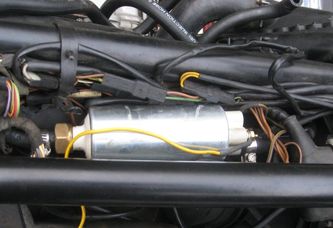
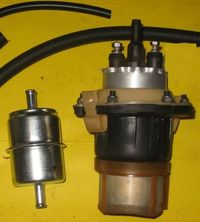
Fuel System: Then I removed the fuel tank. The Craig's List ad mentioned a new fuel pump had been installed. I guess somebody didn't want to spend $500 at BMW for a new fuel pump and vibration dampener so they installed an external pump stuffed in under the tank on the left side.
(One nice thing you can see in this picture is the condition of the paint job on the frame. All of the frame looks that nice so my guess is that it has been repainted at some point in time.) And this is the nightmare I found inside of the tank. I was tempted to scrap the tank and replace it but since it had a good paint job and no dents I decided to have a go at rejuvenating it. As you can see below, somebody cut and bent the outbound fuel line and stuck a cheap plastic fuel filter in where the fuel pump is supposed to be.
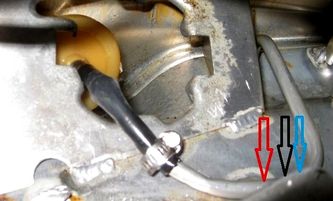
As I feared would happen, the aluminum fuel line snapped (where the red arrow is) just behind the weld (black arrow) that holds the line to the bottom of the tank when I tried to gently straighten it. Using a Dremel cutting wheel I carefully cut the fuel line right in front of the weld (blue arrow) and then gently bent that up so I could install a fuel line on it. Then I installed all new submersible fuel lines, a new fuel filter and a K bike fuel pump where it is supposed to be.
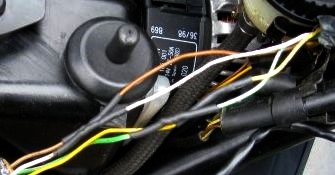
Whoever committed this savage act of butchery also cut the fuel pump power leads from the fuel level sender so I replaced the fuel level sender with a good used one with a good "ping pong ball" float. And they also butchered the fuel level sender connector from the main wiring harness so I had to fix that too. I soldered in a connector from another wiring harness and then put two layers of heat shrink tubing on each of the connections.
And then covered the wires with spiral bundling wrap.
Tank Pad: Later I removed the adhesive residue from the missing rubber pad at the back of the tank and replaced it with this one:
3D Tank Roundels: I replaced the flat tank roundels with some 3D ones:
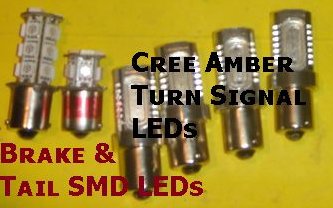
Kisan SignalMinder Flasher Relay & LED-Friendly BMU: Once I had the fuel system sorted out I started on some electrical upgrades. I started by swapping in a Kisan SignalMinder flasher relay so I can run LED turn signals and also an LED-friendly BMU (Bulb monitor unit) I made so that I can run LED brake and tail lights too. The red wire from the SignalMinder to the brake light wire from the BMU tells the SignalMinder to pause its timed auto-cancel feature when the brakes are applied.
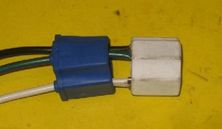
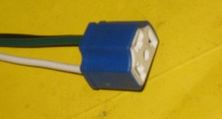
Ceramic H4 Headlight Socket: Before adding headlight relays to run a 130/90W H4 Xenon bulb I put together a new ceramic headlight socket with 14 AWG wiring.
Lighting "Master Control" Relay: Using my multimeter I determined that the low beam is always on, even when the high beam is on. Since I'd be adding headlight relays and putting in a higher wattage bulb, I prefer the high and low beams to operate mutually exclusively so I fabricated what I refer to as a headlight master control relay using an 8 amp DPDT PCB (printed circuit board) relay.
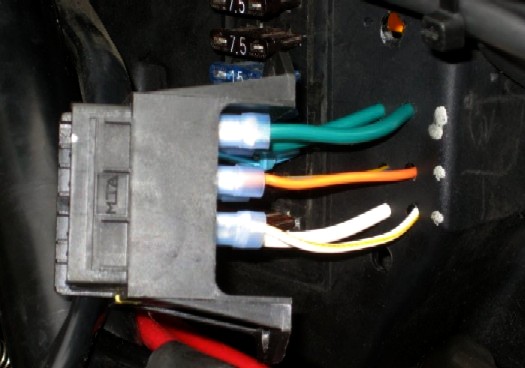
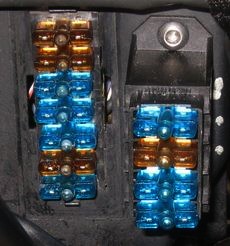
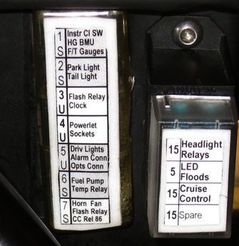
Aux Fuse Block: I'm not a fan of inline fuses for electrical mods so I installed this auxiliary fuse block next to the factory one.
Later I swapped in some fuses with LEDs in them that illuminate if the fuse blows.
And labeled them:
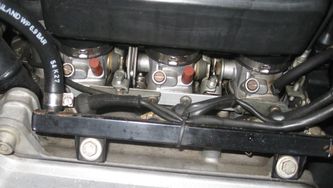
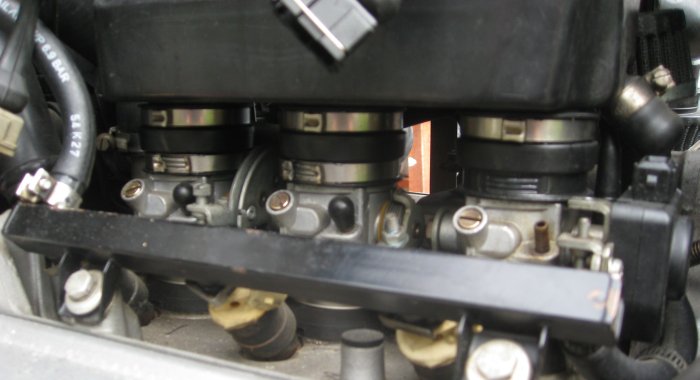
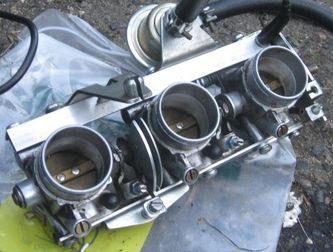
Throttle Bodies: Next I took a break from electrical work to attack the throttle bodies. Here are the original ones.
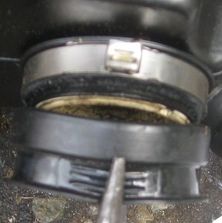
After I replaced the vacuum caps with OEM ones I took a look at the intake manifolds under the TBs and noticed they were cracked - not surprising for a bike of this age and miles. The first step was to use a Dremel cutting wheel to get rid of the stupid Oetiker clamps on the upper boots in order to remove the plenum.
All of the upper boots looked like this. I've never seen any this bad before but I'd guess that these would negate any benefits of turbocharging.
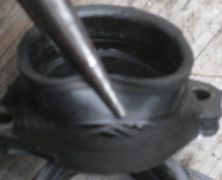
And the intake manifolds below the TBs all looked about like this.
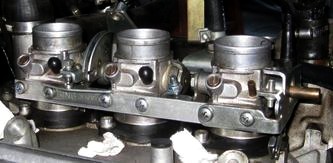
And here's what the old TBs looked like.
I decided to replace them with a newer, cleaner 52K set that I cleaned up. Before installing them I replaced the fuel lines, vacuum hose and fuel pressure regulator with new parts.
New manifolds installed.
"New" TBs installed.
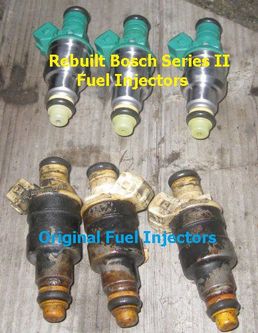
Fuel Injectors: Given their appearance, I assume that the fuel injectors are the original ones and had most likely have never been serviced. I considered getting them reconditioned but instead decided to install some Bosch Series II fuel injectors. These have four holes in them instead of one to atomize the fuel better, theoretically leading to better, more complete combustion. I've run these in several other of my K bikes and they perform well so I decided to buy a set of three reconditioned ones for this bike.
Fuel Rail: The original fuel rail had a couple of small rust spots on it so I replaced the fuel rail with a nicer one when installing the new fuel injectors. I polished the heads of the brass bypass screws too.
TPS: Then I installed a throttle position switch I'd pulled off of a 24K bike.
And here are my renovated throttle bodies and fuel system.
Mass Airflow Sensor: I had a 46K mass airflow sensor on hand so I swapped that in too. On a side note, although I've read in many places that K&N oiled filters let more crud through, this bike has been running them since the turbo was installed over 90,000 miles ago and the interior of the mass airflow sensor and throttle bodies were surprisingly clean for that many miles.
The intake to the mass airflow sensor was installed with Allen buttonhead bolts. Given the tight bend right before I wasn't able to get a good purchase on the upper outer one and ended up stripping it's head.
So I cut the head off with a Dremel cutting wheel.
And when I installed the "new" mass airflow sensor I put new stainless hex head bolts in the outer holes to simplify future maintenance.
Front Powerlet Socket: Then it was back to fiddling with electrical stuff. I added a dash pad with a Powerlet socket for my electrified tank bag. I Posi-Tapped the power supply for that into the OEM coil Powerlet socket wiring so they're both on the same fused OEM circuit.
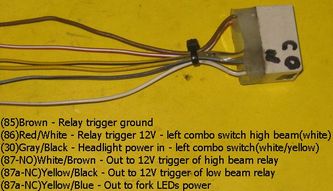
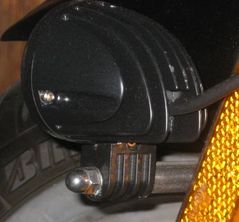
Fork Mounted 10W LED Floods: For daytime conspicuity in traffic I installed 10W LED flood lights on the forks since a triangle makes it easier for other road users to judge your distance and speed.
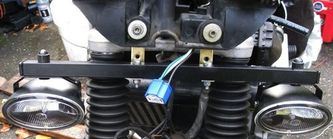
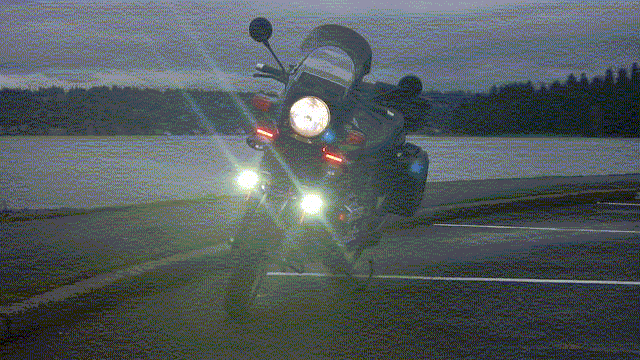
Light Bar w/ HID Hella FF50s: I fabricated a light bar out of 1" square aluminum tubing, had it powder coated, mounted it under the fairing and installed some Hella FF50 driving lights that I'd converted to 35W 4300K HID. These are tied into the high beam so they go off automatically when I turn switch the high beam off for oncoming traffic.
Light Bar Amber LED Strips: Later on I decided to add some very bright strip LEDs on each side of the light bar to improve turn signal conspicuity. They're brighter than they look in this picture because my camera was compensating for the brightness of the white LED flood lights on the forks.
LED Side Reflectors: Each side reflector is backlit by 12 5050 SMD LEDs for side running lights. They are tied into the turn signals so they also serve as side turn signals.
LED Bulbs: I made an LED friendly BMU by cutting the guts out and shorting the tail light power in to the tail light power out and the two brake switch wires to the brake light. I installed a Kisan SignalMinder in order to run some Cree LED turn signal bulbs.
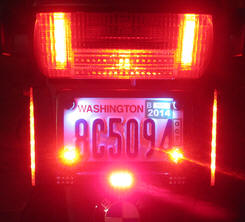
License Plate LEDs: Since a white LED bulb looks pink in the tail light lens I use a red one. However, to be legal, there still needs to be white light illuminating the license plate so I got these LED bolts for $3.50 shipped on Fleabay from China.
And added some skulls bolts with red LED eyes for the lower bolts. For a couple of extra bucks they came with matching skull valve stem caps with the eyes painted red instead of having LEDs.
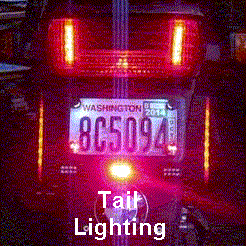
Anyhow, the bike has tons of bright LEDs in the back:
Brake Light Strobe: I added a brake light strobe and wired that up to the additional LED running lights I put in the sides of the brake/tail light lens as well as a Run-N-Lites Lite-Blazer below the license plate. It flashes 10 times and then goes solid. Here's an animated gif that simulates the brake light strobe:
Front Brakes: When I rode the bike around to the back of my house when it arrived, I found that the front brakes were surprisingly lame. The front brake lever had been bent from a drop and the threads for the banjo bolt on the bottom of the master cylinder were kind of stripped.
I wanted to get rid of the stupid OEM front brake setup that goes through the steering head and then Ys off to the calipers below the lower fork tree.
I replaced the front master cylinder with a nicer newer one.
Front Brake Lines: My solution for reducing/eliminating front brake line mushiness is to run a braided stainless line from the master cylinder to the right caliper and then a metal line from the right caliper to the left caliper.
Brake Lever: I installed the brake lever that has a small set screw in it for fine tuning the front brakes.
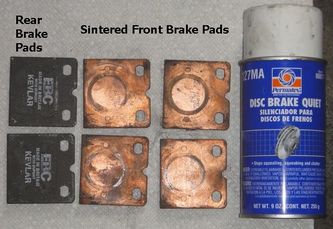
Brake Pads: For additional grab I use sintered pads in the front. I use Permatex Disc Brake Quiet on the backs of the brake pads to preclude disc brake squeal. Here are the pads before I sprayed them down.
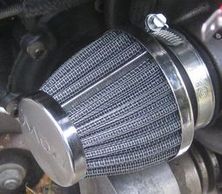
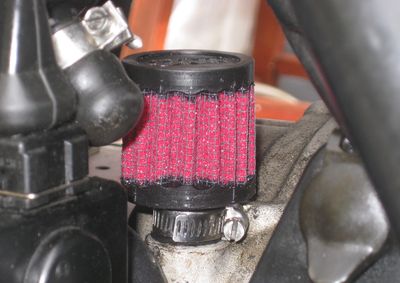
When I changed the rear end that changed the old drum brake to a disc. I installed a braided stainless line for that as well. Air Filters: Since oiled K&N filters aren't known for being the best at keeping dirt out of en engine I chucked the old K&Ns and installed some generic paper filters on the turbo and secondary air filters.
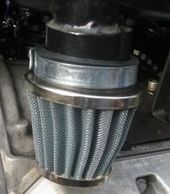
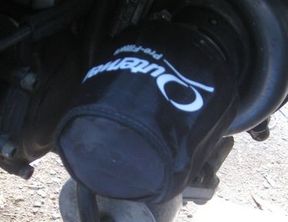
Pre-Filters: And then covered both of the air filters with water-resistant pre-filters from Outerwears.
I replaced the crank case breather filter with a new non-oiled washable breather filter from Uni Filter.
Forks: I replaced the original K75 forks with a set of the later, better "S" forks with Progressive springs after I'd disassembled them and cleaned them.
Fork boots: While I was at it I installed some fork boots with stainless steel hose clamps.
Wheels & Tires: 3 spoke wheels with radial tires (Bridgestone 110/80-18 BT-023 front, Avon AV46 Azaro 140/80-17 rear) and new metal valve stems. Front & Rear Fender Extenders:
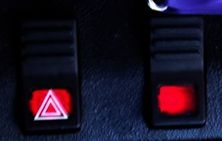
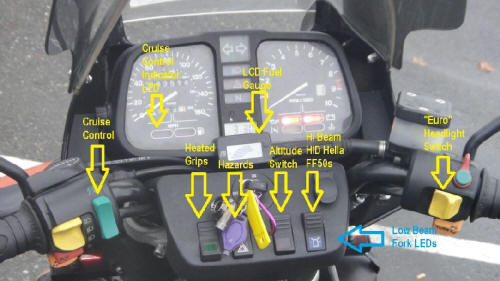
Controls & Instruments: "New" square dash pad with Powerlet socket. I LED backlit the two center switches to make them easier to find at night.
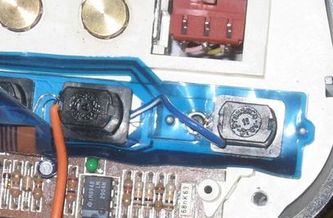
And I added a dash switch to replace the altitude plug. I installed a lower mile instrument cluster with all of the lighting in it replaced with LEDs. The digital clock is converted to a more US-friendly 12 hour clock. The usual 10% fast speedometer has been recalibrated to be more accurate.
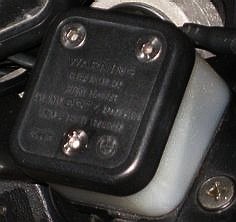
LCD Fuel Gauge: I also installed a backlit LCD fuel gauge. In addition to the fuel gauge it also has an LCD "WARNING" to hook up to the oil pressure switch. Since the K bike already has a warning for that I wired it up be a visual reminder of when the altitude switch is on.
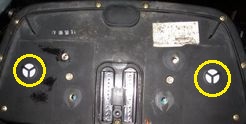
Vented Instrument Cluster Backplate: Installed a newer instrument cluster backplate that has vents in it to reduce condensation forming inside:
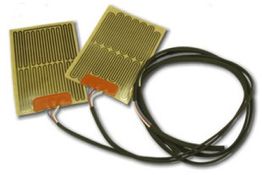
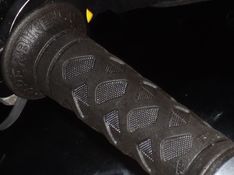
Heated Grips: I installed some Symtec heated grip elements and used my favorite ProGrip 699 gel grips.
Bar ends: Chromex ceramic coated bar ends.
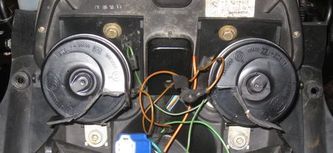
Fiamm 135 dB Horns: K75s came from the factory with wimpy little disc horns that belong on a scooter. I had to cut them down a bit to fit them inside of the C fairing but I installed a pair of the louder horns installed on RS/RT/LT bikes as well as BMW cars of the era.
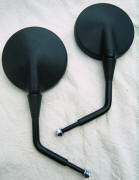
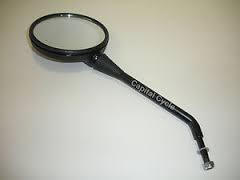
Taller, Wider Mirrors: To get a little better visibility in the rear I installed some taller and wider BMW mirrors.
Cruise Control: Rostra Electronic Cruise Control operated by a K1100LT windscreen switch. I wired up the extra indicator next to the low fuel indicator in the instrument cluster to illuminate when the cruise control is engaged. So that it wouldn't be too bright at night I installed an amber LED behind the red lens. The cruise control puts out a ground signal when engaged so I got the power for the indicator from the backlight socket next to it.
Rostra control unit in tail cowl.
Fabricated a bracket to hold the servo cable above the midpoint between the second and third throttle bodies.
How it's hooked up to the throttle.
Laminar Lip: I installed a Laminar Lip above the K75C windscreen to reduce wind buffeting.
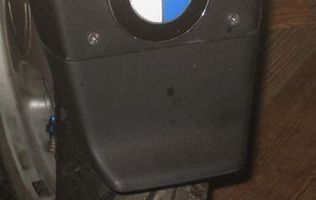
Front Roundel: I added this to the front center of the C Fairing:
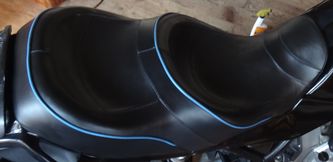
Corbin Seat: Leather Corbin Dual tour Seat in very good condition.
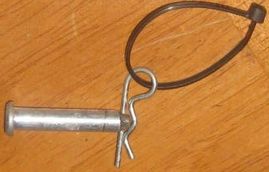
Rear Seat Hinge Pin: Installed with an easy to remove clevis pin. I just put my finger through the zip-tie and pull.
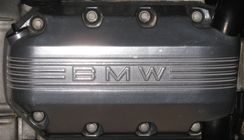
Engine Side Covers: I had the valve and crank case covers coated in Chromex ceramic coating. When installing them I replaced all of the gaskets and cover bolt bushings with new ones. And I polished the BMW on the spark plug cover.
Stainless Steel Hardware: I replaced all of the visible hardware with stainless steel. (Still need to do the oil sump and front covers.) Here's some examples. Stainless buttonheads for the alternator cover, a stainless fill plug for the transmission and the visible transmission bolts are stainless too.
Other: Of course I also replaced all of the fluids. The engine, transmission and final drive now all have fully synthetic oils in them with Guard Dog moly additive in the transmission and final drive. I also replaced a bunch of other minor stuff with nicer parts (like the clutch perch) along the way but it's not worth documenting minor things like that. |
||||||||||||||||||||
|
"Finished" I still have a few more final things I want to do to it (like add tank knee pads) but for the most part the project was complete. The Acid Test: I hadn't run or ridden it since I rode it around the block in October when it was delivered. By New Years it was about ready to go. In early January, I checked to make sure that the battery had ample charge (it did), turned the key and hit the starter button. Much to my dismay, it did not start. When I looked down, I noticed that there was fuel flowing onto the top of the cylinder head. It seems as though somehow I'd managed to nick the top o-ring on the #2 fuel injector. But, once I had that replaced, it fired right up and purred like a kitten. I let in warm up and sync'd the throttle bodies with my CarbTune. The First Ride: I was waiting for a dry sunny day but those can be rare in Seattle. On January 12, 2014, it was cloudy and the streets were ever-wet as usual but I geared up and took it for a spin to run some local errands anyhow. Everything worked as it should (even the cruise control) and I'm looking forward to keeping and riding this turbo'd K75. Since I was just running errands around town for a couple of hours so I didn't get much of a chance to "spin up" the turbo but I did run it up to about 6,000 RPM in second gear on a freeway onramp and it certainly wanted to go faster. I can't wait for a sunny day where I can get it out into the country and see what it's got. Pictures from the first ride are here. |
![]()
![]()


