|
Instruments/Controls |
|
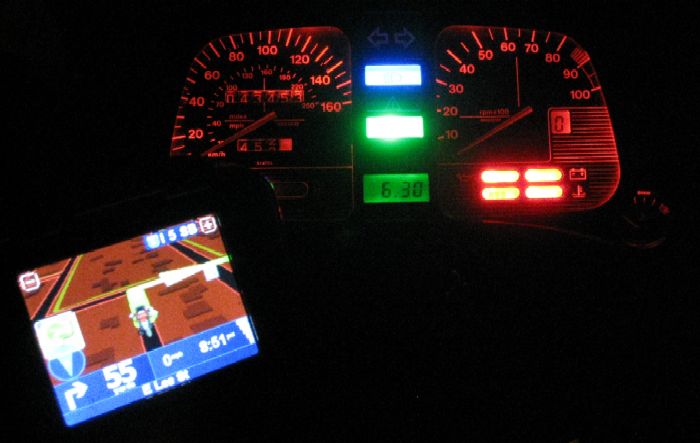
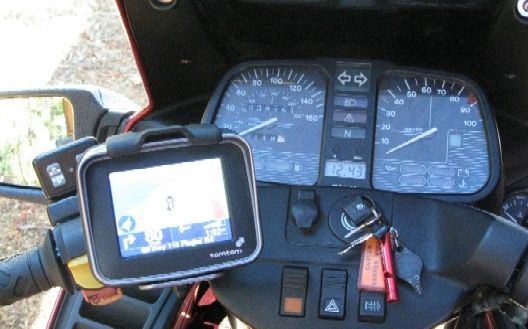
Instrument Cluster LEDs:
My first round of replacing the
instrument cluster and fuel and temperature gauge filament bulbs
with LEDs consisted of redoing the backlighting. I used red LEDs to
match the color of the bike. Since the LCD of the clock display is
not very visible with red backlighting I used green to backlight the
digital clock.
In late 2008, I did some more
experimenting and was able to replace every single warning lamp and the
turn signal indicators as well so now every bulb in the cluster is LED
illuminated.
Back to
index |
|
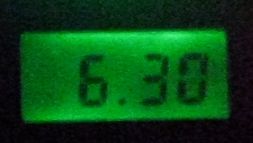
12 Hour
Clock:
From the factory the LCD digital
clock in the instrument cluster is in military or 24 hour time. Mine
has been modified to now read in 12 hour time.
Back to index |
|
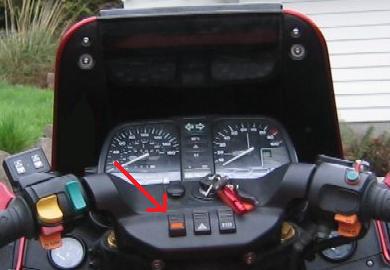
Sidestand Warning Light:
Since I don't like it, I disabled the
side stand cut-off switch so that I could run my bike on the sidestand.
I rewired the switch with a relay so that it illuminates the bulb monitor
lamp in the instrument cluster to warn me that the sidestand is down.
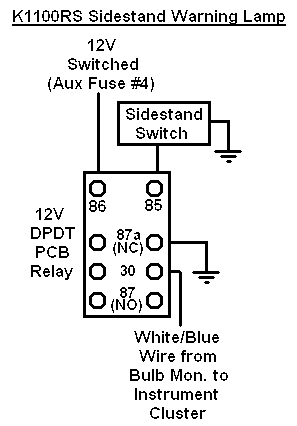
I put a 6 bulb very bright LED in the
warning lamp to make it extra obvious.
Back to
index |
|
Calibrated
Speedometer:
From the factory, BMW K bike
speedometers usually run about 10% high - so you have to do some math to
figure out how fast you're going. I calibrated my speedometer that
that it now only runs slightly fast. If the speedometer reads 70
then I'm actually going about 68 or 69 mph and staying the under 10mph
allowance most police will give you.
Back to index |
|
Real Cruise
Control:
On my K1100LT I figured out how to
install real cruise control (Audiovox CCS-100) and a K bike. One of
the first things I did to this bike was install cruise control on it as
well. For about $100, it's the best bang-for-your-buck mod there is. I
made a bracket, had it powder coated and mounted it on the clutch perch
where I can control the cruise control without taking my hand off of the
grip.
Back to
index |
|
Throttle
Friction Screw:
I picked up a local parts K1100RS on
eBay. It had a throttle friction screw on it (a.k.a. poor man's
motorcycle cruise control) which allows me to adjust the throttle friction
to relieve wrist stress. While real cruise control is better for the
most part, the throttle friction screw works better in traffic where minor
speed adjustments are often required.
Back to
index |
|
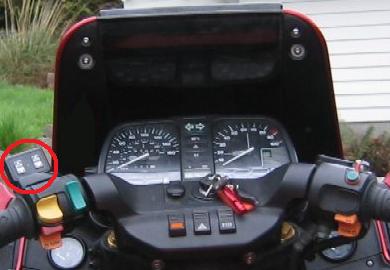
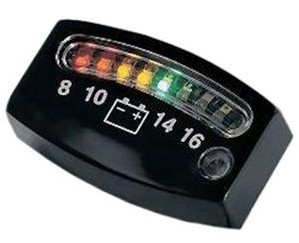
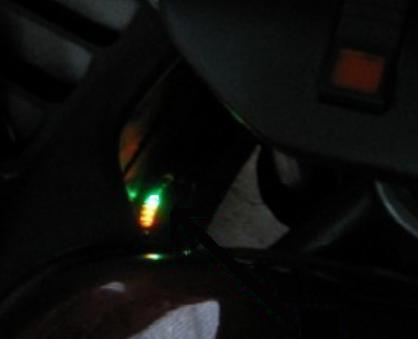
Kuryakyn LED
Voltmeter:
I have a Kuryakyn LED voltmeter
hidden in the fairing. This keeps it out of the way but it is
positioned so that it's visible to me while riding.
Back to
index |
|
Oil Filled
Thermometer:
Since I ride year round I like to
know what the temperature is so I know when there's a chance of ice
forming. I ordered this a while ago and it is still on backorder so I
have not installed it yet. Hopefully it will be here by summer.
Back to
index |
|
TomTom Rider
GPS:
I picked up a reconditioned TomTom
Rider GPS on eBay from Hong Kong for less than $100 shipped. I
figured that wasn't too much money to risk and my Magellan Meridian
Platinum was getting to be pretty old technology so I wanted something
with 3D mapping, a touch screen and newer maps and routing software.
I also purchased the TomTom handlebar mount and power cord as well.
Then I was able to download and hack some 2007 North America maps.
Unfortunately, out of the box the
TomTom rider does not store tracks. I like that feature because it
allows me to download the track after a ride and easily chart a map of
where I've been. Fortunately, I found some third party software
called Tripmaster that runs in the background and automatically stores
tracks on the SD card in the TomTom. The Tripmaster software also
has a feature which displays the altitude on the TomTom display every five
seconds.
The TomTom Rider also has several
features which allow for customization of it. I created my own "car
icon" which looks like my K1100RS from the rear:
I also
changed the startup and shutdown screens.
Startup screen:
Shutdown screen:
MENUS & DOCUMENT READER
For safety or
liability reasons, the TomTom Rider has an extremely limited four function menu
when the unit is mounted on a motorcycle and moving. I find this extremely
annoying. I was able to disable this "feature" and get full menus by
placing a small piece of electrical tape over one of the contacts on the back of
the unit.
The TomTom line of GPS units also has an SDK which allows you to customize the
menus. The software also includes a document reader but for some reason
that doesn't show up on the default menu. By composing my own menu I am
able to gain access to the document reader, reorganize the menus to my liking
and get rid of unwanted menu functions.
MOBILE WEB
The TomTom
document reader allows viewing of HTML and text files as well as several common
graphics file formats. I created a small web on the TomTom SD card and all
of the following can be accessed from the index page I created:
-
Pre-ride checklist
-
Numerous pages of diagnostic information
about the engine, fuel injection and ABS, etc....
-
A scanned in copy of the K1100 Owners
Manual
-
List of BMW dealers
-
Wiring diagrams for both of my K1100s
-
A page on tuning the Ohlins rear shock I
have on both bikes
-
E-texts of books and short stories to read
in my tent when I'm on the road
POINTS OF INTEREST
Like most modern GPS units the TomTom allows you to add your own POI categories
in addition to all of the preloaded POIs. Along with loading the POIs from
my prior GPS I loaded a list of BMW dealers and independent BMW shops in North
America.
I've also added several other POI categories for some of my favorite
restaurants, gas stations, retailers, post offices, etc.... from places like The
POI Factory and The GPS Data Team.
SHOP MANUALS
On the TomTom
Rider's SD card I have also loaded the BMW factory shop manual and the Clymer
manual for K bikes. Although they are in PDF format and not viewable on
the TomTom, it might be useful to have them with me someday.
Back to index |
|
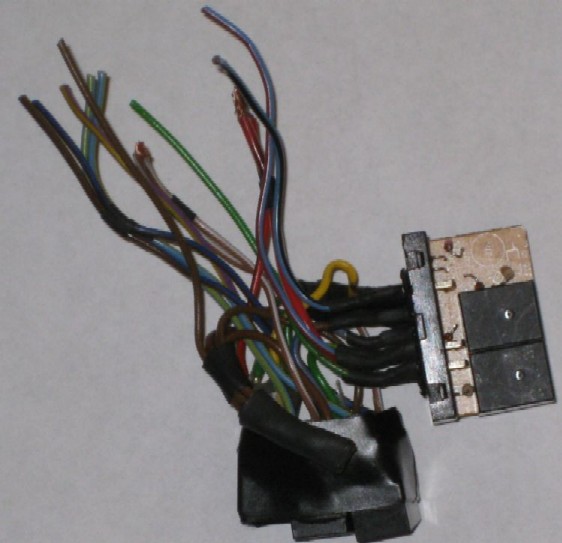
K1100LT
Left Switches:
I don't like add-on switches and like
to keep things as OEM looking as possible. The later K1100LTs had a
windscreen up/down switch built into the left-hand handle bar switches.
I swapped a set of those in to get two additional momentary switches. I wired
the upper button to the ABS system which freed up a slot in the dash pad
for another BMW switch. I wired the bottom button to trigger the 139
dB Stebel Nautilus Compact Air Horn that I added.
Back to
index |
|
Garage
Door Opener:
Since it's better in traffic than my
K1100LT, I usually use the K1100RS for city riding and running errands so
it's in and out of the garage a fair amount.
I modified the hazard lights switch so that the down position still turns
on the hazard lights but the top position activates a key chain garage door opener
remote control that I waterproofed and hid inside the fairing.
Back to
index |
|
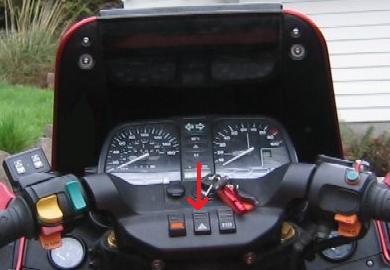
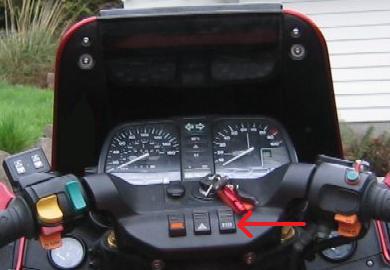
Fan Switch:
As described later on, I added a
circuit which allows me to manually run the fan at partial speed.
Since I didn't want to have an add-on switch, I rewired the low position
of the heated grips switch to activate that circuit. I figure I
won't have heat issues if I'm running the heated grips and won't need
heated grips if it's warm enough out to want to run the partial fan.
Back to
index |
|
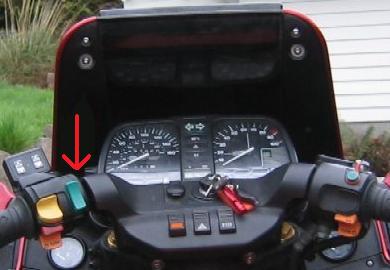
Fog/Driving Light Switch:
I use a 3 position rewired BMW
heated grip switch to operate my fog and driving lights. I replaced
the graphic switch insert with an orange one to differentiate it from the
real heated grip switch.
It's wired as follows:
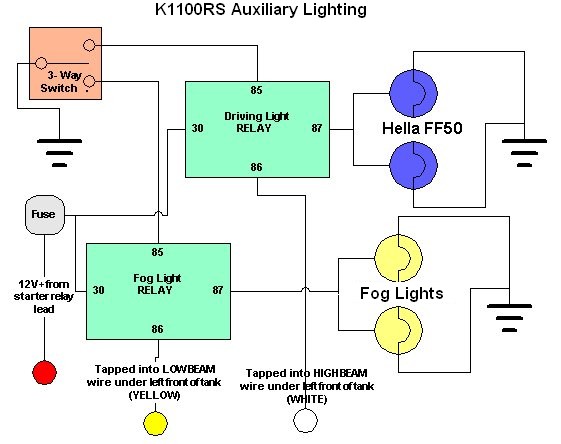
Wired like this the fog lights are
only on with the low beam and the driving lights are only on with the high
beam. When I flash my high beam during the day, this makes it so
that my fog lights go out simultaneously. This should make my
flashing the lights more obvious to others. Since the driving
lights only go on with the high beam, they are dimmed automatically when I
switch to the low beam so as not to blind oncoming traffic.
Back to
index |
|
Solid
Brake Lever:
My K1100RS came with an adjustable
brake lever. It felt mushy to me so I replaced it with an older,
non-adjustable brake lever which gives me a more solid feel when braking.

Back to
index |
|
Lighting |
|
Headlight Relays:
From the factory, the lighting on
these bikes is not that great. Some of this is due to the way the
low beam cuts off sharply at top. In addition, the wiring is pretty
thin. This results in less voltage getting to the headlight, making
it dimmer than it could be with full voltage. In addition, the
headlight power runs through the switch. Each time you switch the
lights a small spark is created. Over time this will gradually
deteriorate the switch until it finally fails. Adding relays lengthens the service
life of the switch since only a very small amount of current is required
to trigger the headlight relays.
I also upgraded the wiring to 14
gauge. This not only increases the voltage that gets to the
headlight but also allows me to run a higher wattage bulb without fear of
burring up the wiring.
Back to index |
|
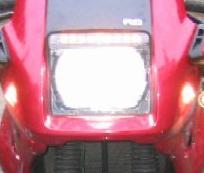
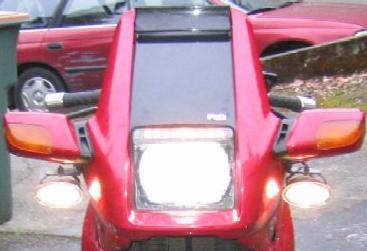
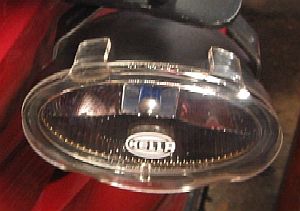
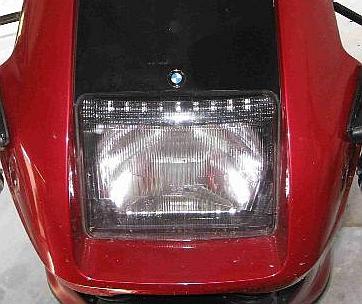
90/100W Xenon Headlight Bulb:
From the factory the bike had a
halogen 55/60 watt bulb. Though great in their time, halogen lights
are rather old technology these days. I upgraded to a Xenon 90/100
watt H4 and, with the headlight relays, the lighting is vastly improved.
It's not Hid but it's close. It also makes the headlight more
visible during the day.
Back to index |
|
Parking Light LED Bar:
In my never-ending LED pursuit, I removed the stock 10W parking light bulb at the top of the
headlight assembly and replaced it with a bar of 18 amber LEDs.
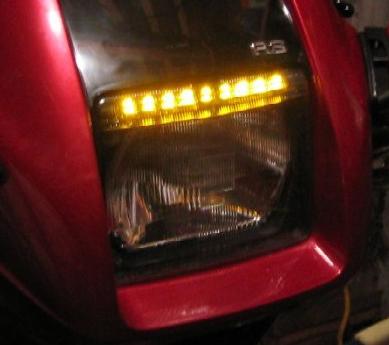
Back to
index |
|
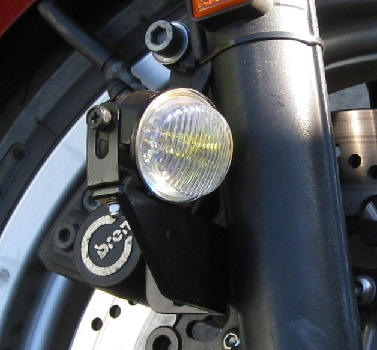
Caliper Mounted Fog/Daytime Lights:
I like to make my bikes as visible as
possible during the day to reduce the risk of other motorists not seeing
me, a common occurrence when riding. For day time
conspicuity, I run pair of yellow 55W wide beam fog lights during daylight
hours. (They also work great as fog lights but that's not why I
added them.)
I wanted them mounted down low to
form a triangle so I made my own caliper mounts from some
aluminum angle brackets I purchased on eBay.
What the brackets looked like when I
got them:
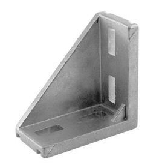
Here's what they looked like as I
modified them to meet my needs:
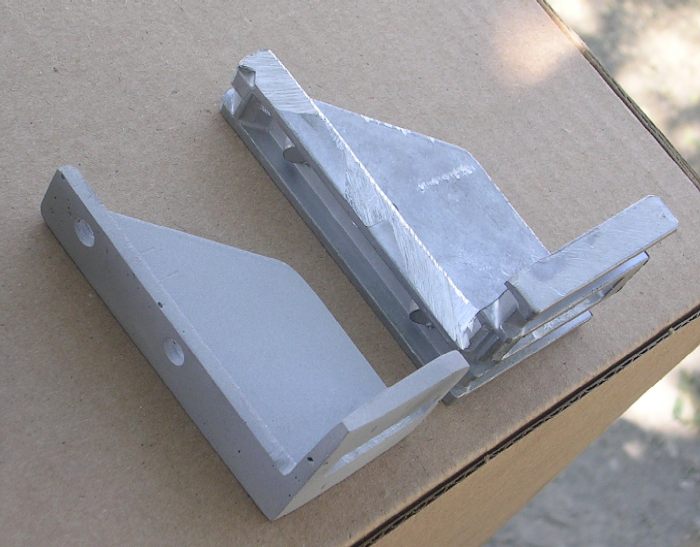
Then I had them powder coated in
black, mounted the fog lights and installed them on my bike:
Here's what they look like on the
road:
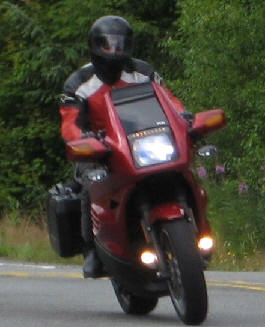
Having them on during the day makes a
noticeable difference in reducing the number of car drivers that don't see
me and also makes lanesplitting easier when I'm riding in California.
Back to
index |
|
Mirror Mounted Hella FF50 Driving Lights:
Although my 100 watt Xenon high beam
puts out quite a bit of light, I added driving lights to give me a wider
field of vision when riding at night and to help me spot critters like
deer.
Given their reputation, I bought some
Hella FF50 Driving Lights on eBay for about $40 shipped and mounted them
on brackets under the mirrors. They came with halogen bulbs which I
upgraded to Xenon bulbs which give off much more light that is whiter.
An added benefit of adding the mirror
brackets and 1/8" think rubber underneath them to protect the fairing
paint is that it pushed the mirrors out about another 1/3" which improves
the field of vision in the mirrors so I'm not just looking at me
elbows.
I also added some clear Hella Lexan covers to
protect them from rocks and gravel.
Back to
index |
|
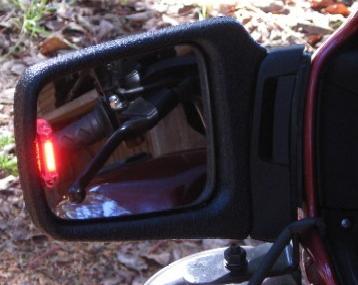
Turn Signal LEDs on Mirrors:
Since I ride hits bike a fair amount
in the city, I wanted to improve turn signal visibility. I added
some really bright LEDs from Radiantz to my mirrors and wired them into my
turn signal wiring. This makes my turn signals more obvious to
others from the side and rear when city riding.
Back to
index |
|
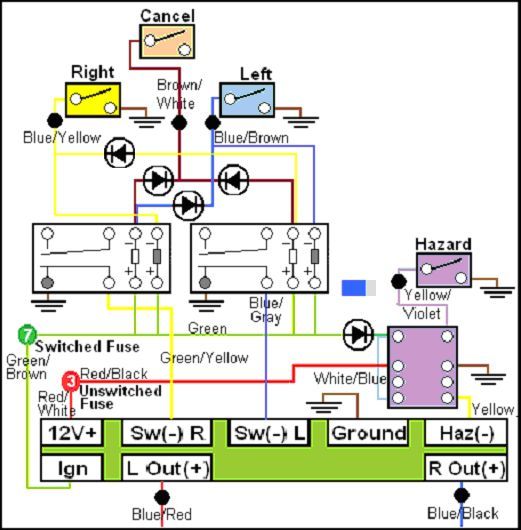
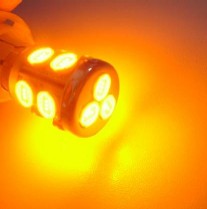
LED Turn Signals:
Ever since I had my old K75RT, I'd
wanted to find a way to convert the turn signals to LEDs. The big
problem is that swapping in LED bulbs for the filament bulb makes the
flasher relay think one or more of the bulbs is out and it will
"hyperflash." This can be overcome by adding load resistors but that
seemed sort of kludgy to me so I decided to see if I could find a way to
overcome the hyperflash issue without using load resistors.
There are lots of LED flasher relays
out there but I wasn't able to find one that would accommodate the
momentary handlebar switches that BMW uses for the turn signal and cancel
switches. So I had to take an LED flasher relay and add some
latching relays and diodes on the front end to deal with the BMW momentary
switches. As I started to solder my new relay circuit together I quickly
realized that with care I could build a circuit small enough to fit into
factory flasher relay and have "plug-n-play" solution. When I was
finished building the LED flasher relay circuit, I gutted on old
non-working flasher relay and soldered my circuit to the pins.
Not only does my flasher relay
emulate the BMW relay without hyperflashing but it also emulates how the
hazard lights work. Namely that the hazards can only be turned on
when the bike is turned on with the key but will remain on when the bike
is turned off. But they cannot be turned on without the key.
This keeps people from turning on your flashers and running down your
battery when you're not around.
Here's a wiring diagram of the
circuit I designed:
Here's the finished product before I
soldered it into the BMW OEM flasher relay housing:
High power 13 watt 1156 SMD LED bulbs
that I'm running now with my home-made flasher relay:
Back to
index |
|
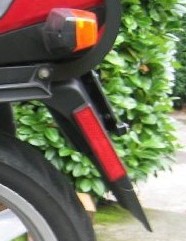
K75 Rear Reflectors:
The stock rear side reflectors on the 4
valve K bikes are kind of small and are held on by double-sided tape.
The K75 rear reflectors are taller and are screwed on so they're better
and won't eventually fall off.
Back to
index |
|
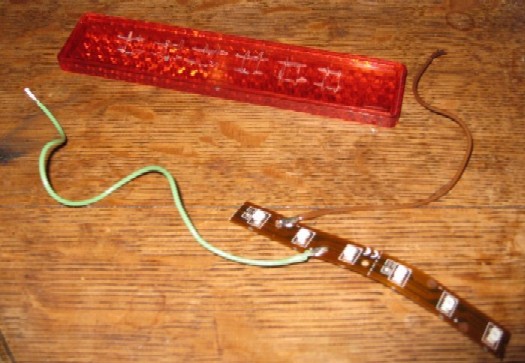
LED Running Light Reflectors/Turn Signals:
In another fit of LED obsession, I
added LED backlighting to the front and rear side reflectors. I used some
LEDs on film, cut some holes in the back of the reflectors and glued them back
into the bases.
Here's how my bike looks at night
with LED running lights in the side reflectors:
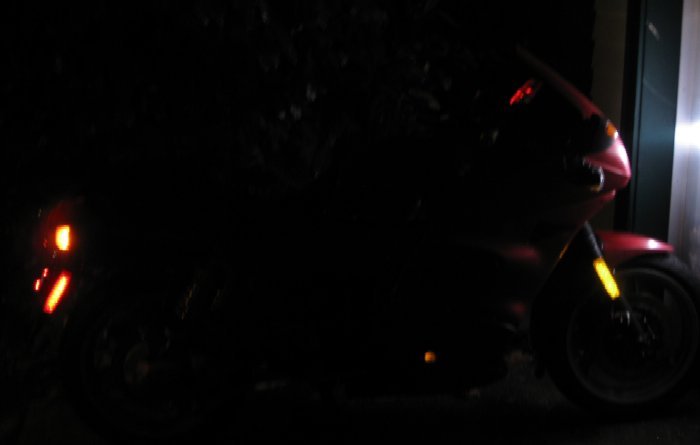
Of course that wasn't good enough so
I also added some micro relays so that they now turn off when the turn
signals turn on. They now alternate with the regular turn signals
turning them into LED side turn signals as well as running lights.
Back to
index |
|
LED Tail Light:
I wanted to run an LED tail light.
However, the bike has a bulb monitoring unit that lights up a warning
light if your tail light or brake light goes out. I removed the bulb
monitoring unit and shorted some wires across it's wiring harness
connectors to remove it. Now I can run an LED tail light without the
warning light coming on in the instrument cluster.
I would run an LED brake light too
but the cruise control runs a small reverse current through the brake
light bulb to make sure the brake circuitry is working. Therefore,
if I used an LED brake light bulb then the cruise control wouldn't work.
Back to
index |
|
Lite-Blazer LED Brake Light:
I bought this used on eBay for about
$10 just to see how well it worked. When my brother was learning to
ride I put it on his bike to see what it looked like from behind. It
works as both superbright LED rear running lights as well as a flashing
LED brake light. It also works great for getting tailgaters to back
off. I think it's an excellent product.
Back to
index |
|
More LED Brake Lighting:
I also added banks of LEDs in the
outer compartments of the tail light lens to provide even more brake light
visibility.
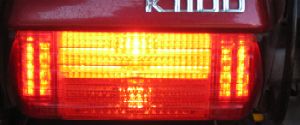
In real life the side LEDs fill out
the lenses better but my camera doesn't pick up the LEDs too well.
Back to index |
|
Oil Sight Glass LED:
The oil sight glass on a K1100RS is
hidden in the fairing where it's dark and difficult to see. I added
an amber LED above the oil sight window so I could quickly and easily
check the oil level without needing a flashlight. It turns on when I
turn the ignition on.
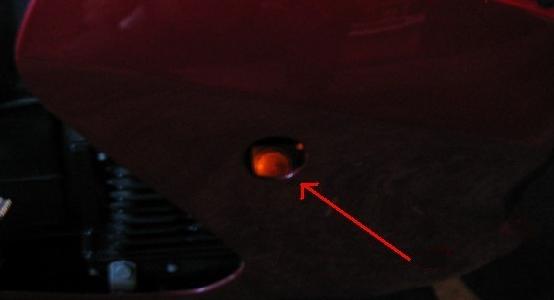
Back to
index |
|
Electrical |
|
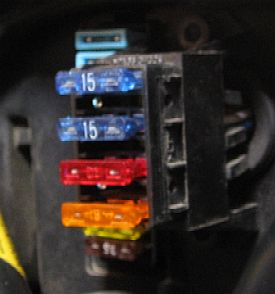
Auxiliary Fuse Block:
When I got this bike, I knew I'd be
adding quite a few electrical items to it so one of the first things I did
was add an auxiliary 4 circuit fuse block. I used this one because
it conveniently fits next to the factory fuse block.
Back to
index |
|
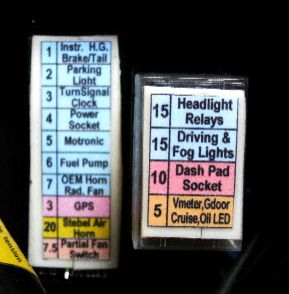
Added Three Fuses to Factory Fuse Block:
Well, adding four circuits ended up
not being enough for all the electrics I added to this bike. The
K1100LT bikes have one empty fuse slot and this bike, the K1100RS, has
three empty fuse slots. By salvaging the terminals from the wiring
harness of another 4 valve K bike I was able to add three more fuses to
the bottom of the factory fuse block.
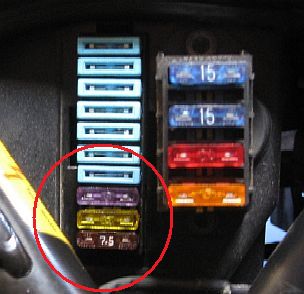
I also made some laminated labels for
both fuse blocks to identify the fuses.
Back to
index |
|
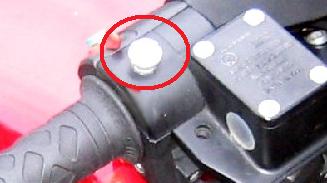
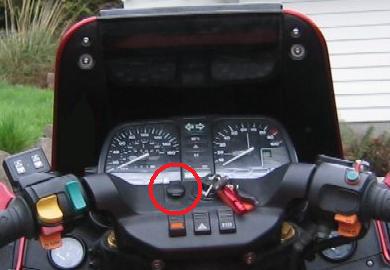
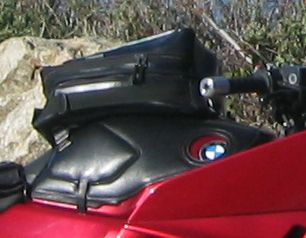
Powerlet Socket in Dash:
I knew that eventually I'd be wanting
to electrify the tank bag on this bike so I added a Powerlet socket
to the dash pad.
Back to
index |
|
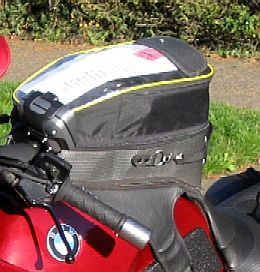
Electrified Tank Bag:
I wanted to electrify my tank bag in
order to allow me to charge my phone on the road as well as being able to
run a radar detector in my tank bag. I used an RV roof connector
which accepts standard two lead SAE connectors and has a waterproof cover
for when it's not in use.

For the mounting inside the tank bag, I found a stainless steel washer with
the right inner and outer dimensions at the hardware store. The
diameter of the connector and the washer were too large so I had to trim
them down prior to installation.
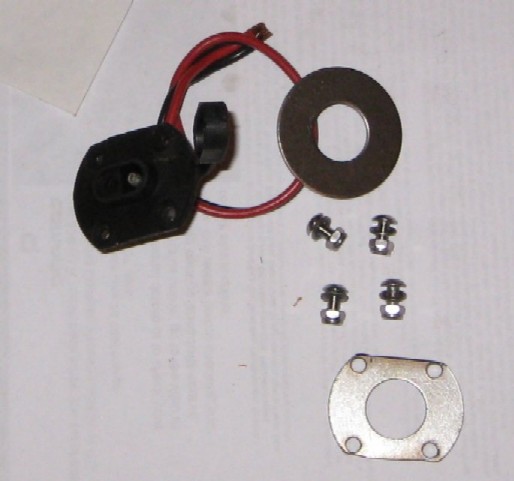
Then I made a short cable with a
Powerlet plug to plug into the added Powerlet socket on the dash pad and
an SEA two lead connector on the other end to plug into the tank bag
socket. I made the cable long enough so that it can still be used
when the rain cover is on the tank bag.
Back to
index |
|
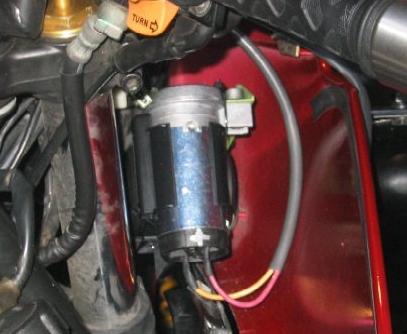
Partial Speed Fan:
One of the issues with these bikes it
that they put off a lot of heat to the thighs in hot weather. In
order
to help manage the heat a bit better, I added a circuit with a load
resistor and switch that allows me to turn on the fan at about 60-70%
speed. This helps keep the cooling system cooler and reduces the
heat output to the legs when riding in hot weather. I wired it into
one of the switches on the dash pad as described above.
Back to index |
|
Disabled Side Stand Cutout:
From the factory the K1100RS comes
with a sidestand cut-off switch so that the bike won't run with the side
stand down. I never liked this safety feature so I shorted the
connector to the fuel injection computer so the bike now runs on the side
stand. As noted above, I also wired a relay to the switch to light
up a warning light in the instrument cluster if the side stand is down.
Back to
index |
|
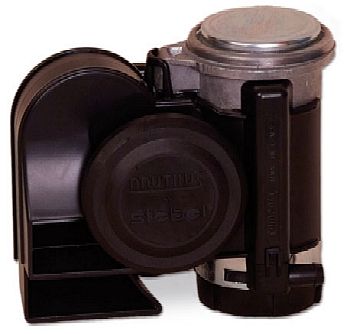
Stebel Nautilus Air Horn:
The stock horns on K1100s are pretty
darned loud and are the same Fiamm horns that were used in BMW cars of the
era but I wanted something even better so I removed the low tone horn from
the fairing and replaced it with a 139dB Stebel Nautilus Compact Air Horn.
I wired it up to a K1100LT windscreen switch as described above in the
Instruments/Controls section.
The factory high tone horn still
works using the factory horn button so I now have both a "polite" horn and
the Stebel Nautilus as a "get the heck out of my way" horn.
Back to
index |
|
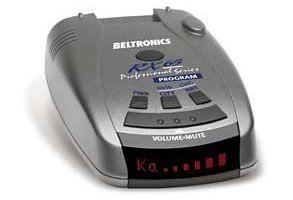
Radar Detector:
I have a Beltronics RX-65 Radar
Detector that works quite well and does a good job when mounted in the map
pouch on the top of my tank bag. I wired my tank bag electrification
to power the radar detector when the bike is running. I put a map
over the radar detector in the map pocket and you can't even tell it's
there.
I also built a wiring harness which
routes the earphone jack from the radar detector to one side of my earbuds
and the output from my MP3 player to the other earbud.
Back to
index |
|
Suspension/Steering |
|
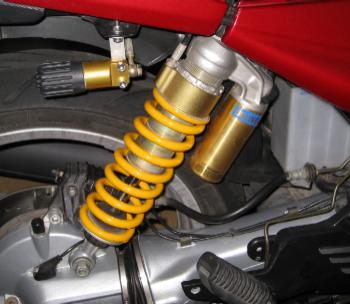
Ohlins Rear Shock:
I saw this Ohlins rear shock with
rebound and compression damping on eBay for a decent Buy It Now price six
months before I even bought the bike. I knew it was easily worth the
price and I could resell if need be. Well, as luck would have it, I
bought this bike six months later and it was one of the first things I
installed.
Back to index |
|
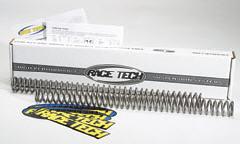
Fork Springs:
I had a K100RS4V that had upgraded
forks with Race Tech fork springs. Before I sold it I removed the
forks and replaced them with stock forks, planning to put them on my
K1100LT when I eventually needed to replace the fork seals. Then I
bought this bike before the LT fork seals started to leak so I put the
upgraded forks on
this bike instead.
Back to index |
|
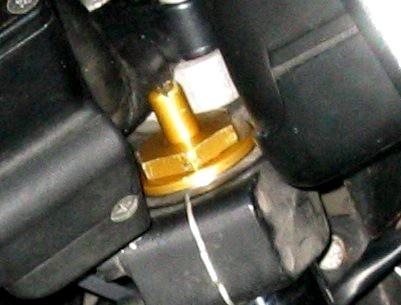
Adjustable Fork Spring Preload:
The forks I took off of my K100RS4V
before selling it also had some nifty fork caps on them which allow me to
adjust the fork spring preload with the turn of a screwdriver. It
makes tuning the suspension very easy.
Back to
index |
|
Fork Boots:
When I swapped in the upgraded forks I
took the opportunity to install fork boots to protect the upper forks.
Back to
index |
|
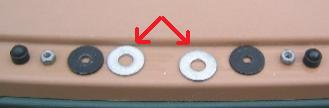
Stiffened Steering:
From the factory K1100s come with the
handlebar clamps mounted in rubber bushings to reduce the vibration
transferred to the handlebars. This is OK I guess but it makes the
steering a bit mushy. I added some washers at the bases of the
bushings which stiffened up the handlebar mounts so that they're virtually rock solid now. The steering input is greatly improved and there
isn't any discernable increase in vibration that I can tell. But
I've never had a vibration issue on this bike anyhow.

Back to
index |
|
Steering Damper:
As a legacy from the K100RS4V, the
K1100RS has mounting points a for a steering dampener but for some reason
BMW did not install them on the K1100RS. I bought one in good used
condition on eBay and installed it.
Back to
index |
|
Stainless Bar End Weights:
I added MANIC Salamander stainless
steel bar end
weights to the bike. They weigh almost 19 ounces a piece.
I did it for show but it's also probably part of the reason that I don't
have handlebar vibration issues after firming up the handlebar mounts.
Back to
index |
|
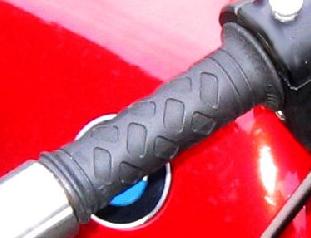
ProGrip Gel Grips:
My first experience with ProGrip
Model 699 gel grips was that they were on my K75 when I purchased it.
I always liked them and, when tooling around at slow speeds in National
Parks at low speeds, found them to be quite comfortable even without
gloves. They are much better than the ribbed hard rubber BMW OEM
grips, seem to transfer heat from the heated grips just as well and are
one of the first things I put on any K bike I own.
Back to
index |
|
Seats |
|
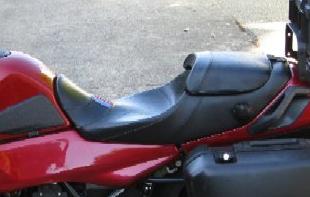
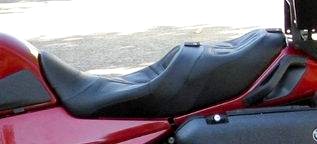
Corbin Rumble:
I use this seat for local riding.
It looks like the Corbin
Gunfighter seat but the rear portion can be folded up and serves as a
backrest for 2-up riding.
I like the looks of it too.
Back to
index |
|
Corbin Carbon Fiber Canyon Dual Sport:
I use this seat for long distance
touring. I like the Corbin Rumble seat but this seat is a tad more
comfortable for 12+ hour riding days and the passenger seat has a better
shape for strapping on my camping gear bag.
Back to
index |
|
Exhaust |
|
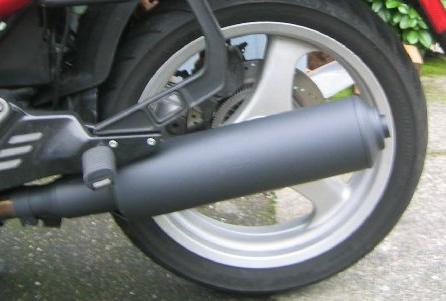
Ceramic Coated Staintune Exhaust:
The factory exhaust on K1100s looks
nice but has a few issues. To start with, the headers are welded to
the exhaust can. This makes it cumbersome to remove and reinstall.
The welds at the collector also have a tendency to crack and be difficult
to repair. Finally, the K1100s were the first bikes to have
catalytic converts. This makes the exhaust heavier and even more
cumbersome to deal with during maintenance.
I picked up this Staintune exhaust on
eBay. I got it with the headers for a very low price because I was
the only bidder. It had lots of surface rust and looked like junk.
For $50, I had it ceramic coated in flat black and I'm very happy with it.
It works great, is about as quiet as the stock exhaust and, being black,
doesn't show the tar spots that silver exhausts do. Since it's ceramic
coated, I use wheel cleaner on it so it's very easy to clean. I call
it The Black Mambo.
Back to
index |
|
Appearance |
|
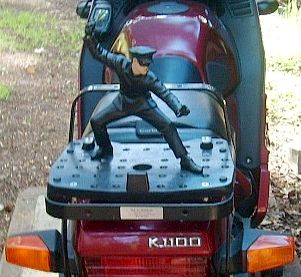
Kato
Action Figure:
This is my Kato action figure (played by Bruce Lee
in The Green Hornet TV show in the 60s) that I
usually have mounted on the rear of my K1100RS. I get tons of
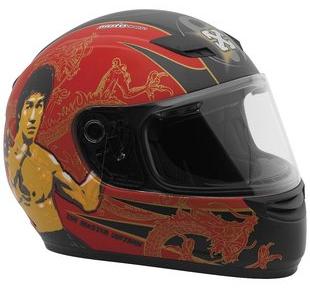
compliments on it. I also found a nice red SparX helmet called "The
Master" that has Bruce Lee graphics on it.
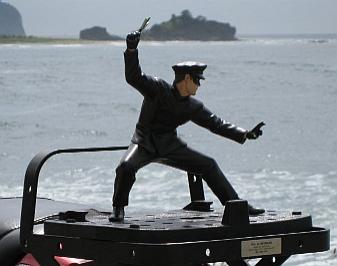
Now you know why this bike is named
Kato. (To be honest, I usually refer to the bike as "my RS" or "the red
bike" since I'm not really that much into naming vehicles other then
boats.)
Back to index |
|
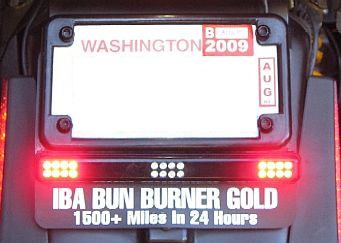
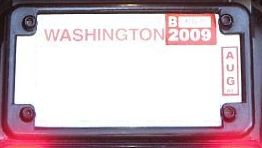
License Plate Frame:
This bike didn't even have a license
plate frame on it when I bought it. I added a simple metal black
license plate frame. (And also my Iron Butt Bun Burner Gold license
plate back.)
Back to index |
|
DGzRS Metal/Enamel Badge on Rear:
A friend of mine used to sell these
on eBay. It's a high quality metal and enamel badge. The
Deutsche Gesellschaft zur Rettung Schiffbrüchiger is a Coast
Guard-like organization founded in the 1800s and is one of the most
advanced originations of it's type in the world. It is funded solely
by donations.
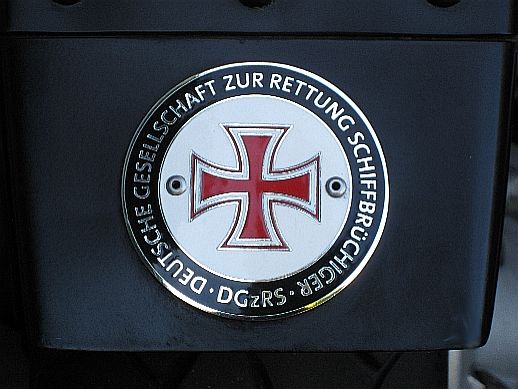
But the
reason I have it on my bike it that I think the red Iron Cross with German
letting looks great on a red BMW.
Back to index
|
|
Upgraded Tank BMW Roundels:
The stock tank BMW roundels are flat
and printed on aluminum. When one of mine started to show some wear
(I think from the Bagster tank bag rubbing it) I started looking for other
alternatives. These are nice heavy metal and are 3-D. The
outer perimeter is raised and the roundel is very slightly convex.
In my opinion, they look much nicer. They are used on BMW cars and later
BMW motorcycles. I had to grind the mounting posts off of the back in
order to put them on my tank but that was pretty easy.
Back to
index |
|
Added Front BMW Roundel:
The RS lettering on the bottom of the
windscreen is a hassle to clean around so I got rid of it and mounted a
small acrylic BMW roundel with gold accents roundel to the front of the bike.
Back to
index |
|
System Case Roundels:
When I redid my system cases I
decided to modify the roundels from blue and white to red and white to
match the bike.
Back to index |
|
Coil Cover Plate:
From the factory the two ignition
coils are exposed and, in my opinion, ugly. I fashioned a cover
plate out of aluminum and had it powder coated.
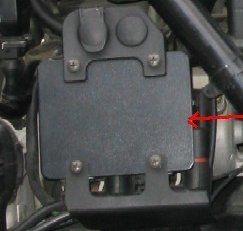
Back to
index |
|
Tail Cowl Protectors:
These protective tail cowl inserts
came on K75s and K100s during the 80s. They protect the paint under
the passenger grab handles. For some reason (cost cutting?) they
stopped including them on later K bikes. I added these as part of my
effort to give this bike a black and red theme.

Back to index |
|
Perforated Stainless Steel Side Vents:
For a K75S I restored, I made
perforated stainless steel radiator and belly pan screens. I had
some perforated stainless left over so I made these for my K1100RS.
They look much nicer then the old holes into the engine compartment.
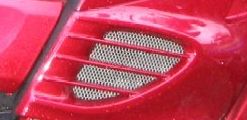
Back to
index |
|
Machined Aluminum Oil Filler:
I replaced the plastic OEM factory oil filler
cap with a machined aluminum one.

Back to index |
|
Stainless Steel Hardware:
I've replaced just about all of the
visible hardware on this bike with stainless steel hardware. You can
buy kits on eBay to do this but I went to a local screw company and did it
myself.
Back to index |
|
Stainless Front Rotor Bolts:
The bolts that hold the front brake
rotors and ABS ring on are rather dingy looking. I wanted to replace
them with stainless bolts. For the rotor bolts I did not want to
sacrifice strength so I decided it would be best to get Grade A4 stainless
steel. Being metric, I could not find any in the US so I ended
up getting them from an eBay seller in the UK. For the ABS ring, I
used normal Grade A2 stainless steel since strength is not an issue there.
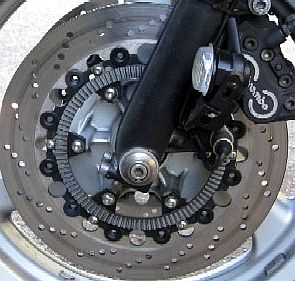
Back to
index |
|
Black Final Drive:
This bike came with a silver final
drive. It looks nice and all but it's higher maintenance to clean
and I want to make this bike black and red. I'll be doing a spline
lube soon and will be swapping in a black swing arm and final drive that I
have in the basement. This should be the last mod to this bike.
Back to index |
|
Line-X Truck Bed Liner Coating |
|
Introduction:
Though fairly low mileage when I got
it, this bike had some typical cosmetic issues when I bought it.
Scratches on the outsides of the mirrors, some belly pan wear behind the
front tire and the usual minor scuffs from use on the system cases. I
chose to get some things done in Line-X truck bed liner as it has a great
reputation and is incredibly durable with a lifetime guarantee. And
it didn't cost that much either since I did all of the prep work and
taping before taking the parts in.
It's tough stuff so I'll no longer
get minor scuffs on the hard cases and the belly pan and mirrors won't get
nicked up. It's also kind of shiny so it has a nice appearance.
Back to index |
|
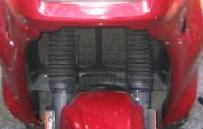
Belly
Pan:
When I got this bike the center of
the belly pan had the usual gravel dings and the paint behind the front
wheel looked like someone had ridden through a puddle of battery acid.
I debated getting just a wide stripe of Line-X down the center of the belly pan but
in the end decided to give the whole bike a black and red "ruggedized"
look. To my surprise, the final product has a nice shininess to it
and I think it came out quite well.
Front Fender:
Like the belly pan, the lower part of
the rear half of the front fender had some paint damage that I wanted to
cover up. I had the lower part of it done in Line-X and tried to
match the line of where the belly pan meets the main fairing on the sides.
Mirror Housings:
The RS mirror housings had typical
scrapes on their outer edges from falling off or scraping the garage wall
or whatever. In my opinion, the bike looks a little better with the
Mystic Red mirrors so instead of having them redone, I picked up some
spares on eBay and had them done in Line-X. I still have the original
mirrors in case I change my mind and want to put them back on. At
least now they are scratchproof.
Knee Pads:
To make everything black blend in
better I also had the tank knee pads done.
Gas Cap:
The finish on K bike gas caps is very
hard to keep looking nice. With the added thickness of the Line-X
coating, I wasn't sure if the gas cap would work with Line-X. I had
an old beat up looking gas cap so I included that in the lot of parts I
took in for coating. It came out better than expected and I'm happy
with the results.
Tail Cowl Grab Handles:
The way I strap my camping gear on
through the grab handles, they tend to get a little paint wear. They
are easy to remove so I had them done in Line-X too.
System Cases:
From normal use, system cases
inevitably get minor marks in them and boots scuffs on the top corner of the
right one from mounting the bike. It was a fair amount of work to
prep these and reassemble them but now they're "bulletproof" and I don't
have to worry about them.
33 Liter BMW Top Case:
I mount this top case for long
distance touring because it has lots of room. This was pretty easy
to do in Line-X and it matches the system cases.
Back to index |
|
Luggage |
|
BMW
Multivario Tank Bag:
I used to like the Bagster tank bag
but my preference has turned back to the BMW Multivario tank beg.
It has two level storage compartment, is expendable with a third center
section and has a map window on the top. It also has a detachable yellow
rain cover. The map window is rather narrow given the shape of the tank
bag but with the advent of GPS that drawback is more or less moot these
days. It's good for holding my radar detector too.
Back to index |
|
Bagster Tank Bag:
This came with my K1100LT. The
nice thing about this tank bag is that the base is a full tank bra which
protects the tank and that the rain cover is built into on the bottom of
the front. But the rain cover is all black so you can't see the map
window when the rain cover is on. It's also easier to get on and off
during fillups so it's still a good tank bag. But these days I
prefer the BMW one.
Back to index |
|
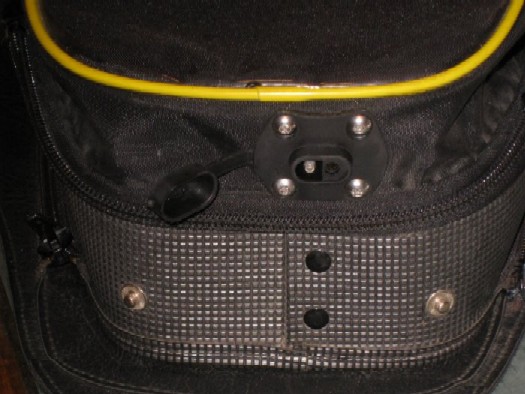
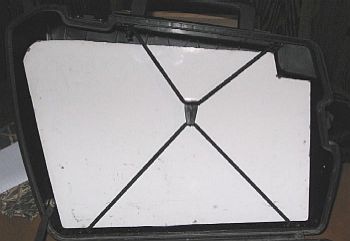
System Case Mods:
Early on in my K bike career there
were two things that routinely irritated me. First, when you open
the system cases when they are on the bike, the contents of the inner half
can fall out past the elastic "X" that's supposed to hold things in there.
One day I had an inspiration and built some
retainer panels
to hold the contents in when the cases are opened while on the bike.
I used white board left over from a home message board project. I
might make some new ones out of ABS or aluminum someday but these have
worked fine for years.
The other issue is that the elastic
inside the cases is pretty wimpy and gives out after a fair amount if use.
I've replaced the factory elastic with 1/4"
bungee cord
which is stronger and will outlast the BMW elastic by a country mile.
It would cost $45 to replace the elastic with OEM parts. For $4 I
can get better results. It's a no-brainer.
Back to
index |
|
Reynolds Rack:
There are several options for
mounting top cases on the rear of a K bike. I prefer the Reynolds
Rack. It has a level mounting surface and does not require drilling
holes in the tail cowl like the factory tail rack does. You can also
remove it to show off the nice looking tail cowl on K bikes. Not only does
the level mounting surface allow you to choose from a variety of
aftermarket top cases but it's also a good place to put my beer when
working on the bike. Best of all it's good for mounting my Kato
action figure.
I also have a backrest for it that
can be bolted on.
Back to index |
|
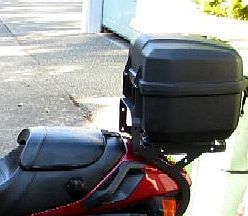
Small Top Case:
This is a small inexpensive EMGO
locking top case that's just large enough for a full faced helmet.
It's good for running around town when you don't want to have to carry
your helmet with you. It mounts on and off in a few seconds on the
same plate pictured above.
Back to
index |
|
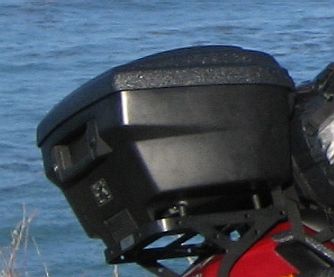
33 Liter BMW Top Case:
This is a BMW 33 Liter top case that
I picked up on eBay for about $50. Some had mutilated the K1100LT
mounting base in order or mount it on another bike so nobody else bid on
it. Since I have a Reynolds Rack and was going to figure out my own
mounting system anyhow, that was not an issue to me.
For a few
dollars at the hardware store for some bolts and spacers, I developed a
way to mount it to the Reynolds Rack. It takes a couple minutes to
install/uninstall it given the bolts so it won't pop on and off like other
top cases but I have a liner bag fits it almost perfectly so that's not an
issue to me. I also rekeyed the lock core to work with my ignition
key.
And the Reynolds Rack is much sturdier than the plastic BMW mounting rack.
Back to
index |
|
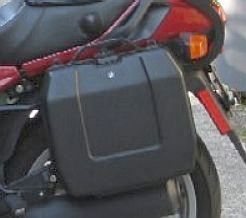
City Cases:
These are my BMW city cases. They
don't hold as much as system cases but are top loading and give the rear
of the bike a narrower profile for slipping through traffic.
Back to
index |
|
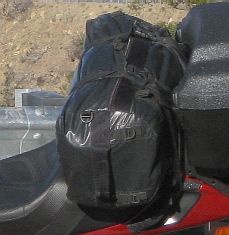
Waterproof Duffle:
I have a waterproof bag made by
Pangea that just fits all of my camping gear and the tarp I use to cover
my bike at night when touring and is easily strapped down on the rear seat. I
originally purchased it several years ago to use when fishing but it's
worked out great on my bikes and been all around the US and Canada with
me.
Back to index |
|
Miscellaneous |
|
Insulating Blanket:
One of the issues with the K1100RS is
the amount of heat put off near the knees. A friend of mine
experimented with insulating the under of the tank and sided of the engine
compartment with foil backed bubble insulation. It certainly helps.
Back to index |
|
Insulated Fuel System:
Another issue in the heat department
is that the return fuel line is located right behind the radiator which
heats the gas and ends up making the gas tank warmer. For a while in
the 90s BMW insulated some of the fuel lines. Since that is still
available as a separate part, I ordered several sections of it and
insulated all of the fuel lines and the fuel rail. My gas tank stays
a little cooler now.
Back to index |
|
Fuel Tank Drain Cup:
There are two outlet pipes under the
right rear of the gas tank. Typically these are routed by hoses to
drain behind right rear foot peg. If the gas tank is not installed
properly these can get kinked and not operate as designed. On some
of the earlier K bikes, BMW installed a square cup underneath them to
catch the gas and drain it out through one hose behind the right peg
plate. I've gotten rid of the hoses and replaced them with one of
those cups. This makes gas tank removal and installation much easier
and since it doesn't get moved around the drain hose will not get kinked.
Back to
index |
|
Mirror Leashes:
The RS mirrors are held on by three
clips. If the mirror is bumped then it will fall of and hit the ground,
usually at least scratching the paint and sometimes breaking the mirror
glass or turn signal lens. If it happens in traffic then chances are
you might not ever see your mirror again. In order to prevent this, I used
some steel cable fishing leaders to make "leashes" for the mirrors so if
knocked off they merely fall a few inches and hang from the side of the
bike.
Back to index |
|
Front Fender Extender:
For some reason BMW never made a font
fender extender for the K1100s. However, there was a Canadian
company that made them for a while. I salvaged this one from my
parts K1100RS.
Back to
index |
|
Side
Stand Extension:
In the stock setup, K bikes have
always leaned quite a bit when put on the kickstand. I cured this by
bolting a piece of hockey puck onto the bottom of the side stand. The
bike sits at a much more "normal" lean when on the sidestand now.
Back to
index |
|
Gear |
|
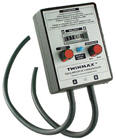
Twin-Max:
This is my favorite tool. I use
it too synch the throttlebodies whenever I have the fairing side panel off
or change the spark plugs. It keeps the throttlebody airflow
balanced resulting in a smoother running bike.
Back to
index |
|
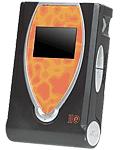
MP3 Player and Earbuds:
I like to listen to music when I
ride. Instead of spending tons of money on an Ipod or similar, I
picked up this NEX IIE MP3 player on eBay for about $15 shipped. The
music is stored on easily swapped Compact Flash cards and it lasts 12+
hours on a pair of AA batteries so I never have to worry about powering or
charging it. (Costco batteries are cheap.) The controls are easy to operate even with thick
insulated winter gloves on.
I clip it to
my belt and use JVC
"Marshmallow" earbuds to listen to music when I'm riding. They block
out ambient noise to protect my hearing while riding and provide very
respectable sound quality. And they only cost about $17/pair.

Back to index |
|
Heated Jacket Liner:
After riding around getting cold for
a few years, I finally broke down and bought a used Aerostich heated
fleece vest. It worked great but my arms would get chilly so when
Tourmaster recently came out with their Synergy line of affordable heated
gear I decided to buy a heated jacket liner. With an 10% off eBay coupon I was
able to get it new for about $120 on eBay. I put a Powerlet plug on
the power cord to plug into the Powerlet socket above the coils.
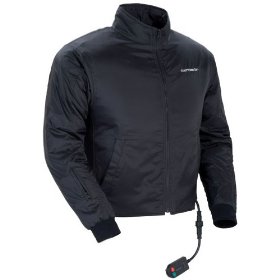
Back to
index |
|
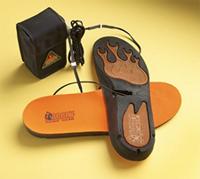
Heated Insoles:
The one part of me that would really
get cold when riding was my toes. Putting heat packets in my boots
worked but was kind of a hassle. When I
bought the Synergy jacket I found some 12V heated boot insoles on sale for
$10 and wired
them into the pants power outlet from the jacket. They are
controlled by the controller for the jacket and take good care of my
exposed boot toes without getting my feet too hot.
Back to
index |