![]()
|
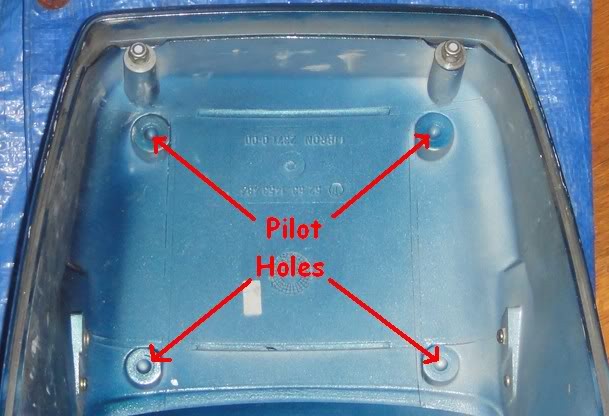
© 2013 Drake Smith - Please do not use or reproduce this elsewhere. Feel free to link to it though. Remove Tail Cowl - Install Tail Rack This is handy if you want to drill holes to install a tail rack or drill a hole for mounting the Audiovox CCS-100 cruise control in the tail cowl. 1) Remove both side/battery covers. 2) Remove the seat. 3) Undo the plastic knobbed machine screws in the back of the tail cowl the hold the brake/tail light lens on. 4) Unscrew the two Phillips screws that hold the rear lighting wiring harness connector to the back of the black "wedge." 5) On each turn signal, remove the Phillips screw that holds the turn signal lens in place. Then remove the female blade connectors from the turn signal socket terminals. Pull the turn signal wires out from the rear. 6) Remove the little black plastic caps on the two nuts on the bottom inside of the tail cowl. (If your bike still has them.) 7) Remove the two 10mm nuts inside the bottom of the tail cowl. The bracket those attach to may fall to the ground. 8 ) Remove the two 5mm Allen head bolts that hold the metal bar for the rear seat hinge. 9) Remove the two Phillips screws on the front lip of the tail cowl. The tail cowl and "wedge" can now be removed. 10) Remove the four 5mm Allen head bolts the hold the black "wedge" to the painted part of the tail cowl. Do not overtighten them when putting them back on as the material they screw into can break free and you'll need to get out your JB Weld to fix them. 11) Drilling holes to mount a tail rack (like the factory tail rack or a Givi E181 base) is actually quite simple because BMW molded perfectly positioned pilot holes into the tail cowl when it was manufactured:
12) Using a 1/4" drill bit, drill a hole through each of those spots so that the hole is perpendicular to the surface of the "stump" that you're drilling into. (So that the holes will be vertical when the tail cowl is remounted.) Don't press hard on the drill in order to avoid chipping the paint when the drill bit exits on the other side. It is also helpful to put some tape on the painted exit hole location prior to drilling to keep the paint from chipping. 13) Next, try installing the rack to make sure that your holes are lined up well. If they're a little off, don't worry. Just use the drill as a router to make any fine tuning adjustments on the positions of the holes. 14) You'll want to do the final install of the tail rack before you put the "wedge" back on the tail cowl because it's much easier to install it when you have things apart. 15) Installation is the reverse of removal.
Notes on mounting the 22 liter top case: 1) Sometimes, when mounting the 22l top case on the tail of a K, the mounting pin will scratch the tail cowl's roundel. This can be avoided if you put a small piece of dense foam over the roundel prior to mounting the top case. 2) 22l top cases have been known, on occasion, to fly off of the bike at speed. This can be avoided by making sure that the mounting pin is solidly secured in its "notch" when you rotate it clockwise to lock the case on. If there's any play in that then it is advisable add another washer under the inside portion of the pin to ensure the top case stays on firmly.
© 2013 Drake Smith - Please do not use or reproduce this elsewhere. Feel free to link to it though. |
![]()