![]()
|
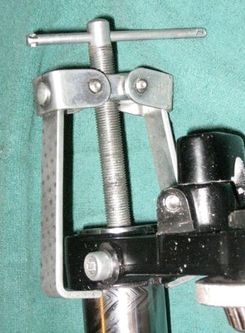
© 2013 Drake Smith - Please do not use or reproduce this elsewhere. Feel free to link to it though. Installing Progressive Springs In Showa Forks 1992 and later K75s came with Showa forks that are better than the two earlier types of forks that BMW used prior to 1992. I decided to swap some Showas in on one of my K75s to replace the earlier S forks. Although the Showa forks came from the factory with progressive springs, I decided to upgrade the forks with stiffer springs from Progressive suspension. Part number 11-1509 for the Showa forks. (11-1126 for earlier K75 forks.) (Since the Showa forks are 0.3 mm smaller in diameter I also swapped in some later fork trees as well.) Note: It's a good idea to work on forks one at a time so you don't get the parts confused. Before disassembling them, I drained them and measured how much fork oil came out. It was a little over 400 ccs. (Which is close to the 410 cc BMW spec for refilling them after draining them - or 420 cc if you disassemble them.) With the fork mounted in the upper fork tree, I depressed the fork cap with a wheel puller in order to pick out the C clip that holds the cap in the stanchion.
Since the Progressive springs take up more volume in the fork, the forks need less oil. I refilled the fork with 410 ccs of fork oil and used a piece of wooden dowel to measure the distance from the top of the stanchion to the top of the fork oil with the factory spring still installed. The oil level was just under 11" below the top of the stanchion with the fork fully extended. This is how much oil I put in once I installed the Progressive springs. The length of the spacer that came with the new springs was 4 5/16". When I laid the factory factory spring and spacer next to the new spring and spacer they were just about identical in length so I decided just to install the new spacer as is and not trim it. This will probably give more a bit more preload than original but I can always go back and trim it later if the front end feels too stiff.
I emptied the fork by inverting it and letting it sit for a while. Then I installed the new spring and, with the fork fully extended, added enough fork oil to get it to the correct level. Then I installed the washer that came with the new springs, the spacer and finally the fork cap. Then I did the other fork and, along with the new fork trees, installed them on the bike.
© 2013 Drake Smith - Please do not use or reproduce this elsewhere. Feel free to link to it though. |
![]()