![]()
|
© 2013 Drake Smith - Please do not use or reproduce this elsewhere. Feel free to link to it though. Convert A Monolever K75/K100 To A Paralever Final Drive Disclaimer: Some of the technical descriptions of how things work are simplified in order to keep this concise. For a more in-depth explanation please visit Anton Largiader's write-up at this link.
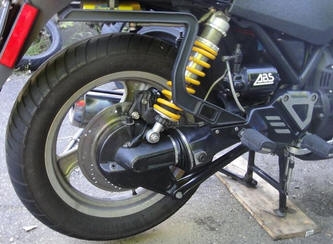
This is a K75 that I converted to a paralever final drive. Why? Mono vs. Para - Due to the geometry and physics involved, under acceleration a monolever produces what is commonly referred to as the "jacking effect." This causes the monolever swing arm to rotate downwards and lift up the rear of the bike. The harder you accelerate, the more jacking effect you'll experience.
With the addition of a pivot where the swing arm meets the final drive and a differential rod (a.k.a. paralever strut), the rough parallelogram formed keeps the final drive more or less level as it travels up and down and reduces the jacking effect so that it becomes negligible. The result is a better handling rear end. Spline Wear - Spline wear occurs when splines slip back and forth against each other under load. As a monolever moves up and down the splines at the rear of the drive shaft move back and forth on the final drive splines. If not kept properly lubed then the splines will wear and eventually fail.
The drive shaft for a paralever has two pieces. The front and rear splines are held in place by C-clips so they do not move back and forth and are not subject to wear. The intermediate splines between the two halves of the drive shaft do move back and forth slightly but they are long and tough so any spline wear that occurs there, if any, is negligible. Gearing - The stock gearing on a K75 monolever final drive is 32:10 or 3.2. The gearing on K bike paralever final drives is "taller" and comes in the following gear ratios:
With 2.91 being the shortest (most torque & RPMs) and 2.75 being the tallest (less torque and RPMs.) Worth It On A K100? - For the time, effort and expense involved, I think a better idea would be to buy 4 valve K bike that had a paralever from the factory. In addition to getting a four cylinder paralever K bike, you'll also get 10 more horsepower, MUCH better front brakes and radial tires. What's Involved? Paralever Final Drive - The gearing options are described above. There's a couple of other colors but most of them are either black or silver. Transmission: Option A - The easiest approach is to install a transmission from a K100RS4V, K1 or K1100 as that already has the drilled mounting tangs for the front end of the paralever strut. Any of these transmissions have the same transmission housing and will "bolt right up" to any K75 or K100 bellhousing and frame. The only difference internally is that K75s have a shorter fifth gear ratio of 1.67 while four cylinder K bikes have a fifth gear ratio of 1.61 - about 3% taller.
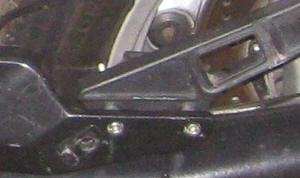
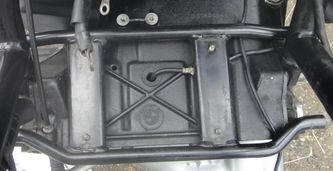
Bottom right rear of a later K75/K100 transmission. (Upside down) Transmission: Option B - Some of the later K75/K100 transmissions do have the mounting tangs for the front end of the paralever strut. However, they do not have holes in them so they would need to be drilled/machined to accommodate the bolt at the front of the paralever strut. Swing Arm - You'll need a 4V K bike swing arm and the rubber boot (with hose clamps) that connects it to the paralever final drive. The pivot hardware at the front of the swing arm is the same for monolever and paralever swing arms so you can re-use those. You will need to have the right and left pivot hardware where the paralever swing arm connects to the final drive. Drive Shaft - You'll need both halves of the paralever drive shaft. Be sure the U-joints aren't "lumpy." The U-joints on the paralever drive shaft are the common point of failure but given the lower horsepower of a K75 that should be less of an issue. Paralever Strut - There are two styles of these. Early solid ones and later two piece stamped metal versions. I prefer the latter since they're a bit lighter. Shock - The shock for paralever bikes is about an inch longer so you'll need one of those too. Peg Plates: Option A - The "bulge" where the swing arm meets the paralever final drive will not fit inside of a K75/K100 right peg plate. However, you can shim out the rear of the right peg plate with some washers to deal with that. Peg Plates: Option B - Use peg plates from a K100RS4V or K1100. (The picture at the top of the page has K1100 peg plates.) These are already stepped out in the back to accommodate the paralever bulge. Since the left side is also stepped out, you'll need some longer bolts and spacers for the exhaust hanger bracket.
For K1100 peg plates, you'll also need the peg plate mounting bracket that mounts under the battery tray as well as the side rear brackets. There are two versions of this, ABS and non-ABS.
© 2013 Drake Smith - Please do not use or reproduce this elsewhere. Feel free to link to it though. |
|||||||||||||||||||
![]()