|
© 2013 Drake Smith - Please do not
use or reproduce this elsewhere. Feel free to link to it
though.
RT/LT K
Bike Fairings
Below is a copy of a write-up I
did for the IBMWR
K Bike Tech Pages on removing the fairing from a K75RT.
K100RTs and K100LTs are, for the most part, identical.
K1100LTs differ slightly but are the same in many regards.
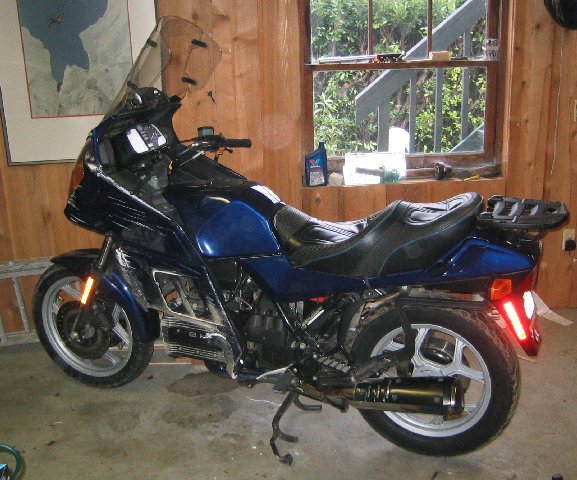
K75RT Fairing Removal/Installation
Removing or installing the RT faring is somewhat of a puzzle if you've never
done it before. However, if you do things in the right order and know
where all of the bolts and screws are, it's very straightforward. Included below
are step by step instructions with pictures for completely removing the fairing
from your bike. Although the bike pictured is a 1990 K75 RT, these
instructions may also be helpful for other faired K bikes, specifically the
K100RT. Installation is merely the removal instructions below but in reverse. If
you're putting a fairing on for the first time, the pictures should help you
identify which mounting brackets go where and how they're oriented.
TOOLS REQUIRED: 10mm wrench (socket set preferred), Phillips screwdriver and
the Allen wrenches that came with your bike.
NOTES: I have used my own terminology for naming some of the parts. The part names may not agree with official BMW part names but, with the pictures, should be easy enough to understand. Also, this isn't the optimally efficient ordering of the steps to remove a fairing but removal/installation does work in this order.
STAY ORGANIZED: There's a lot of screws and bolts and such, so in order to stay organized, I highly recommend keeping the parts for each step organized. To do this, I use Ziploc bags and Post-it notes. After completing each step of the removal process, I put all of the parts for that step/part in a Ziploc bag and then put a note with the part name in the bag. This makes it much easier to find the fasteners/parts for a particular part when reassembling the fairing.
DON'T OVERTIGHTEN THINGS: I don't have the torque specs for the screws and bolts but I suggest being careful not to overtighten. Use common sense when tightening things and remember that you're putting screws through clips that are mounted on fiberglass which is not an especially strong material.
UNIVERSAL DISCLAIMER: When using these instructions, remember what you paid for them. This is not meant to be the be-all and end-all in fairing removal, just some helpful hints and pictures to help you solve the RT fairing puzzle. I take no responsibility for anything, period. When putting a fairing on, remember to keep headlight, radio and other wiring from interfering with your steering - double check that the steering and lights work before riding.
|
Step
|
Description
|
Notes
|
Picture(click to enlarge)
|
|
0
|
Put bike on center stand
|
Make sure the bike remains turned off or, ideally, disconnect the battery. (If you have a BMW radio, make sure you have the 4 digit lock code before disconnecting the battery or removing the radio.)
|
|
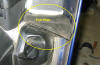
|
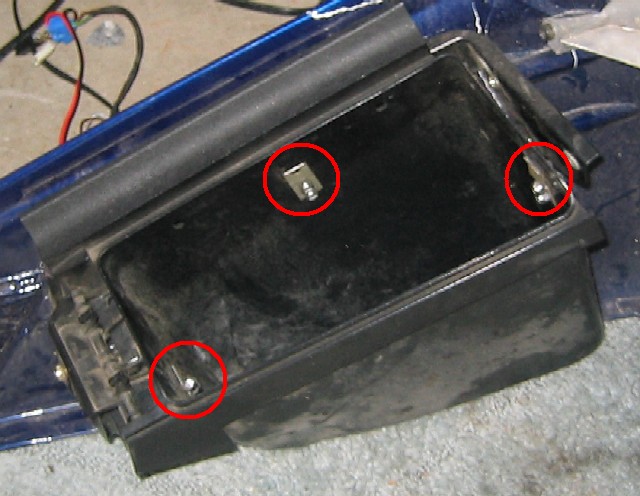
0.5
|
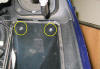
Remove radio
(if installed)
|
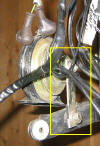
There's no need to remove the radio from the mounting plate and then remove the mounting plate. Just remove the mounting plate with the radio still installed in it. To remove the radio mounting plate, place an ice pick or similar instrument in each of the three holes to spring the clips holding the radio mounting plate.
The picture should give you an idea of what the radio plate spring clips look like, where they are, and how to spring them.
Disconnect the radio and set it aside.
|
|
|
1
|
Remove lower inners on both sides
|
The top screws are under the latch for the fairing pocket. The bottom screw is at the bottom. When putting back together, the bottom screw should go in horizontally - this one is tough to align properly sometimes so be patient.
|
|
|
2
|
Remove fairing pockets on both sides
|
Remove the two screws at the front of each pocket and remove the pockets. You may need to move the handlebars around to get the pockets in and out.
|
|
|
3
|
Remove the windscreen
|
To remove the top outer screw on each side of the windscreen, you'll need to use a Phillips screwdriver on top while holding the underside part with a 10mm socket. Remove the remaining screws working from top to bottom, alternating sides. When removing the last two screws at the bottom, hold the windscreen so it doesn't fall off of the bike and get damaged.
When reassembling, align the clips to the holes the best you can before putting the windscreen back on. It'll make it easier to get the screws in.
|
|
|
4
|
Remove the cross member and dashboard
|
Once the windscreen is removed, these parts are loose and can be lifted out. You may have an instrument panel instead of the regular crossmember. If so, hold the panel while opening it (four screws) so that it can be disconnected and set aside.
|
|
|
5
|
Remove "under" panel
|
On the bottom of the fairing under the headlight is a black plastic panel. Remove the 8 screws holding it in place and take the panel out.
|
|
|
6
|
Remove radiator panel
|
Before removing the radiator panel itself, you need to make sure you can get the brake line out of the panel so you'll need to remove the curved piece of black plastic ("cup") behind the fork. It's held in place with three nasty little black plastic fasteners. To remove the three fasteners holding the fairing cup, use an ice pick or similar skinny object to push the core of the fastener through. Do it slowly so the core doesn't go very far when it comes free. Once you've punched the core through the fasteners, they'll come right off and you can remove the cup.
The radiator panel/grill of the fairing is held on with four screws. Three of them are visible from the front, the fourth is up under the lower right (rider's right) corner of the radiator panel. Remove the bottom two first, then, while holding the panel so it doesn't drop, remove the top two.
|
|
|
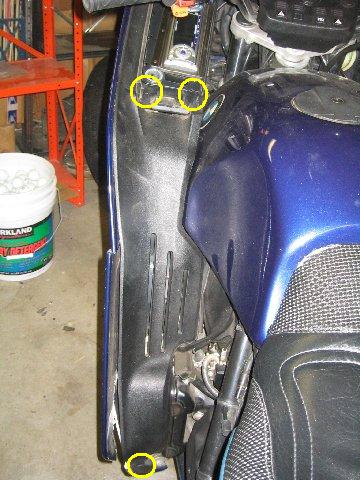
7
|
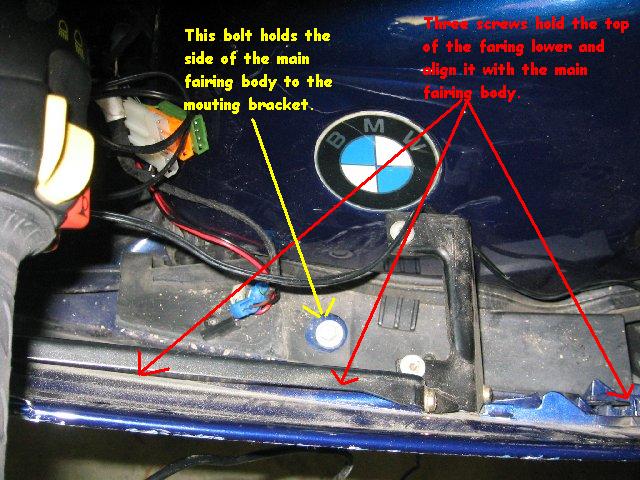
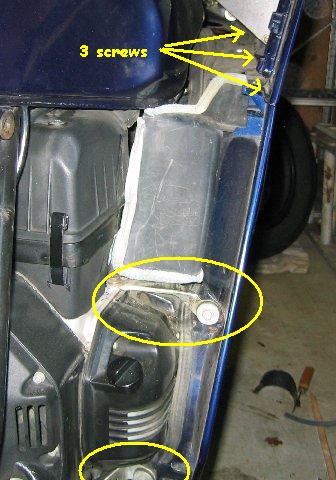
Remove left lower
|
Remove the two bolts holding the lower to the fairing brackets. While holding the lower fairing piece so it doesn't drop and get damaged, remove the three screws along the top.
When reassembling, be sure to remember the horizontal piece of black plastic which "seals" the side of the fairing to the gas tank.
|
|
|
8
|
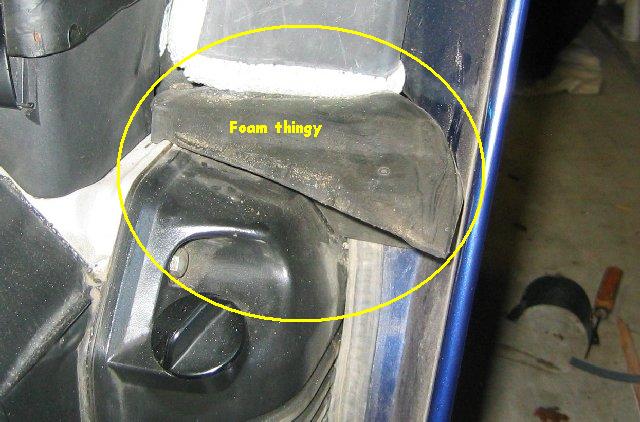
Remove right lower
|
Same as the left. When reassembling the right side, the picture shows where the strangely shaped piece of foam goes over the middle bracket.
When reassembling, be sure to remember the horizontal piece of black plastic which "seals" the side of the fairing to the gas tank.
|
|
|
9
|
Disconnect wiring
|
With the windscreen and dashboard removed, the fairing wiring is exposed. Disconnect (and label if desired) the wiring to the turn signals, horns, headlight and parking light above the headlight.
|
|
|
10
|
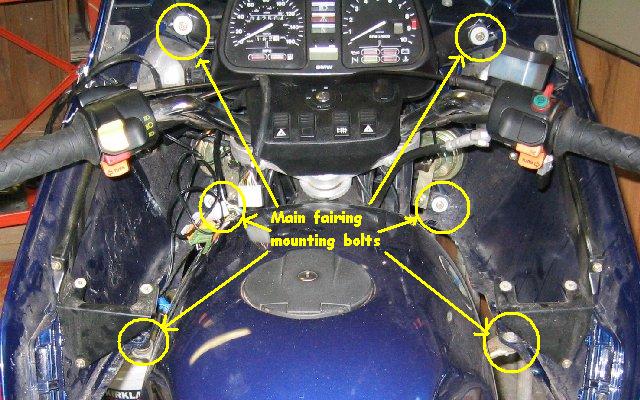
Remove main fairing body
|
Remove the bolts holding the sides of the main fairing body to the brackets on each side of the gas tank. Note that each of these bolts has a nut underneath it so you'll have to stick your hand inside the fairing with a small wrench to hold these nuts while unscrewing the bolts. Then remove the bottom front mounting bolts. While holding the main fairing body carefully so it doesn't drop, remove the top two bolts and remove the main fairing body.
|
|
|
11
|
Remove horns(optional)
|
Here's how the horns are mounted with the open part pointing down.
|
|
|
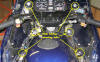
12
|
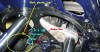
Remove the main "tree"
|
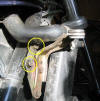
IMPORTANT: Before removing the tree, note how the cables and wires are routed. The main fairing tree (my name for it) is a four-pronged bracket attached to the steering column with four bolts. For some odd reason, the top ones have Allen heads and the lower ones normal heads.
SAFETY WARNING: When reassembling, it is very important to make sure the cables and wires are routed so that they do not interfere with the steering.Be sure to double-check that the steering is unhindered before riding.Double-check that all lighting and horns work while you're at it.
|
|
|
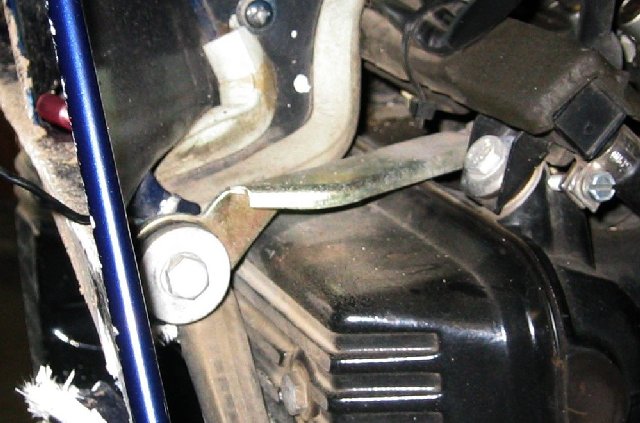
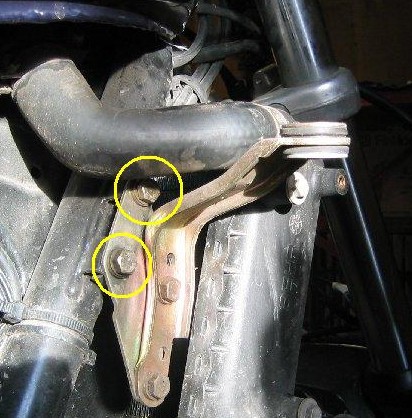
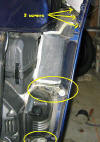
13
|
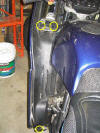
Remove left brackets
|
The top mounting bracket on the left side attaches to the top rear left inside of the radiator. It's easiest to get to it's mounting bolts if you pull the gas tank back first. To pull the tank back, pull the clips from the mounting posts under each rear corner of the tank, then pull the rear of the tank upwards and carefully pull it back an inch or two. (double check that the hoses under the right rear of the tank are attached properly when putting the tank back in place)
Alternately, you could remove the forward hose from the gas tank but it will spill gas so it's least messy to just pull the tank back an inch or two.
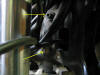
Each of the bolts holding the top bracket to the frame have loose nuts inside the little square boxes. Poke the nuts out and keep them with the bracket.
The middle and bottom brackets attach to the engine block directly above and below the #3 cylinder. (At least on a K75.) See pictures.
|

|
|
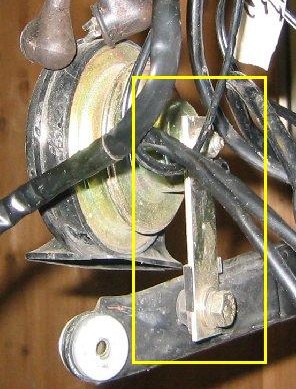
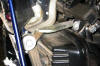
14
|
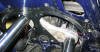
Remove right brackets
|
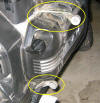
The top right mounting bracket attaches to the upper right side of the radiator. Each bolt has a nut in a little square holder on the side of the radiator. Remember to get these nuts out and keep them with the bracket. The middle bracket attaches with a normal bolt above the crankcase.
The lower bracket attaches under the rear corner of the crankcase with a vertical Allen-headed bolt that comes up from the bottom.
|
|
|
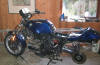
99
|
Voila!
|
The fairing is removed.
|
|
|