All BMW K bikes are fuel
injected. Unlike most cars, many times, for various
reasons, K bikes will sit unused for extended periods of
time. (As in years, not months.) When this happens,
the gasoline left inside of the fuel injectors will dry out,
leaving non-evaporable "varnish" inside of them. These
deposits can cause reduced flow, impact the spray pattern or
even clog them completely.
Given their construction, it is
generally not possible to clean fuel injectors at home.
The proper way is by placing them in a heated cleaning
solution in an ultrasonic cleaner. This gets out all
of the varnish and restores them
to the correct spray pattern and flow rate.
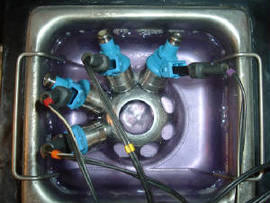
(Generic picture. These
are not K bike fuel injectors.)
When should I have my fuel injectors reconditioned?
Since you never really know a
bike's history when you get it and, given how old these
bikes are getting, there's a good chance that any K bike you
purchase has probably sat for an extended period at some
point in its life. Therefore, whenever I take
possession of a "new to me" K bike, I have the fuel
injectors reconditioned to ensure that the bike is running
as well as it can.
Is
there a recommended service interval for this?
Not really. However, I
usually give my bikes a complete stem to stern servicing at
every 50,000 miles and do this as preventive maintenance.
Where can I have my fuel injectors reconditioned? (USA)
I send mine to
Mr. Injector.
I just wrap them up, put them in a USPS small flat rate box
with the
service form and away they go. I've tried other
retailers who perform this but have settled on Mr. Injector
because:
-
The price is reasonable at
only $18 per injector with return Priority Mail shipping
for about $8.
-
Quick turnaround time. He
usually only has them for a day or so and with Priority
Mail shipping both ways you get them back quickly.
-
His service includes a report
showing before and after testing of the spray pattern
and flow rate.
-
Included are new O-rings,
filters and pintel caps for all of the injectors.
-
They are cleaned up or painted
if necessary.
As a point of reference, here are
the before and after results from a 59K 1986 K100 that I
purchased in the summer of 2013:
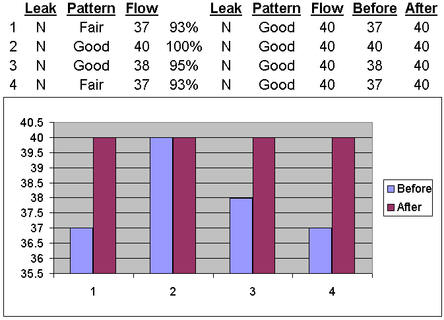
The results Mr. Injector sends back with your
FIs look different than this. The above is a spreadsheet
that I put together when I got them back.
Removing Fuel Injectors
|
1. |
Pick the small wire clips off of
the electrical connector for each fuel injector.
Then pull off each connector. Reinstall the wire
clip on each connector to keep from losing them.
When you put the connectors back on, the wire clip
will just slide over the angled nubs on the side of
each injector.
|
|
2. |
Loosen the hose clamps (7mm
socket or flat screwdriver) and remove the fuel lines at
the front and rear of the fuel rail. Note that if
the bike has been run recently there may still be
pressure in the fuel system so turn your head to
keep gas from spraying into your eyes.
|
|
3. |
For K75s and 2V K100s:
There is a small well in the cylinder head around
the base of each injector. Using compressed air or a
small vacuum, clean around the bases of all of the
injectors. If you do not then any dirt or tiny
pieces of gravel that have collected there may fall
into the cylinder head when you remove the
injectors. (This is not an issue for 4V K bikes as
the injectors are mounted in the rubber boots
between the throttle bodies and cylinder head.)
|
|
4. |
Remove the two 10mm hex bolts
that attach the fuel rail to the cylinder head.
|
|
5. |
Pull the fuel rail with the
injectors straight back. It's not a bad idea to
stick something like rolled up paper towels in the
fuel injector ports when the inejectors have been
removed.
|
|
6. |
Remove the square clips that
hold each fuel injector in the fuel rail and then
pull each injector out of the fuel rail. The clips
just pull off to the side pretty easily. |
Installing Fuel Injectors
|
1. |
Coat the top and bottom O-rings
of each fuel injector with a light film of motor oil
or other lubricant.
|
|
2. |
Insert the top of each fuel
injector into the fuel rail, making sure that each
one is
fully seated. Once each injector is seated in the
fuel rail, reinstall the square clip that holds it
to the fuel rail. The inner face of the clip
should be seated in the slot around the body of the
fuel injector and the outside slots should be on the
lip of the fuel rail port.
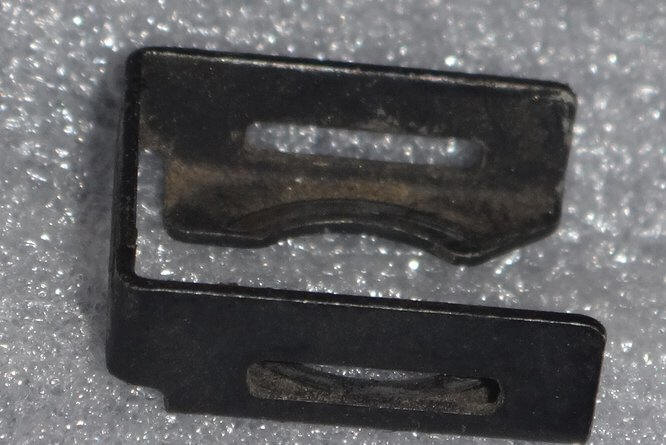
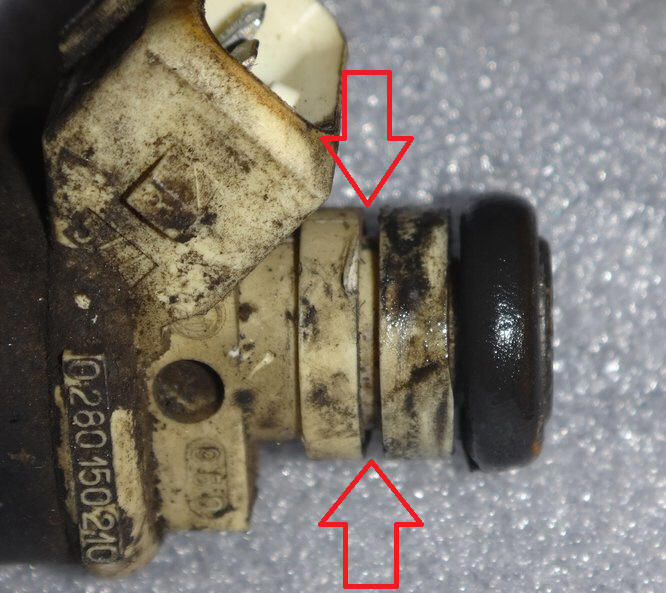
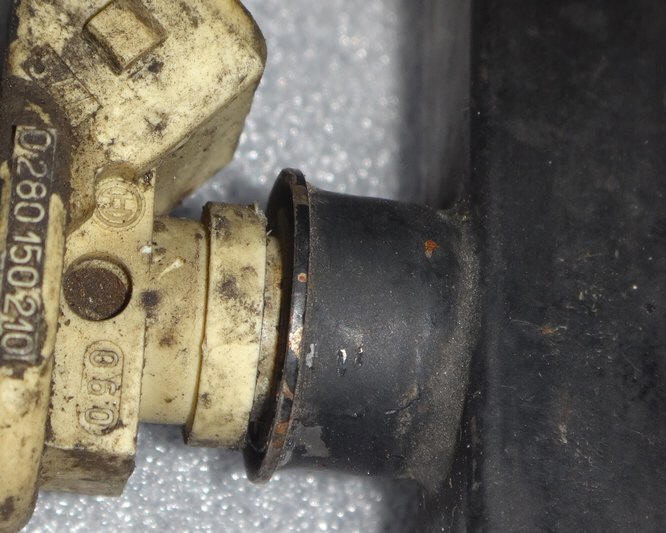
Pictures:
Square clips that hold tops of
fuel injectors into the fuel rail: (may be silver in
color on earlier Ks)
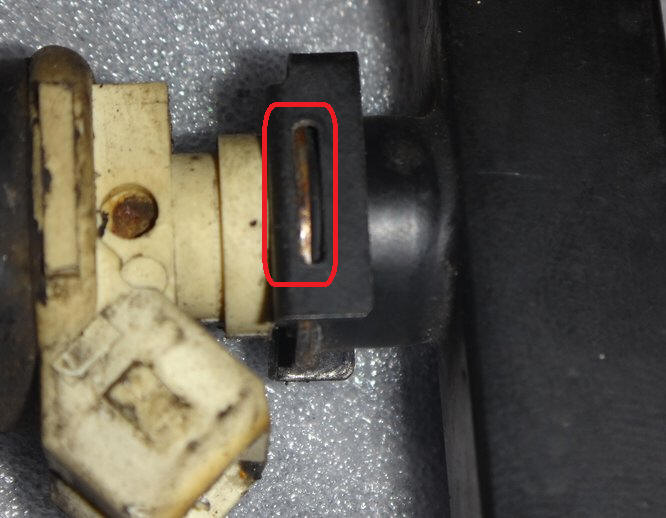
Groove in top of fuel injector
for the clip:
Fuel injector seated in fuel
rail:
Clip partially installed:
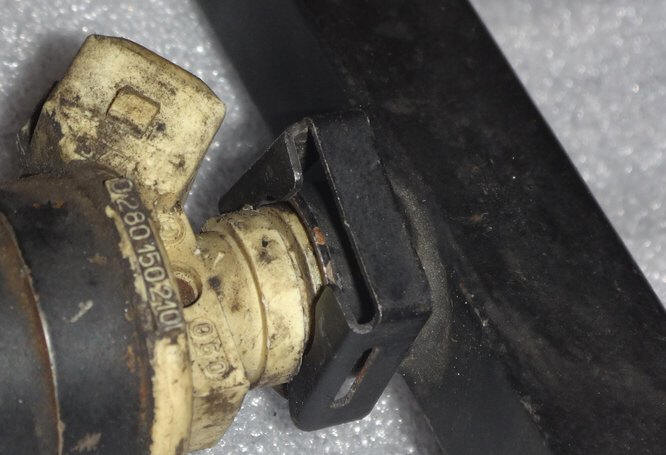
When the clip is fully installed
the lip on the rim of the fuel rail port should pass through
the slits on each side of the clip:
|
|
3. |
Install the fuel injectors into
the cylinder head.
Sometimes on K75s and 2V K100s the injectors may be
a little stubborn going into the cylinder head
fully. If this happens, I usually place a
block of wood on the fuel rail and then hammer
lightly on the fuel rail or I use a
rubber mallet and GENTLY tap the
fuel injectors into place until they are fully
seated.
|
|
4. |
Reinstall the two 10mm bolts
that hold the fuel rail to the cylinder head.
|
|
5. |
Reseat the electrical connectors
on each fuel injector. Give a quick pull on
the BODY of each connector to make sure that it is
properly seated.
|
|
6. |
Reattach the two fuel lines and
tighten their hose clamps.
|
|
7. |
Start the motor and let it run
for a short period. Inspect for leaks at the tops
and bottoms of the fuel injectors. |
Ongoing "Maintenance"
It doesn't hurt to add some
Chevron Techron Concentrate to the gas every now and
then. Auto parts stores often have Buy 1 - Get 1 Free
deals on it so that's a good time to buy it.
It's a good idea to
resynch the
throttle bodies any time you replace the fuel injectors,
install new spark plugs or adjust the valves.
© 2021 Drake Smith - Please do
not use or reproduce this elsewhere. Feel free to link
to it though.