![]()
|
© 2013 Drake Smith - Please do not use or reproduce this elsewhere. Feel free to link to it though. 4V Valve Check/Adjust Notes Disclaimer: These are just some "quick & dirty" notes relating to checking/adjusting the valves on a K100RS4V, K1 or K1100. More complete instructions can be found in the BMW and Clymer manuals. Allowable valve clearances:
Here's 3 pages from the BMW K1100 service manual on checking/adjusting valves: K1100.Manual.4Valve.Adjust.pdf And here's a "cheat sheet" I use when doing valves: 4V.Valve.Check.Adjust.pdf And here are links to a couple of write-ups at the IBMWR K Bike Tech Pages:
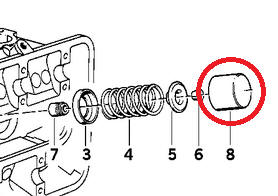
4V K Bike Valves: The valves on these bikes are "bucket" type valves. You adjust the valves on these engines by swapping in different thickness buckets.
They vary in thickness from 2.5 mm to 3.2 mm in increments of 0.05 mm and, as of December 2013, cost about $22 each.
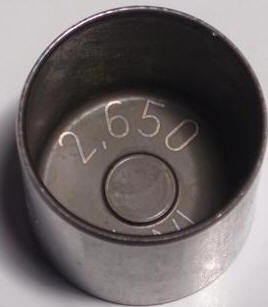
Valve Bucket Size: : The valve bucket size is marked on the inside. Part 11327666045:
Valve Clearances:
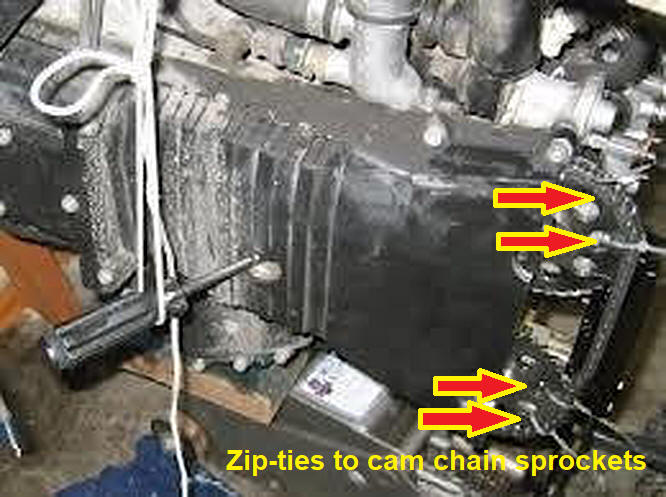
The engine should be cold when checking valve clearances. Ideally below 80 degrees F. On the last ride before doing the valves, it's a good idea to turn the bike off and then tilt it to the right for about 15-20 seconds to minimize the amount of oil that will leak out when you remove the valve cover. Then put it on the center stand. When removing the valve cover place a long drain pan or some towels underneath it as oil will drip down when you remove it. Do not mess with the spark plugs when doing the valves as carbon deposits can fall into the exhaust valves and lead to erroneous readings. With the bike in fifth gear, you can rock the rear wheel to rotate the engine to move the valve cams. Each valve clearance should be checked when the lobe of the cam is pointing directly out from the valve. For the intake valves this is roughly 25-30 degrees up and for the exhaust valves pointing down 25-30 degrees. Swapping Valve Buckets: Zip-tie the valve cam sprockets to the timing chain to keep the timing correct. Before loosening the valve cam guides you need to depress the cam chain tensioner behind the blanking plug in the middle of the timing cover.
You can use BMW special tool 112640 to do this. However, I found that using a bit driver and a piece of rope over the lower fork tree with a trucker's knot you can keep the cam chain tensioner depressed without the need for that special tool. Here's a picture of when I experimented with this on a parts engine:
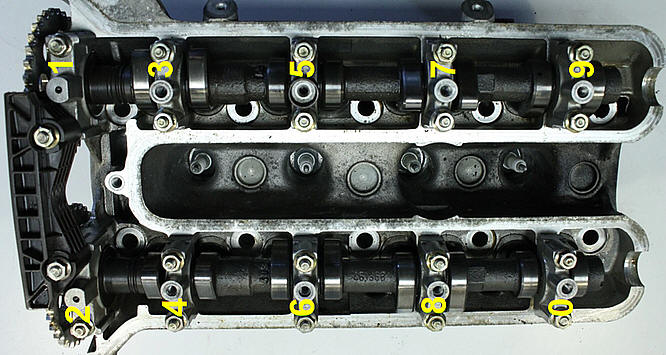
Note that the cam chain tensioner is ratcheted so you're not trying to move it down, just hold it down enough so that it doesn't move up. Numbered Bearing Caps: When removing/replacing notice that they are stamped with sequential numbers as shown in yellow below.
Note that #9 intake and #6 exhaust look almost identical so keep them well sorted when removing/replacing.
Replacing The Valve Cover: When doing this it's a good idea to replace the valve cover gasket with a new one - part 11121461396. Gasket Sealant: I use Permatext Form-a-Gasket No.2. You do not need to use sealant on the entire gasket. Just place a light film of it on the surfaces of the "half moons" on the gasket and then a small dab at each of the seams in front where the cylinder head meets the timing cover. Get all of the valve cover bolts installed finger tight. Then, starting from the center, follow an "X-outward" pattern to torque them to spec. DO NOT over-tighten the valve cover bolts. They are "shoulder" type bolts that can only go in so far so if you attempt to tighten them too much their threads will strip. Torque Values:
© 2013 Drake Smith - Please do not use or reproduce this elsewhere. Feel free to link to it though. |
![]()